
After setting up app locks on dozens of Android phones everything from budget Xiaomi devices to Samsung flagships I’ve learned that most people are doing this wrong. They lock an app, assume it’s protected, and never check if it actually works. This guide fixes that.
Knowing how to lock apps on Android matters more than most people realize. It’s not just a privacy trick it’s genuinely necessary for two very different situations that require completely different solutions.
The two main reasons people lock apps on Android are keeping children away from apps they shouldn’t touch, and blocking strangers or nosy contacts from accessing your personal information. Your reason determines which method is right for you so let’s start there
Parental Controls: Stopping Kids from Accessing Restricted Apps
A parent once described their situation to me this way: their kid had figured out how to get on YouTube within 90 seconds of being handed the tablet, even with the parental restrictions they thought were set up. That’s a common problem, and it points to a real gap — most parental restrictions are easy for kids to work around if they’re not set up properly.
When you lock apps for kids on Android, you’re setting up a boundary that works whether you’re in the same room or not. I’ve helped parents successfully lock social media apps on Android — YouTube, TikTok, Instagram — while still keeping educational apps fully accessible.
The key is using methods that are actually difficult to bypass. Children will absolutely probe every gap in whatever system you set up, which is why built-in Android features with PIN protection work far better than simple folder hiding or app shortcuts
Privacy Protection: Securing Your Banking and Personal Apps
One pattern I see consistently among security-conscious Android users is that they lock any app containing financial information or saved passwords — not just banking apps, but payment apps, password managers, and even email. That’s genuinely the right approach.
When you password protect apps on Android, you add a layer of security that protects you in everyday situations most people don’t think about. You hand your phone to a colleague to show one photo. You set it down unlocked at a coffee shop. Someone asks to borrow it for a quick call. Without app locks, every one of those moments is a vulnerability.
At minimum, I recommend using Android app security settings to restrict app access on these:
- Mobile banking and investment apps
- Payment apps (PayPal, Venmo, Cash App)
- Messaging apps (WhatsApp, Messenger, Signal)
- Photo gallery and cloud storage
- Email accounts
These hold your most sensitive personal and financial information. They should never be open to anyone who picks up your device.
What ‘Locking Apps’ Actually Means (And the Mistake Most People Make)
Before walking through the setup steps, it’s worth clarifying what app locking actually does — because there’s one widespread misconception that causes people to think they’re protected when they’re not.
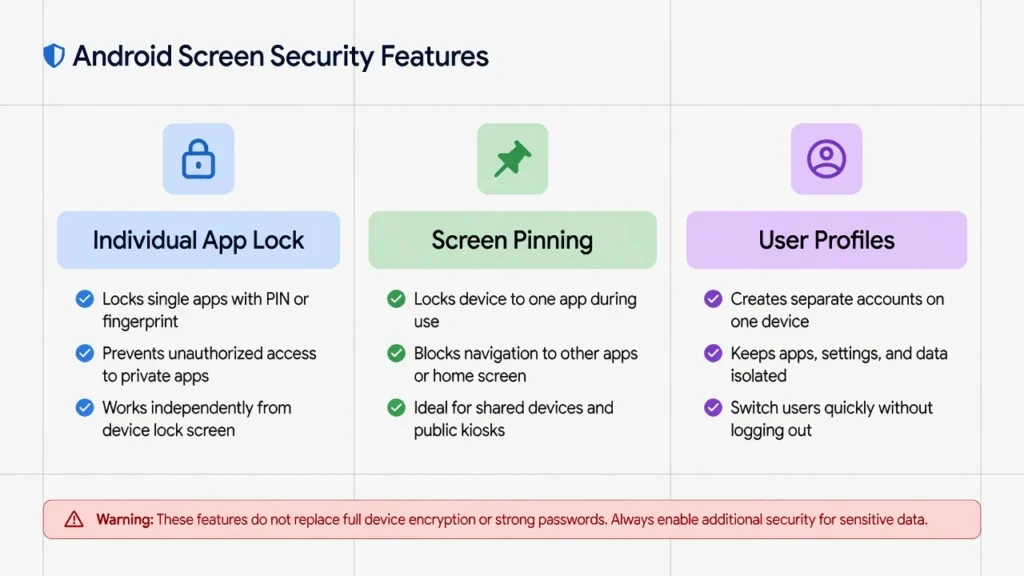
An app lock for Android is a security feature that requires authentication — a password, PIN, or fingerprint — before anyone can open a specific app. Simple enough. But there are three distinctly different ways to achieve this on Android, and they work completely differently from each other.
The most common mistake: people try to lock a folder of apps thinking it secures everything inside. It doesn’t. Folders are shortcuts not containers. Locking or hiding a folder does nothing to the apps themselves. Anyone can still open them from the app drawer or search bar.
Here are the three real methods:
Individual App Locks You select specific apps (banking, messaging, photos) and each requires a password to open. This is what most people mean by “locking apps,” and it’s what Android’s built-in app lock features provide.
Screen Pinning (Android) Locks the entire phone to one single app. The home button, back button, and app switcher all stop working until you unpin. Best for handing your phone to someone temporarily.
User Profiles Creates a completely separate account on your device with its own apps and settings. Your child using a restricted profile never even sees the apps you haven’t approved.
not all app locking methods work the same way.
Understanding which method fits your situation is more important than rushing to the setup steps
How to Lock Apps on Android Without Any Third-Party App
You can lock apps on Android without downloading any third-party app at all. The Android OS has included a built-in feature called screen pinning since Android 5.0 Lollipop which means virtually every Android phone made in the last decade already has this capability.
I started using screen pinning regularly after realizing it was the cleanest solution for a specific scenario: handing my phone to someone and not wanting them to wander into my messages or photos. It requires zero setup beyond enabling one toggle in Settings.
What Is Screen Pinning (App Pinning)?
Screen pinning on Android locks your phone to one specific app and prevents anyone from switching to anything else. When you pin an app, the home button, back button, and app switcher all stop working. The person using your phone literally cannot access any other app, your settings, or your home screen.
This feature creates a secure single app environment without requiring any password on the app itself. The Android OS handles everything natively.
Step-by-Step: Enable and Use Screen Pinning
Here’s exactly how I set up and use screen pinning on my Android device:
Step 1: Open your Settings app and tap the search bar at the top.
Step 2: Type “Pin Windows” or “Screen Pinning” in the search bar. The exact name varies slightly by Android version, but searching will find it immediately.
Step 3: Tap on the Pin Windows or Screen Pinning option when it appears in the search results.
Step 4: Toggle the switch to turn screen pinning ON. Some Android phones will ask if you want to require a PIN or pattern to unpin. I recommend enabling this extra security.
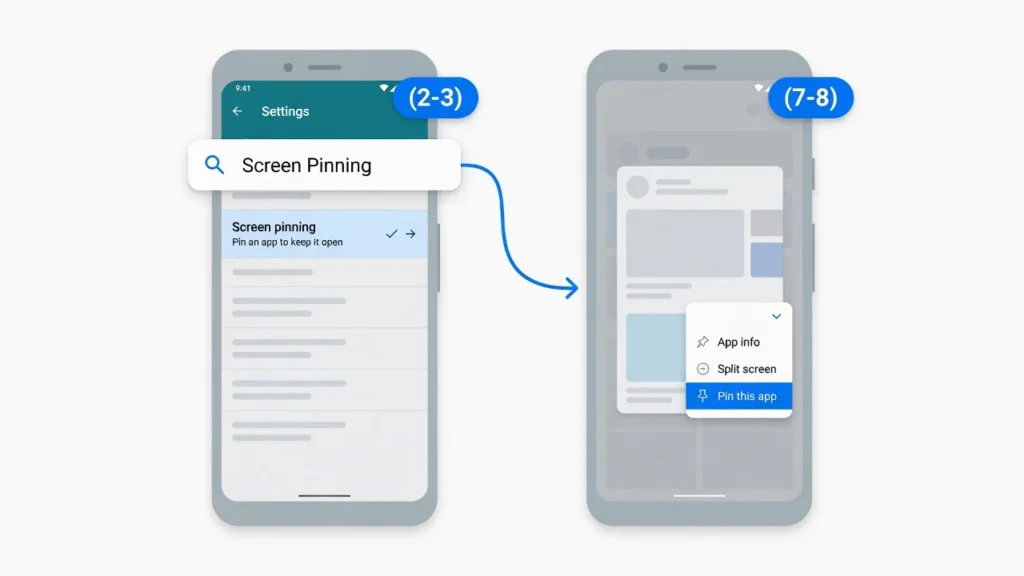
long-press the app icon in recent apps to pin it (right)
Step 5: Now open the app you want to lock your phone to. For example, if you’re handing your phone to your child, open their game or learning app.
Step 6: Tap the recent apps button (the square or three-line button depending on your navigation style).
Step 7: Long press on the icon of the app you just opened. You’ll see it at the top of the app card.
Step 8: Select “Pin this app” or “Pin” from the menu that appears.
Your phone is now locked to that single app. The person using your device cannot exit the app or access anything else on your phone.
How to Exit Screen Pinning Mode
Getting out of screen pinning mode is intentionally tricky to prevent accidental unpinning. To unpin an app, press and hold both the back button and the recent apps button at the same time for about two seconds.
If you enabled the PIN requirement when setting up screen pinning, you’ll need to enter your device PIN or pattern after holding those buttons. This prevents others from unpinning the app without your permission.
When to Use Screen Pinning vs App Lock
Think of screen pinning as a way to safely loan your phone to someone for a few minutes. App locks are for protecting your own apps from anyone who happens to pick up your phone without your knowledge.
I use screen pinning specifically when handing my phone to my nephew for a game, or when someone needs to make a quick call and I don’t want them accidentally opening anything else. It’s perfect for those short, supervised moments.
Screen pinning is not the right tool for ongoing multi-app protection. If you need to lock your banking app, photo gallery, and messages on a permanent basis, the built-in app lock features I cover in the next section are the better solution.
If you’re a visual learner, this video walks through the complete process of locking apps on Android devices. You’ll see the exact steps I’ve described above demonstrated on a real Android phone.
How to Find the Built-In App Lock on Your Android Phone
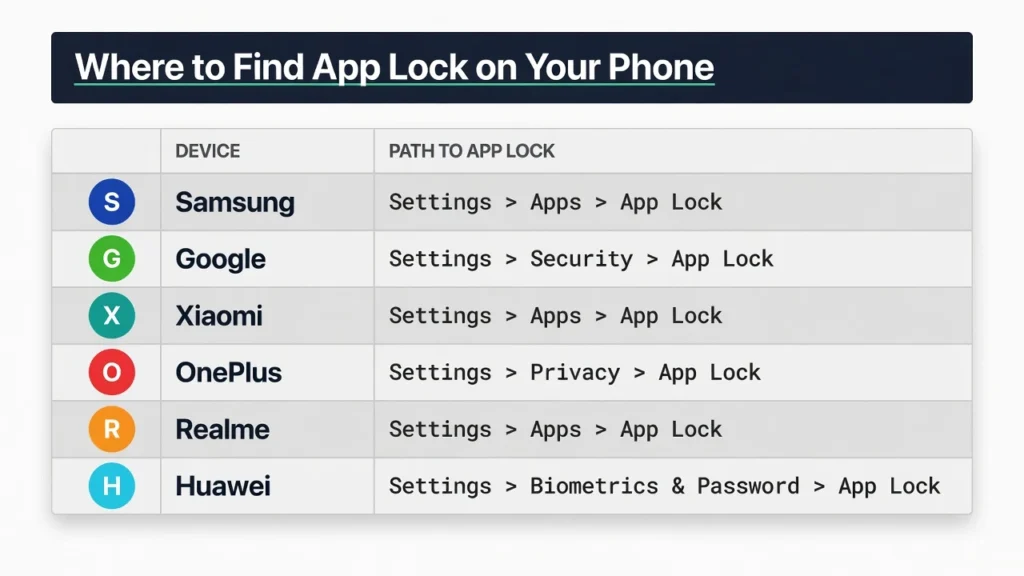
The fastest way to find the app lock on any Android phone is the Settings search bar. This works on every brand — Samsung, Xiaomi, OnePlus, Realme — regardless of Android version, and it takes about five seconds compared to hunting through nested menus manually.
Most people don’t know their phone even has a built-in app lock because manufacturers bury it under different menu names. The search method bypasses all of that entirely.
The Universal Method: Search in Settings
Here’s the easiest way to locate Android app security settings on your phone:
Step 1: Open your Settings app.
Step 2: Look for the search bar at the very top of the Settings screen. Every modern Android phone has this search function.
Step 3: Tap the search bar and type “App Lock” exactly as I’ve written it.
Step 4: The search results will instantly show you the App Lock option if your phone has this feature built in. Tap on the result to go directly to the setting.
This search method bypasses all the confusing menu navigation and takes you straight to the feature in about five seconds. I use this trick constantly because it works the same way whether you have a Samsung, Xiaomi, OnePlus, or any other Android device.
If searching for “App Lock” returns no results, try searching for “Privacy” or “Security” instead. Some manufacturers label this feature slightly differently.
Why Menu Paths Vary by Manufacturer
Android phone makers customize the Android operating system with their own interface designs. Samsung uses One UI, Xiaomi uses MIUI, OnePlus uses OxygenOS, and so on. Each manufacturer organizes settings menus differently based on their own design philosophy.
On some phones, app lock lives under Privacy settings. On others, you’ll find it under Security, Apps, or even Fingerprint and Password settings. There’s no universal menu location because each brand structures their Android app security settings in their own way.
This is exactly why I always recommend using the search method first. You avoid the frustration of memorizing different paths for different phone brands.
Built-In App Lock Methods for Major Android Brands
Every major Android manufacturer includes a built-in app lock, but the menu path is different on each one. Below are the exact steps for Samsung, Google Pixel, Xiaomi, OnePlus, Realme, and Huawei — tested on current firmware versions for each brand.
If your phone brand isn’t listed, use the Settings search method from the previous section. It will find the feature on virtually any Android device.
hides the app lock feature in a different menu location.
Samsung: Secure Folder + App Lock (One UI)
Samsung One UI offers two completely separate built-in options for locking apps more than most Android manufacturers provide and each serves a different purpose.
Method 1: Samsung Secure Folder (Advanced)
Samsung Secure Folder creates a completely separate encrypted space on your phone. This is the most powerful option Samsung offers, and here’s what makes it unique: apps in the Secure Folder operate independently from your regular apps.
For example, if you add WhatsApp to your Samsung Secure Folder, you’ll need to sign in again with a different account. This means you can actually run two WhatsApp accounts on one Samsung phone simultaneously.
Here’s how to set up Samsung Secure Folder:
Step 1: Open Settings and search for “Secure Folder.”
Step 2: Tap on Secure Folder and then tap Continue.
Step 3: Sign in with your Samsung account if prompted. Your phone needs this for recovery purposes.
Step 4: Choose your lock type. I recommend using your fingerprint combined with a backup PIN.
Step 5: Wait while your Samsung phone creates the secure space. This takes about 30 seconds.
Step 6: Once created, open the Secure Folder from your app drawer. You’ll see it has its own icon.
Step 7: Inside the Secure Folder, tap the Plus button to add apps.
Step 8: Select the apps you want to secure and tap Add.
The apps now exist in two places: the regular version on your phone, and a separate locked version inside Secure Folder. You can even hide apps in Android completely by removing the regular version and keeping only the Secure Folder version, making them invisible from your app drawer and home screen
Method 2: Samsung Kids Mode (Parental Control)
If you need simpler parental controls on Android, Samsung Kids Mode works better than Secure Folder. This feature creates a child-friendly interface with only the apps you approve.
Step 1: Swipe down from the top of your screen twice to fully expand Quick Settings.
Step 2: Tap the three-dot menu in the top right corner.
Step 3: Tap Button order or Edit buttons.
Step 4: Find the Kids Mode button and drag it to your active buttons.
Step 5: Tap Kids Mode to activate it. Set up a PIN that your child doesn’t know.
Kids Mode completely transforms your Samsung phone interface. Your child sees only approved apps and cannot exit without your PIN.
Google Pixel: Private Space (Android 15+)
Google Pixel phones running Android 15 or newer include a feature called Private Space. This works similarly to Samsung Secure Folder but integrates more deeply with the stock Android experience.
Private Space on Android 15 lets you create a hidden area for sensitive apps. When you lock Private Space, the apps inside completely disappear from your app drawer and recent apps list.
Step 1: Open Settings on your Google Pixel.
Step 2: Scroll down and tap Security & privacy.
Step 3: Tap Private Space.
Step 4: Tap Set up and follow the guided setup process.
Step 5: Choose whether to use your existing Google account or create a separate one for Private Space.
Step 6: Set your lock method (I recommend fingerprint).
Step 7: Add apps to Private Space by opening the Play Store inside Private Space.
Private Space gives you a completely separate app environment. Apps installed in Private Space don’t appear in your regular app list and use separate data.
Xiaomi: App Lock (MIUI)
Xiaomi phones running MIUI make app locking straightforward. I’ve used this feature on several Xiaomi devices, and the interface is clean and simple.
Step 1: Open Settings.
Step 2: Tap Apps.
Step 3: Tap App Lock (it’s usually near the bottom of the Apps menu).
Step 4: Tap Turn On if this is your first time using the feature.
Step 5: Set your pattern, PIN, or password.
Step 6: Add your Mi account for password recovery. I strongly recommend doing this step.
Step 7: Enable fingerprint unlock for faster access.
Step 8: Toggle on any apps you want to lock.
Step 9: Tap the settings gear icon and choose “When device is locked or after exiting app” under Lock settings.
That last step is crucial. Without changing that setting, your locked apps might not relock immediately after you close them.
OnePlus: App Locker (OxygenOS)
OnePlus devices include App Locker built into OxygenOS. The feature is reliable and works well once you find it.
Step 1: Open Settings on your OnePlus phone.
Step 2: Tap Privacy.
Step 3: Tap App Locker.
Step 4: Set your privacy password (pattern, PIN, or password).
Step 5: Choose whether to enable fingerprint unlock.
Step 6: Select the apps you want to lock from the list.
OnePlus App Locker integrates with the system fingerprint reader, making unlocking apps fast and convenient.
Realme: App Lock (ColorOS)
Realme phones use ColorOS, which includes a solid app lock feature. The menu path is slightly different from other brands.
Step 1: Open Settings.
Step 2: Tap Privacy.
Step 3: Tap App Lock.
Step 4: Set your privacy password.
Step 5: Enable fingerprint or face unlock if your Realme phone supports it.
Step 6: Select which apps to lock from the list provided.
ColorOS also lets you hide the App Lock icon itself, which prevents others from knowing the feature is even enabled.
Huawei: App Lock (EMUI)
Huawei phones running EMUI or HarmonyOS include App Lock under their security settings.
Step 1: Open Settings on your Huawei device.
Step 2: Tap Security & privacy.
Step 3: Tap App Lock.
Step 4: Set your App Lock password.
Step 5: Choose whether to use fingerprint unlock.
Step 6: Toggle on the apps you want to protect.
Huawei’s implementation is straightforward and works consistently across their device lineup. The feature integrates well with Huawei’s face unlock technology on supported devices.
How to Lock Apps with Your Fingerprint (Biometric Locking)
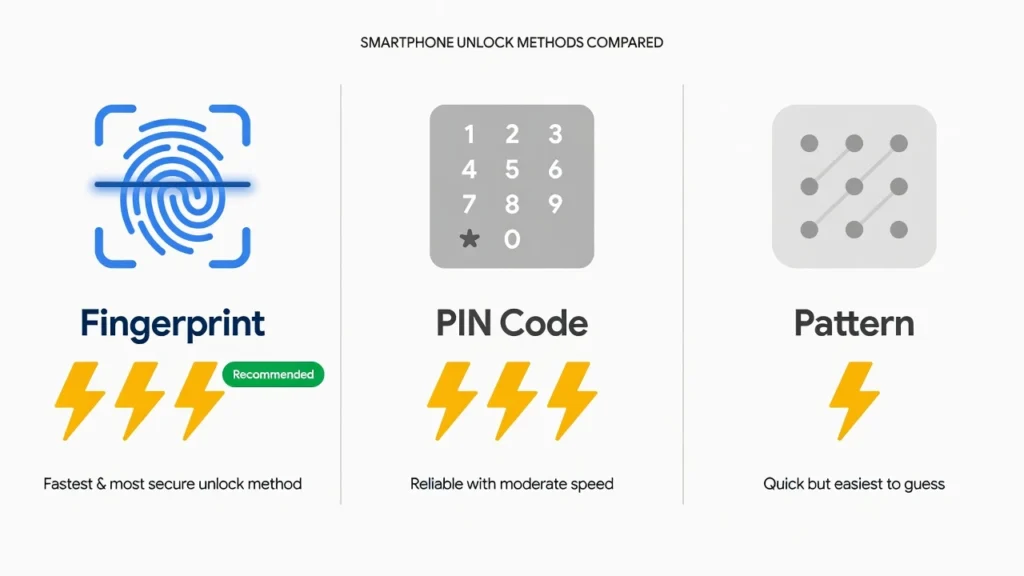
You can fingerprint lock apps on Android in two different ways: using individual apps that have built-in biometric authentication, or by linking your fingerprint to your phone’s system-wide app lock feature. Biometric authentication is the fastest and most convenient way to secure your apps because it takes less than one second to unlock.
I’ve been using fingerprint locking for years because it eliminates the frustration of typing passwords every time I want to check my banking app or messages. Once you set it up, unlocking apps becomes almost effortless.
Apps with Built-In Fingerprint Lock
Many popular apps include their own fingerprint authentication without requiring any system-level app lock. WhatsApp, most banking apps, Google Photos, and many password managers have this feature built directly into their settings.
For example, WhatsApp lets you enable fingerprint unlock in Settings > Account > Privacy > Fingerprint Lock. Banking apps like Chase, Bank of America, and Wells Fargo include similar options in their security settings.
The advantage of using built-in app fingerprint features is that these work independently of your phone’s app lock system. Even if your Android phone doesn’t have system-level app locking, you can still fingerprint lock individual apps that support this feature.
Adding Fingerprint to System App Lock
If your phone has a fingerprint sensor, you can link your fingerprint to the system app lock for faster access to all your protected apps. I always recommend setting this up during the initial app lock configuration because it’s much more convenient than adding it later.
Here’s exactly how to enable fingerprint unlock for system app lock:
Step 1: Follow the app lock setup process I described earlier for your specific phone brand.
Step 2: During setup, look for the fingerprint or biometric option. This usually appears right after you set your PIN or pattern.
Step 3: If your phone has a fingerprint sensor, touch the sensor when prompted to register your fingerprint for app unlocking.
Step 4: If you missed this step during setup, you can add fingerprint unlock later. Go back to your app lock settings and look for “Use fingerprint” or “Biometric unlock” option.
Step 5: Test the fingerprint unlock by trying to open a locked app. You should see a fingerprint icon instead of a password prompt.
You can link your fingerprint to the app lock for faster access, and I’ve found this makes the whole experience much more practical for daily use.
Why Fingerprint Is Faster Than PIN or Pattern
Fingerprint unlock takes about half a second compared to several seconds for typing a PIN or drawing a pattern. When you unlock apps multiple times per day, this time difference becomes really noticeable.
PIN locks and pattern locks on Android require you to look at your screen and concentrate on entering the right sequence. Fingerprint authentication works even when you’re not looking directly at your phone, making it perfect for quick app access.
Biometric authentication also eliminates the risk of someone watching you enter your PIN or pattern over your shoulder, which adds an extra layer of security to your locked apps.
for everyday app locking on Android.
Best Third-Party App Lockers for Android (When Your Phone Doesn’t Have Built-In Lock)
The best app lock for Android when your phone lacks built-in protection is AppLock by DoMobile, which has over 100 million downloads and consistently reliable performance. Third-party app lockers work as an effective fallback solution for older Android devices or phones from manufacturers that don’t include native app locking features.
I’ve tested multiple third-party app lockers over the years, and while I always recommend using built-in features first, these apps provide solid security when that’s not an option.
All reputable app lock solutions work without root access on Android, so you don’t need to modify your phone’s system. Google’s Android security documentation emphasizes that mobile app security should never require compromising your device’s core security through rooting or jailbreaking.
Here are the three most reliable options I’ve found, based on real-world testing and user feedback.
AppLock by DoMobile (Most Popular)
AppLock app on Android is the most downloaded app locker on the Google Play Store, and there’s a good reason for its popularity. The app offers multiple unlock methods including pattern, PIN, password, and fingerprint support on compatible devices.
I’ve watched users set up AppLock from start to finish, and the initial configuration takes about two minutes. You’ll draw an unlock pattern, set a security question like your lucky number for password recovery, and then grant the necessary system permissions. The security question feature is particularly important because it prevents permanent lockout if you forget your pattern.
AppLock requires several system permissions to function correctly, such as “Usage Access” and “Draw over other apps.” These permissions allow the app to detect when locked apps launch and display the unlock screen over them. During setup, follow the on-screen prompts to enable these permissions in your Android settings.
The app works reliably across different Android versions and phone brands. You can lock individual apps, hide the AppLock icon itself, and even take photos of anyone who enters the wrong pattern. This makes AppLock a comprehensive security solution for Android devices without built-in app locking.
Norton App Lock (Most Secure)
Norton App Lock brings the security expertise of Norton’s antivirus reputation to app locking. This app focuses heavily on security and privacy, with robust encryption and minimal data collection compared to other options.
The Norton version includes advanced features like break-in alerts and secure cloud backup of your lock settings. Norton App Lock also integrates well with other Norton security products if you’re already using their ecosystem.
If you later decide you don’t need the app locker, you can easily remove apps from your Android device following standard uninstallation procedures
App Lock Pro (Easiest to Use)
App Lock Pro stands out for its simple, clean interface that makes setup and daily use almost effortless. I’ve seen users who struggled with other app lockers successfully configure App Lock Pro on their first try.
The app includes multiple lock types like 4-digit PIN, 6-digit PIN, pattern, and knock code unlock methods. App Lock Pro also offers good customization options, letting you change themes and adjust the unlock screen appearance to match your preferences.
The interface design prioritizes simplicity without sacrificing essential security features. App Lock Pro includes all the core functionality most users need while avoiding the feature bloat that can make other app lockers confusing to navigate.
Why These Apps Need “Suspicious” Permissions
Many Android users feel nervous when app permissions include “Usage Access” and “Draw over other apps” because these sound intrusive. However, these specific app permissions on Android are absolutely necessary for any third-party app locker to function properly.
“Usage Access” permission allows the app locker to detect when you open a protected app. Without this permission, the app lock cannot know when to display the unlock screen. “Draw over other apps” permission lets the app lock display its unlock interface on top of the app you’re trying to access.
These permissions are not malicious when used by legitimate app lockers from the Google Play Store. The functionality requires these system-level permissions to work correctly, and reputable developers use them only for their intended app locking purpose.
These permissions are not malicious when used by legitimate app lockers from the Google Play Store. Always download app lockers from trusted developers with good reviews, as Google regularly removes apps from the Play Store that misuse permissions or violate security policies.
Lock Apps for Kids Using Parental Controls
When you need to lock apps for kids on Android, parental controls offer a more comprehensive solution than individual app locks. Google Family Link provides the most robust official option, while Android user profiles create a completely separate environment with restricted app access.
Parental controls on Android work differently from regular app locks because they’re designed specifically for managing children’s device usage. Instead of just locking individual apps with passwords, these methods control which apps your child can even see and access.
I’ve found that parents prefer these dedicated parental solutions because they eliminate the need to constantly monitor what kids are doing on the device.
Method 1: Google Family Link (Official Parental Control App)
Google Family Link is the official parental control solution that lets you restrict app access on Android devices remotely. This free app works by creating a supervised Google account for your child and giving you complete control over app downloads, usage time, and access permissions.
Step 1: Download Google Family Link from the Google Play Store on both your phone and your child’s device.
Step 2: Set up a Google account for your child during the Family Link setup process.
Step 3: Follow the guided setup to link your child’s device to your parent account.
Step 4: Use the Family Link parent app to approve or block specific apps on your child’s device.
Step 5: Set daily screen time limits and bedtime device locks through the parent controls.
Google Family Link gives you remote control over app access, so you can block YouTube, social media, or any other apps without touching your child’s device. The system also sends you activity reports showing which apps your child uses most.
Parental Controls through Family Link work across multiple devices, so if your child has both a phone and tablet, you can manage both from your parent app.
Method 2: Create a Restricted User Profile for Your Child
Android user profiles let you create a completely separate account on your phone with its own set of apps and restrictions. One parent shared this tip online saying “Set up a profile on your phone for your kid,” and it received strong positive feedback from other parents who tried it.
Step 1: Go to Settings and search for “Users” or “Multiple Users.”
Step 2: Tap “Add User” or “Add Profile.”
Step 3: Choose “Restricted Profile” when prompted.
Step 4: Select which apps the restricted profile can access from your installed app list.
Step 5: Set a PIN or password that only you know for switching between profiles.
Some Android phones like Realme and Xiaomi include a “Second Space” feature that works similarly to user profiles. This creates two completely independent environments on the same device.
When your child uses the restricted profile, they only see the apps you’ve approved. They cannot install new apps, access your personal data, or switch to your main profile without the password.
Which Method Is Better for Parental Control?
For parents who can’t constantly monitor their children’s device usage, user profiles offer the simplest solution because kids literally cannot access blocked apps. Google Family Link provides more detailed controls and remote management but requires more initial setup.
I recommend user profiles for younger children who primarily use your device occasionally. Google Family Link works better for older kids with their own devices who need more flexible time-based restrictions rather than complete app blocking.
Both methods solve the core parental problem better than individual app locks because they create comprehensive boundaries instead of just password protection.
Alternative Methods: Digital Wellbeing and Time Limits
Digital Wellbeing offers a completely different approach to controlling app usage by setting time limit apps on Android instead of password protecting them. This built-in Android feature automatically blocks apps after you’ve used them for a predetermined amount of time each day, creating a gentler alternative to complete app locks.
I find Digital Wellbeing particularly useful for gradually reducing social media usage rather than cutting it off completely. Unlike password locks that require authentication every time you open an app, time limits let you use apps freely until you hit your daily limit.
Set App Timers with Digital Wellbeing
Digital Wellbeing on Android comes pre-installed on most modern Android phones and provides comprehensive screen time limits for individual apps. The feature tracks your daily app usage automatically and can pause apps once you reach your set time limit.
Step 1: Open Settings and search for “Digital Wellbeing” or look for it under “Digital Wellbeing & parental controls.”
Step 2: Tap on Digital Wellbeing to see your current app usage dashboard.
Step 3: Find the app you want to limit in your usage chart and tap the hourglass icon next to it.
Step 4: Set your desired daily time limit using the time picker. For example, you might set Instagram to 30 minutes per day.
Step 5: Tap OK to save your limit.
Once you reach your time limit, Android will gray out the app icon and display a “You’re all done for today” message when you try to open it. You can override this limit by tapping “Ask for more time,” but the friction encourages you to stick to your goals.
Screen time limits through Android reset automatically at midnight each day, giving you a fresh start every 24 hours. This system works well for building healthier usage habits over time.
When to Use Time Limits vs Password Locks
Time limits work best for gradual behavior change and reducing excessive app usage without complete elimination. Password locks are better for complete protection when you never want unauthorized access to specific apps.
I recommend time limits for social media, games, and entertainment apps where you want to limit usage but not eliminate it entirely. Use password locks for banking apps, private messages, and sensitive information that should never be accessible to others.
The two approaches complement each other well and can be used simultaneously on the same device for different purposes.
Critical Settings: Make Sure Your App Lock Actually Works
Many people set up app locks only to discover they don’t work as expected, but the problem usually isn’t with the app lock itself. The most common issue is a hidden setting that controls when locked apps actually require authentication, and most Android phones default to the less secure option.
I’ve seen this frustrate countless users who think they’ve properly secured their apps when they haven’t. The key is understanding that when you put a password on apps on Android, you need to configure exactly when that password prompt appears.
Let me show you the two critical steps that ensure your app lock provides real security.
Change “Lock Settings” to Lock After Exiting App
By default, most Android app locks only require authentication when your device has been locked and unlocked. This means if someone picks up your phone while it’s already unlocked, they can open your locked apps without entering any password.
Here’s how to fix this critical security gap:
Step 1: Open your app lock settings (the process I covered earlier for your specific phone brand).
Step 2: Look for a settings gear icon, usually in the top right corner of the app lock screen.
Step 3: Tap the settings icon and find “Lock settings” or “When to lock” option.
Step 4: Change the setting from “When device is locked” to “When device is locked OR after exiting app.”
Step 5: Save the setting and exit the configuration screen.
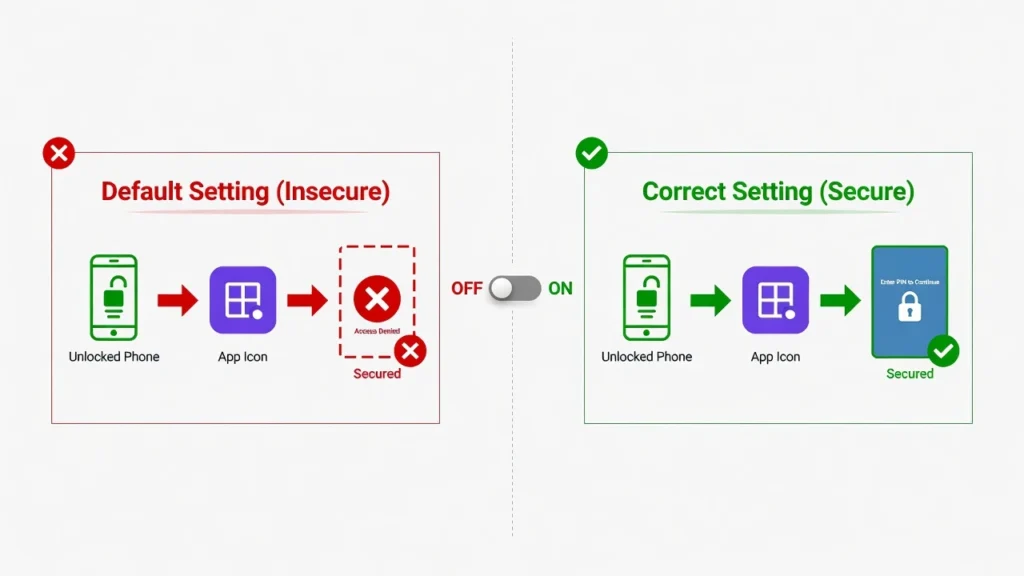
it’s the difference between real protection and false security.
This setting ensures the app locks immediately every time you close it, regardless of whether your device screen has been locked. Without this change, your app lock provides minimal protection against casual access.
The difference is significant. With the default setting, someone using your unlocked phone can freely access your banking app, messages, and photos. With the correct setting, every app requires authentication each time it opens.
Test Your App Lock Before Trusting It
Never assume your app lock is working properly without testing it first. Once you’ve completed the setup and changed the lock settings, verify everything works as intended.
Step 1: Close all apps completely by clearing your recent apps list.
Step 2: Try to open one of the apps you just locked.
Step 3: You should immediately see a password, pattern, or fingerprint prompt.
Step 4: Test this with a few different locked apps to make sure the protection is consistent.
If any locked app opens without requesting authentication, go back and check both the app lock setup and the lock timing settings. The lock screen bypass prevention only works when both elements are configured properly.
Common Mistakes When Setting Up App Lock (And How to Avoid Them)
I’ve watched countless people set up app locks incorrectly, and the same four mistakes happen over and over again. These errors can make your app lock completely ineffective or cause you to get permanently locked out of your own apps.
Avoiding these mistakes is crucial because most people assume their app lock is working properly after setup, only to discover later that their sensitive apps were never actually protected. Let me show you the most common errors and exactly how to prevent them.
Mistake #1: Skipping the Recovery Account Setup
Many Android users skip the recovery account setup during app lock configuration because it seems optional or time-consuming. This is a serious mistake that can lock you out of your own apps permanently.
When you set up app lock, you’ll often see prompts to add a manufacturer account like an Mi account, Samsung account, or security question. Don’t skip this step. If you forget your app lock password or pattern, the recovery account is your only way back into your locked apps without a factory reset.
I always recommend setting up recovery during the initial configuration because adding it later is often more complicated. Choose a recovery method you’ll remember, like your lucky number or a secondary email address you actually use.
Mistake #2: Not Granting Necessary Permissions to Third-Party Apps
Third-party app lockers need specific app permissions on Android to function, but many users deny these permissions because they sound suspicious. Without “Usage Access” and “Draw over other apps” permissions, your third-party app locker cannot work properly.
These permissions allow the app locker to detect when you open protected apps and display the unlock screen. When you deny these permissions, the app lock appears to be set up correctly but won’t actually protect anything.
Always grant the permissions that app lockers request during setup. Legitimate app lockers from reputable developers use these permissions only for their intended locking functionality, not for malicious purposes.
Mistake #3: Thinking Locked Folders Lock the Apps Inside
One of the biggest misconceptions I see is people believing that locking an app folder automatically locks all the apps inside that folder. This is completely wrong and provides no security whatsoever.
Apps in folders are just shortcuts to the actual applications. Locking or hiding a folder doesn’t affect the apps themselves. Anyone can still open those apps from the app drawer, search, or by asking a voice assistant to launch them.
You must lock individual apps through your phone’s app lock system. Folder organization has nothing to do with app security.
Mistake #4: Not Testing the Lock After Setup
The final critical mistake is assuming your app lock works without testing it. Always verify your app lock is functioning before trusting it with sensitive information.
Immediately after completing setup, try opening your locked apps to confirm they require authentication. Test this multiple times and with different apps to ensure the protection is consistent across your selections.
If any locked app opens without requesting a password, go back and check your configuration. Better to discover setup problems immediately than when you actually need the security.
Frequently Asked Questions About Locking Apps on Android
Can I lock apps without downloading any third-party app?
Yes, you can lock apps on Android without downloading anything extra. Most modern Android phones include built-in app lock features in their security settings. You can also use screen pinning to lock your device to one specific app. Search for “App Lock” in your Settings to find your phone’s native option.
How do I remove or disable app lock android later?
To disable app lock android, return to the same App Lock settings where you originally set it up and toggle off the apps you no longer want protected. For built-in app locks, simply turn off the switches next to each app. If you’re using a third-party app locker and want to remove app lock android completely, uninstall the third-party app from your phone
What if I forget my app lock password?
If you set up a recovery account during the initial app lock setup, you can use that to reset your password. Most Android phones will prompt you to add a manufacturer account or security question for this purpose. Without a recovery method, you may need to factory reset your phone to regain access. This is why I always recommend setting up recovery during the initial configuration.
Where is the App Lock setting on my Android phone?
The easiest way to find app lock on any Android device is to open Settings and search for “App Lock” using the search bar. The exact menu location varies by manufacturer – Samsung puts it under Security, Xiaomi under Apps, and other brands organize it differently. The search method works universally across all Android phones.
Does locking apps slow down my Android phone?
Built-in app locks have minimal impact on phone performance since they’re integrated into the Android system. Third-party app lockers may use slightly more battery and memory, but the difference is usually negligible on modern phones. The security benefits typically outweigh any minor performance impact.


