
What to Do the Moment You Notice a Bright Spot
Seeing a bright spot on your phone screen for the first time is genuinely alarming. I get it. Your first instinct is probably to Google “why is there a bright spot on my phone screen,” panic a little, and start pressing the spot to see if it goes away. But before you do anything else, there are two critical steps I want you to take right now that will save you time, money, and potentially all your photos and contacts.
The first thing is to stop and observe. Do not press the spot. Do not try to rub it off. Just look at it carefully for a moment.
The second thing depends on what you see, and I will walk you through that below.
First: Is It Actually a Screen Defect or Just Your Proximity Sensor?
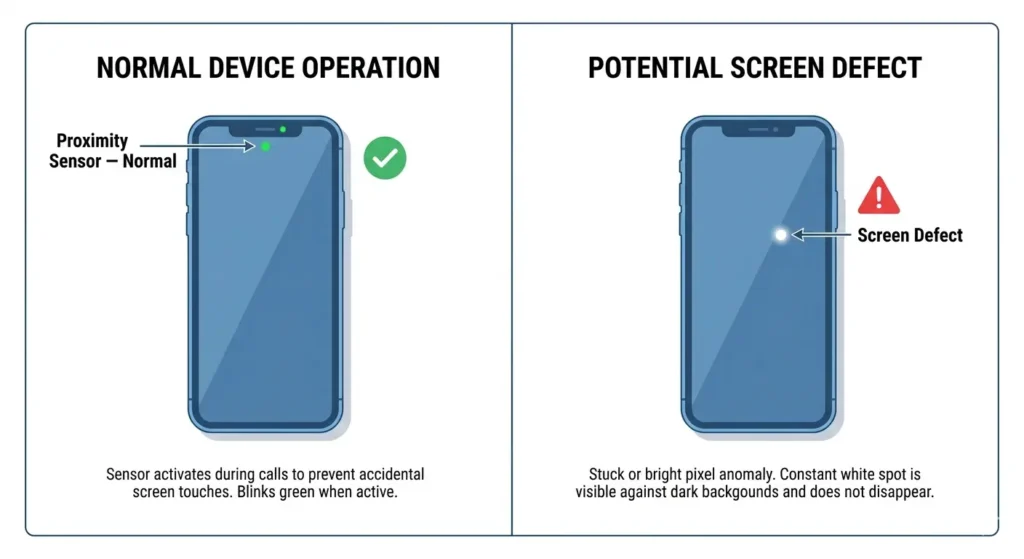
Before you assume the worst, ask yourself one simple question. Does the bright spot blink, or is it always there?
I came across a video of a Google Pixel 5 owner who was completely convinced his screen was damaged. He filmed what looked like a blinking white dot near the top of his display, pointing at it with a yellow arrow because he was so sure something was wrong. Turns out it was his proximity sensor doing exactly what it is supposed to do.
The proximity sensor on some phones sits just under the display. When the sensor is active, such as during a phone call or when certain apps check your distance from the screen, a small white light flickers on briefly. This is completely normal behavior and not a screen defect at all.
Here is a quick way to tell the difference. If the bright dot on your phone screen blinks and only appears during calls or when you hold the phone close to your face, your display is perfectly fine. If the bright spot stays visible constantly across every app, every screen, and every situation, then you are dealing with an actual display issue.
This one check alone can save you from an unnecessary trip to a repair shop.
Backup Your Data Right Now (Especially If You Have an OLED Screen)
If you confirmed the bright spot is real and not your proximity sensor, your very next step should be backing up your phone. Not tomorrow. Right now, before you try any fix.
Here is why this matters so much. In a real discussion from a Nothing Phone community online, an experienced user gave some of the most honest advice I have seen on this topic. The moment someone reported a bright dot on their screen, the response was immediate: backup your data right now.
The reason behind that urgency is something called OLED rot. On phones with OLED or AMOLED screens, display damage does not always stay in one place. What starts as a single bright spot can spread across the screen surprisingly fast, sometimes within hours, sometimes overnight. One community member described it almost poetically: it started as one tiny spot, and by night it had grown, spreading across the glass and swallowing colors until the screen went dark.
If your screen reaches that point while your data is not backed up, you may not be able to see anything to unlock your phone and save your files.
Backing up takes less than five minutes. Go to your settings, open your cloud backup option (Google One on Android or iCloud on iPhone), and start a full backup right now. Once your data is safe, you can focus on figuring out what the bright spot actually is and whether it can be fixed.
If you have an LCD screen rather than OLED, the urgency is slightly lower because LCD bright spots tend to stay in one place rather than spreading. But backing up is still smart practice regardless of your screen type.
Why Bright Spots Appear on Phone Screens (5 Common Causes)
If you are wondering why is there a bright spot on my phone screen, the answer depends on your screen type and what caused the damage. Bright spots appear most commonly from physical pressure on the display, backlight layer damage in LCD screens,
OLED pixel degradation, post-repair installation errors, or battery swelling pushing against the screen from inside. Understanding which cause applies to your phone determines whether you can fix the bright spot yourself with software solutions or need professional screen replacement.
If you are asking why there is a bright spot on your phone screen, the honest answer is that bright spots on phone screens happen for five main reasons: physical pressure on the display, backlight layer damage, OLED pixel degradation, post-repair installation errors, and battery swelling. Knowing which cause applies to your phone is the first step toward fixing it correctly.
Let me walk you through each one in plain language.
Pressure Damage (Most Common Cause)
Pressure damage is the most common reason a phone screen develops a white patch or bright spot, and it happens more easily than most people realize.
Your phone display is made of multiple thin layers pressed together. When something pushes against those layers with enough force, the layers can separate slightly or compress unevenly. The result is a phone screen white patch that appears where the pressure was applied.
I came across a case where someone brought in a Redmi phone with significant screen bleeding along the edges. After visiting a repair shop, the technician identified the cause immediately: the owner had been sleeping with the phone under their pillow. The body weight pressing down on the phone night after night created enough pressure damage to the phone screen that the display started bleeding light from the edges inward.
Drops are another major cause of pressure damage to a phone screen. Even if the glass does not crack on the outside, the internal display layers can shift or compress on impact. Phone dropped screen damage often shows up as a bright spot or white patch that appears a day or two after the fall, which makes people confused because the glass looks fine.
Tight jeans pockets, sitting on your phone accidentally, or stacking heavy objects on top of your device can all create the same result over time.
LCD Backlight Layer Issues
If you have an LCD phone, there is a specific type of bright spot that comes from inside the backlight layer itself, and understanding how LCD screens work makes this much easier to grasp.
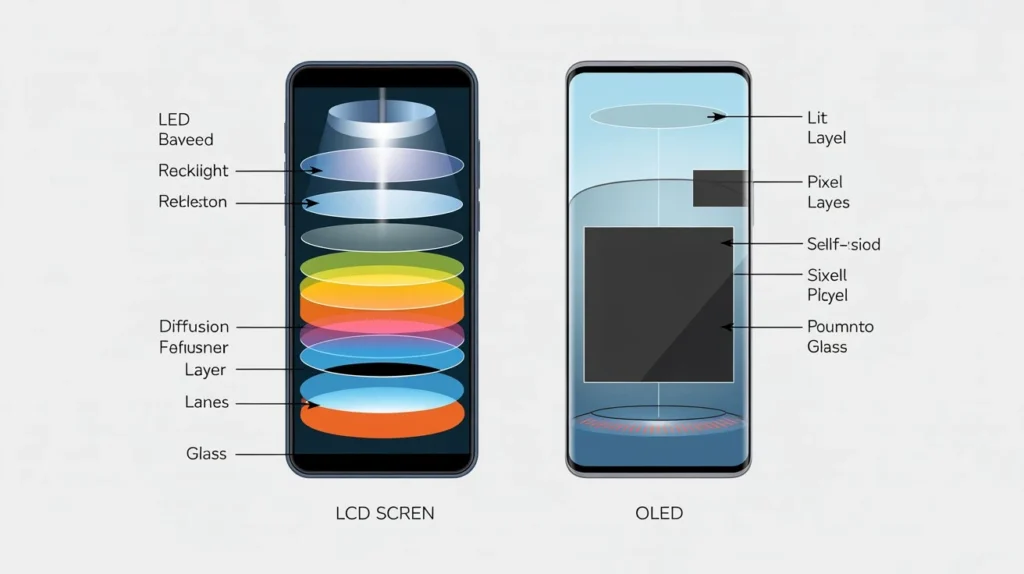
An LCD display does not produce its own light. Instead, the LCD panel sits in front of a backlight system made of LED lights. Between the LEDs and the panel, there are small plastic reflector lenses that spread the light evenly across the screen. When these lenses are working properly, the light distribution looks smooth and uniform.
Here is where things go wrong. A repair technician who has worked on both TVs and phones explained this clearly: the small reflector lenses inside a display are held in place with adhesive. Over time, heat from the backlight LEDs weakens that adhesive. When a lens falls off its LED, the raw LED light hits the display panel directly without any diffusion. The result is an intense, concentrated bright spot in one specific location on the screen.
This is why LCD screen damage from backlight issues often appears as a very bright, circular white spot rather than a spreading patch. The bright spot location on an LCD screen often corresponds exactly to where a reflector lens has detached inside the backlight layer. Backlight bleed on a smartphone can also appear along screen edges where the backlight is strongest and the diffusion layer is thinnest.
OLED Pixel Degradation and Rot
OLED and AMOLED displays work completely differently from LCD screens. Each pixel on an OLED display produces its own light independently. When those pixels start failing, the damage can look very different from LCD backlight issues.
A bright spot on an OLED screen often signals that a cluster of pixels is stuck in an active state, meaning the pixels are permanently lit. This is different from a dead pixel, which goes completely dark. OLED pixel degradation happens naturally over time as the organic materials inside each pixel wear out, but physical damage, heat exposure, or manufacturing defects can accelerate the process significantly.
The most concerning version of OLED display damage is what many phone users call OLED rot. OLED rot describes a condition where display degradation spreads progressively across the screen rather than staying isolated in one spot. A community discussion from real Nothing Phone users described exactly this progression: what started as a single tiny bright spot in one corner grew overnight until it spread across much of the display, consuming colors and making the screen nearly unusable.
OLED rot can progress within hours or days rather than weeks, which is why backing up your data immediately is so important when you first notice a bright spot on an OLED or AMOLED phone.
Post-Repair Installation Problems
This cause surprises a lot of people, but a bright spot appearing right after a screen repair is actually more common than repair shops like to admit.
A repair technician documented a very specific and revealing case. After replacing a screen on a phone, white spots appeared at locations that corresponded directly to screw positions on the back of the device. When the technician opened the phone again and removed the screws in question, the white dots disappeared immediately. The cause was simple but damaging: the screws used during reassembly were too long. The longer screws pierced through the internal frame and pressed directly against the back of the LCD backlight, creating localized pressure points that showed up as bright white spots on the display.
In a separate iPhone repair case, a white spot appeared in the upper left corner of the display after a screen replacement. Opening the phone revealed a small piece of waterproof adhesive that had been left behind on the back of the new screen during installation. The adhesive was creating a pressure point between the screen and the frame. Removing the adhesive and reinstalling the screen eliminated the white spot completely.
If you notice a white spot on your phone screen within a day or two of getting a repair done, post-repair installation problems are the most likely explanation.
Battery Swelling Pushing on Display
This is the cause I want people to pay the most attention to because a swelling battery is not just a display problem, it is a safety concern for the device overall.
Inside your phone, the battery sits directly behind the display. A healthy battery sits flat and stays within its designed dimensions. But over time, especially in older phones or phones exposed to excessive heat, the battery can begin to swell internally. A swollen battery takes up more physical space than a healthy one, and because the battery sits right behind the screen, the battery expansion pushes forward against the display from the inside.
This internal pressure from a swollen battery creates display pressure damage that looks almost identical to pressure damage from an external source. A white spot or bright patch appears where the battery is pressing hardest against the display layers.
One iPhone repair case demonstrated this clearly. A white spot appeared on the left side of the screen after a repair. When the technician opened the device, the battery had a slight but visible bulge causing the battery to press unevenly against the display. Replacing the battery with a new flat one resolved the white spot on the screen completely.
If your phone feels slightly thicker than usual, if the screen seems to bow outward in the middle, or if you notice a bright spot alongside unusually fast battery drain, these signs together suggest display pressure damage from a swollen battery rather than surface pressure from outside.
Bright Spot vs White Patch vs Dead Pixel: What’s the Difference?
One of the most confusing parts of dealing with phone screen problems is figuring out what you are actually looking at. A bright spot, a white patch, a dead pixel, and screen burn-in all look different and require completely different approaches to fix.
Getting the diagnosis wrong means wasting time on solutions that will never work for your specific problem. If your phone is also showing lines across the display alongside a bright spot, that is a separate but related issue — I cover exactly what causes those in my guide on white horizontal lines on phone screen and the fixes are different from what we cover here.
Let me break down each type clearly so you can identify exactly what your phone screen is showing you.
Stuck Pixel vs Dead Pixel vs Bright Spot
These three terms get mixed up constantly, but they describe three very different conditions on a phone display.
A stuck pixel on a phone is a single pixel that gets locked into displaying one color permanently. Stuck pixels usually appear as a tiny colored dot, often red, green, or blue, that stays visible no matter what you are doing on the screen. A stuck pixel cluster happens when several neighboring pixels get stuck together, creating a small colored patch rather than a single dot. The important thing about stuck pixels is that software can sometimes fix them because the pixel is not physically broken, just frozen in one state.
A dead pixel is the opposite. A dead pixel on a phone screen is a pixel that has stopped receiving power entirely, so the pixel shows up as a permanent black dot against any background. Dead pixels cannot be fixed with software because the pixel itself has failed at the hardware level.
A bright spot is different from both of these. A bright spot on a phone screen is typically a larger white or very bright area caused by physical damage to the display layers, backlight separation, or OLED pixel degradation, rather than a single pixel failure. Bright spots are almost always hardware issues. White dots on a phone screen that cover a wider area than a single pixel point strongly toward backlight damage or pressure-related display separation rather than pixel failure.
When you look at your screen closely, ask yourself: is it one tiny colored dot (stuck pixel), one tiny black dot (dead pixel), or a larger white or glowing area (bright spot or white patch)? That single observation tells you a lot about what you are dealing with.
Single Dot vs Spreading Patch
The size and behavior of the display problem over time is one of the most important things to monitor, and most people do not pay attention to this when they first notice something wrong.
A single isolated dot that stays exactly the same size day after day is generally a contained problem. Stuck pixels almost never spread. A small pressure spot from a minor impact sometimes stays stable for months without changing. A contained problem gives you more time to explore fixes without panic.
A spreading patch is a completely different situation. White spots on a phone screen that grow larger over hours or days are a strong sign of OLED rot, which is progressive OLED pixel degradation that moves across the display over time. Real users who have experienced OLED rot describe watching their phone screen get worse almost overnight. What began as a single bright dot in one corner expanded by the next morning into a spreading patch that consumed larger portions of the display.
If you notice your phone screen getting worse over the course of a day, do not wait. Back up your data immediately and start exploring screen replacement options. A spreading bright patch on an OLED or AMOLED display rarely stops on its own.
How to Tell If It’s Screen Burn-In Instead
Screen burn-in is worth knowing about because burn-in can look similar to a bright spot at first glance, but the two conditions are fundamentally different and the distinction matters for how you approach a fix.
Screen burn-in on a phone display happens when a static image is shown for such a long time that a ghost of that image becomes permanently visible on the screen. Common examples include navigation bars, keyboard outlines, or app icons that appear faintly visible even when a different app or image is displayed. Burn-in is an image retention problem rather than a physical screen defect.
Here is the quickest way to tell the difference between screen burn-in and a true bright spot. Take a screenshot of your screen and open the screenshot image in your photo gallery. If the faint ghost image or discoloration appears in the screenshot photo, the problem is software or image retention related. If the screenshot looks clean but you still see the mark when looking directly at your screen, the problem is a physical display defect like a bright spot rather than burn-in.
Burn-in tends to look like a faint, semi-transparent ghost of a specific shape. A bright spot tends to look like a glowing white or very bright patch with no recognizable shape at all. Once you know which one you are dealing with, you can move forward with the right solution rather than wasting effort on the wrong one.
Is the Bright Spot on Your Screen Dangerous? (When to Act Fast)
Not every bright spot on a phone screen requires the same level of urgency. Some are stable and give you plenty of time to explore fixes. Others can make your phone completely unusable within a day if you do not act quickly. The most important thing right now is figuring out which category your situation falls into.
Your screen type and what the bright spot looks like together will tell you almost everything you need to know about how fast you need to move.
If You Have an OLED or AMOLED Screen: This Is Urgent
A bright spot on an OLED screen is the situation that calls for the fastest response, and I want to be completely honest with you about why.
OLED and AMOLED displays are built with organic pixel materials that can degrade progressively once damage begins. When OLED pixel degradation starts spreading, the process is called OLED rot, and the timeline can be shockingly fast. Real users who have experienced OLED rot describe a situation where a single bright pixel appeared in one corner of their display in the morning. By that same evening the damaged area had grown visibly. By the next day it had spread across a significant portion of the screen, pulling colors out of the display and leaving dark areas where the OLED pixels had failed completely.
OLED rot does not pause and wait for you to find a convenient time to deal with it. The organic materials inside an OLED display continue degrading once the process starts, and the progression can move from a minor cosmetic issue to a fully unusable screen within 24 to 48 hours in serious cases.
If you have an OLED or AMOLED display and your bright spot has grown even slightly since you first noticed it, treat this as urgent. Back up your phone to Google Drive or iCloud right now, then start looking at screen replacement options. Do not leave this for the weekend.
If It’s an LCD Screen: You Have More Time
If your phone uses an LCD display rather than OLED, a bright spot or LCD white spot is almost certainly a more stable problem, and you have time to approach it methodically.
LCD screen damage from backlight issues or pressure typically does not spread the way OLED rot does. The physics are different. An LCD backlight issue, such as a reflector lens that has detached from an LED, creates a fixed bright spot at one specific location. That spot stays where it is because the underlying cause is localized rather than a spreading degradation process. Similarly, a pressure spot on an LCD screen caused by a drop or physical impact tends to remain stable once the pressure source is removed.
What this means practically is that you can take a day or two to try software fixes, remove your screen protector, test in safe mode, and work through the troubleshooting steps I cover later in this article without worrying that the LCD screen damage is going to worsen dramatically while you do so.
The one exception is if the pressure causing the LCD white spot is ongoing. If your phone is still sitting in a tight pocket, under something heavy, or in any position where pressure continues to be applied to the display, the LCD screen damage can worsen over time. Remove any source of ongoing pressure immediately.
Battery Bulge Warning Signs
This is the one situation where the bright spot on your phone screen is telling you something that goes beyond just the display itself, and it deserves your full attention.
A swollen phone battery creates display pressure damage by pushing outward against the back of the screen from inside the device.
The battery expands because internal chemical processes create gas over time, particularly in older batteries or batteries that have been exposed to excessive heat.
As the battery swells, the expanding battery pushes the display layers apart from behind, creating a bright patch or white spot on the screen at the point of highest pressure.
The bright spot itself is actually the least concerning part of this situation. A swollen battery needs to be seen by a professional technician as soon as reasonably possible.
Here is how to recognize if your bright spot might be battery related. Check whether your phone feels slightly thicker in the middle than it used to. Look at whether the back panel or the screen appears to bow slightly outward rather than sitting flat.
Notice if your battery life has dropped significantly at the same time the bright spot appeared. If two or more of these signs are present alongside the display pressure damage, take your phone to a qualified repair technician promptly and let them assess the battery condition before attempting any screen repairs.
Do not attempt to open the device yourself to check the battery if you are not experienced with phone repairs. Leave this one to a professional.
Quick 3-Minute Test: Is It Software or Hardware?
Before you start looking at repair shops or trying complicated fixes, you need to know whether the bright spot on your phone screen is a software issue you can fix yourself or a hardware problem that needs professional attention. The difference between these two determines whether you are looking at a free five-minute fix or a several-hundred-dollar screen replacement.
I am going to walk you through four very simple tests that will give you a clear answer in less than three minutes total.
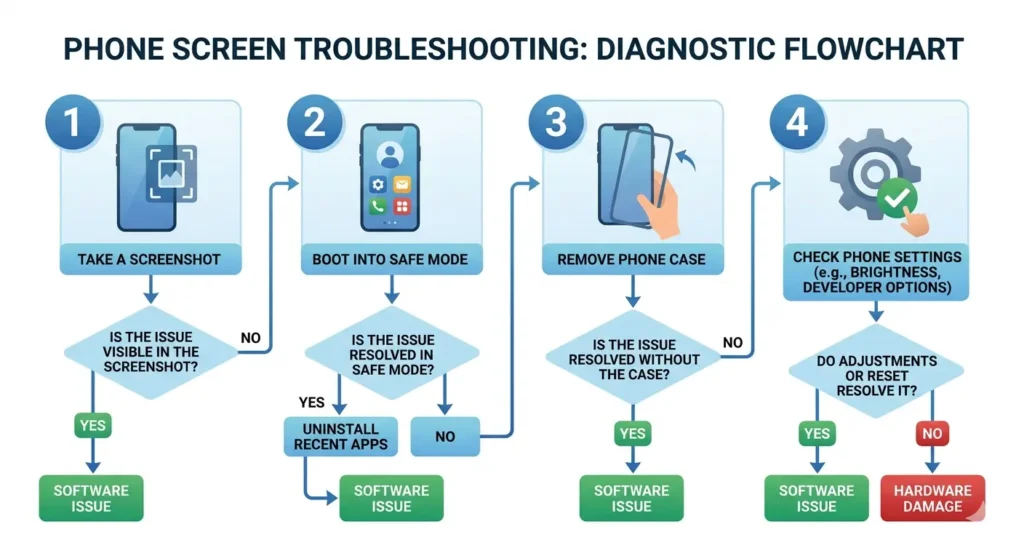
The Screenshot Test (Takes 10 Seconds)
This is the fastest and most definitive test you can do, and the result tells you immediately whether your bright spot is software related or physical screen damage.
Open any app where the bright spot is clearly visible. Take a screenshot using your phone’s normal screenshot method. Open your photo gallery and look at the screenshot image you just captured.
If the bright spot appears in the screenshot photo, the bright spot is being generated by your phone’s software, not by the physical display itself. Software overlays, notification indicators, floating app buttons, and certain accessibility features all get captured in screenshots because the phone is actually drawing those elements on top of everything else.
If the screenshot looks completely clean but you still see the bright spot when looking directly at your phone screen, the bright spot is physical display damage. Screenshots capture what the phone is sending to the display, not what the display hardware is doing with that information. Physical damage to the screen layers, backlight issues, and pixel failures will never show up in a screenshot.
This single test eliminates half of the possible causes in ten seconds.
Safe Mode Diagnosis
Safe mode phone diagnosis is one of the most reliable ways to identify whether a third-party app is causing display problems, including what can look like bright spots or touch screen malfunction.
Safe mode temporarily disables all third-party apps you have downloaded and runs your phone using only the original system apps that came with the device. If a downloaded app is creating a visual overlay, a floating element, or triggering a display glitch, safe mode will reveal that by making the bright spot disappear.
Here is how to boot into safe mode on most Android phones. Press and hold the power button until the power menu appears. Press and hold the power off option for a few seconds. A prompt will ask if you want to reboot into safe mode. Confirm yes. Your phone will restart with safe mode indicated somewhere on the screen, usually in a corner.
On iPhones, safe mode is not available in the same way, but you can achieve a similar result by temporarily removing recently downloaded apps one by one to see if the bright spot goes away.
If the bright spot disappears in safe mode, the cause is definitely software related, and the culprit is one of your downloaded apps. If the bright spot remains visible even in safe mode, the issue is either a system level problem or physical hardware damage.
Remove Your Screen Protector and Case
This step sounds almost too simple to matter, but I have seen multiple cases where a screen protector causing white spot issues turned out to be the entire problem.
Dust, debris, or air bubbles trapped between your screen protector and the actual display can create pressure points that appear as small bright spots or white patches. The trapped particle pushes slightly against the display from the outside, and depending on where the particle sits and how much pressure it creates, the result can look exactly like internal screen damage.
Similarly, a phone case that fits too tightly around the edges can apply continuous pressure to the screen frame, particularly on phones where the display curves toward the edges. That constant pressure can cause display issues that disappear the moment you remove the case.
Take off your screen protector completely. Remove your phone case. Look at the display without any accessories attached. If the bright spot is gone, your screen protector or case was the cause, and you just saved yourself a repair bill. If the bright spot is still visible on the bare screen, the issue is internal to the phone display itself.
Check for Software Overlays
Some phone features create visual elements on your screen that can be mistaken for display defects, and real users get confused by this more often than you might expect.
A user posted in an online community asking for help with what they thought was a bright dot stuck on their screen. The dot appeared on top of every app. The user was genuinely unsure whether the bright spot was a floating button, an overlay from some app, or actual screen damage. Turning out to be a software overlay rather than a defect is more common than people realize.
Go into your phone settings and check your accessibility features. Look for anything labeled as overlays, floating buttons, assistive touch, or screen magnification. Disable each one temporarily and check if the bright spot disappears.
Check your recently downloaded apps, especially any that requested permission to draw over other apps. Floating video players, messenger chat heads, screen recording tools, and similar apps all create visual elements that sit on top of your normal display and move between apps.
If disabling overlays or uninstalling a recent app makes the bright spot vanish, you have found your answer without touching the hardware at all.
How to Fix Bright Spots on Your Phone Screen (Step-by-Step)
If you have confirmed that the bright spot on your phone screen is software related or you want to try every possible fix before committing to a screen replacement, this section walks you through six methods to fix a bright spot on a phone screen at home, starting with the simplest and moving toward more involved solutions.
I have arranged these methods from safest and easiest to more advanced. Try them in order, and stop as soon as one works for you.
Method 1: Restart and Clear System Cache
The very first thing you should try when dealing with any display issue is a simple restart combined with clearing your system cache. This sounds too basic to actually work, but software glitches that cause temporary display problems often resolve themselves when the system refreshes.
Restart your phone completely by powering it off and waiting ten seconds before turning it back on. Once your phone boots back up, check if the bright spot is still visible.
If the bright spot remains, go to your home screen and find the Settings app icon. Long press the Settings icon until a menu appears, then tap the info or app information option. Inside the Settings app info screen, tap on Storage. You will see an option to clear cache. Tap clear cache, then go back one screen and tap Force Stop to completely refresh the Settings system process.
Clearing the Settings app cache removes temporary files that can sometimes cause display calibration issues or visual glitches without deleting any of your personal data or custom settings. The Force Stop option ensures that the Settings app reloads completely from scratch the next time it opens.
This method takes less than two minutes and costs nothing, so there is no reason not to start here.
Method 2: Use OLED Saver App (For Flickering and Line Issues)
If you have an OLED or AMOLED screen and your bright spot is accompanied by flickering, screen lines, or irregular brightness, a pixel repair app called OLED Saver has worked surprisingly well for many users dealing with these exact symptoms.
I came across a detailed case where someone was dealing with severe screen flickering and visible white lines on a Vivo phone. The screen was almost unusable because the brightness would distort and flicker constantly whenever colors changed or apps opened. After installing and configuring OLED Saver properly, the flickering stopped immediately and the screen became stable and usable again.
Here is how to use OLED Saver correctly, because the settings matter a lot.
Search for OLED Saver APK on your browser and download the app. The app file is very small, usually under one megabyte. Install the app and open it. You will see an introductory walkthrough. Tap through the intro screens until you reach a button labeled Enable or Enable Service. Tap that button.
Your phone will prompt you to grant OLED Saver permission to display over other apps. Go into your phone settings where it redirects you and enable that permission. This allows OLED Saver to adjust how your display renders content at a system level.
Once the app is enabled, go into the OLED Saver settings and configure these specific options. Turn on color correction and adjust the color sliders gradually until the bright spot or flickering reduces. Set pixel filtering to do not use, because enabling pixel filtering can make your screen look grainy and actually reduce visual quality. Use the manual brightness slider inside OLED Saver rather than your system brightness slider, because OLED Saver controls brightness in a way that prevents the display from entering the flicker zone where OLED screens tend to show problems.
OLED Saver does not fix physical hardware damage, but the app can stabilize software level display driver issues and reduce visible artifacts caused by OLED pixel behavior. If your bright spot is related to how the display is being driven rather than physical screen damage, OLED Saver can make a noticeable difference within minutes.
Method 3: Try a Stuck Pixel Repair App
If your bright spot is actually a stuck pixel, meaning a single tiny colored dot rather than a larger white area, a different type of pixel repair app designed specifically for stuck pixels might help.
A stuck pixel on a phone happens when a pixel gets locked into displaying one color and stops responding to normal signals. Pixel repair apps work by rapidly flashing bright colors at high speed across the area where the stuck pixel is located. The rapid flashing can sometimes jolt the stuck pixel back into normal operation.
Search the Google Play Store or App Store for stuck pixel repair or dead pixel fix apps. Download one with good reviews. Most of these apps work the same way. Open the app, select the area of your screen where the stuck pixel is located, and let the app run its flashing color sequence for five to ten minutes.
Set realistic expectations here. Pixel repair apps work best on stuck pixels that are displaying a color, not on dead pixels that are completely black or on larger bright spots caused by backlight or pressure damage. If your bright spot is bigger than a single pixel or appears white rather than colored, a stuck pixel app is unlikely to help.
Method 4: Reset Display Settings (Not Full Factory Reset)
If the bright spot appeared after you changed some display settings or installed a system update, resetting your display calibration and system settings back to defaults can sometimes resolve the issue without erasing your personal data.
This is where a lot of people make a costly mistake. Many online guides recommend doing a full factory reset to fix phone screen issues, but a factory reset erases everything on your phone including photos, apps, and personal files.
If you do eventually need to go that route, make sure you understand the process fully first my guide on how to reset your Android phone safely covers exactly what gets deleted and what you can recover. But before you consider that step, there is a much better option that almost nobody mentions.
Go into your phone settings and use the search bar at the top. Type the word reset and look for an option labeled Reset All Settings or Reset System Settings. Do not select Factory Reset or Erase All Data. Those are completely different options.
Tap Reset All Settings. Your phone will ask you to confirm and may request your PIN or pattern. Confirm the reset. This process restores all system settings including display calibration, sound settings, network settings, and accessibility options back to their factory defaults, but your photos, videos, apps, and files remain completely untouched.
After the reset completes, your phone will restart. Check whether the bright spot on your phone screen has disappeared. If a misconfigured display setting or a software conflict was causing the bright spot, this reset should eliminate the issue.
Method 5: Gentle Pressure Technique (Risky – Read Warning First)
I want to be very clear about this method before I explain it. The gentle pressure technique is risky and can make your display damage worse if done incorrectly. I only recommend trying this if you have already confirmed that your bright spot is caused by pressure damage on an LCD screen and you are prepared to accept the risk that you might spread the damage.
Do not attempt this method on an OLED or AMOLED screen. Do not attempt this if your bright spot is spreading or getting worse. Do not use this method if you have any screen cracks.
If you decide to proceed, here is how to do it as safely as possible. Turn off your phone completely. Take a very soft microfiber cloth and fold it into a small square.
Place the cloth directly over the bright spot area. Using just your fingertip, apply very gentle pressure in a small circular motion over the cloth for about ten seconds. The pressure should be extremely light, barely more than a touch.
The idea behind this technique is that very gentle pressure can sometimes help separated display layers resettle or release a trapped air pocket in cases of minor LCD pressure damage. However, too much pressure or pressure applied in the wrong spot can cause the bright spot to spread or create additional damage.
I have seen cases where this worked, and I have seen cases where it made things worse. Consider this a last resort option before moving to professional repair.
Method 6: Update Your Phone’s Software
Display driver bugs are more common than most people realize, and manufacturers frequently release software updates that include fixes for screen related issues.
Go to your phone settings, scroll down to About Phone or About Device, and tap on Software Update or System Update. If an update is available, download and install it while your phone is connected to WiFi and has at least fifty percent battery remaining.
Software updates can fix display driver glitches, color calibration bugs, and compatibility issues that sometimes manifest as bright spots, flickering, or uneven brightness. If your bright spot appeared shortly after a previous update, a newer update may contain the fix.
When Software Fixes Don’t Work: It’s Hardware
If you have tried all six methods above and the bright spot is still visible on your phone screen, the issue is almost certainly hardware damage rather than software.
At this point, continuing to try software fixes is not going to help. The bright spot is being caused by physical damage to the display layers, backlight components, or OLED pixels, and those problems require either professional repair or screen replacement.
Accepting that your phone needs hardware repair is not a failure. You have eliminated every reasonable software fix, and now you know exactly what you are dealing with. The next section will help you decide whether repair makes sense or if replacement is the better option.
My Screen Was Just Repaired and Now There’s a Bright Spot
If a white spot on your phone screen appeared within a day or two of getting a screen replacement or repair done, the bright spot is almost certainly caused by something the repair technician did during installation rather than a defect in the new screen itself. This is more common than repair shops like to admit, and knowing the three main causes gives you the power to verify repair quality and get the issue fixed properly.
Post-repair bright spots usually come from wrong screw sizes, leftover adhesive or debris trapped behind the new screen, or incorrect battery installation. All three of these issues are the repair technician’s responsibility to fix under warranty at no additional cost to you.
Let me show you how to identify which problem you are dealing with.
Check #1: Did the Technician Use the Wrong Screw Size?
This is one of the most documented causes of white spots appearing immediately after a screen repair, and the connection between screw location and bright spot location makes this issue very easy to identify.
A repair technician working on multiple screen replacements documented a striking case. After reassembling a phone with a newly installed screen, white dots appeared at several specific locations on the display. When the technician opened the device again to investigate, the white dots corresponded exactly to where screws were positioned on the back of the phone. The technician removed those screws one by one, and the white spots disappeared immediately each time a screw was taken out.
Here is what was happening. The screws used during reassembly were slightly too long for their designated positions. When the technician tightened those longer screws into the frame, the screw tips pierced through the internal frame and pressed directly against the back of the LCD display from the inside. That localized pressure from the screw tip created a bright white spot visible on the front of the screen exactly where the pressure was being applied.
If your bright spot or multiple white dots appeared right after a repair and the spots seem to be arranged in a pattern rather than randomly placed, wrong screw length is very likely the cause.
Take your phone back to the repair shop and explain that white spots appeared at what look like screw locations. A competent phone repair technician will recognize this issue immediately and replace the incorrect screws with the proper shorter screws designated for those positions. The white spots should disappear as soon as the pressure is removed.
Check #2: Is There Leftover Adhesive or Debris Behind the Screen?
Screen repairs involve removing old adhesive strips and applying new ones to seal the replacement screen to the phone frame. During this process, small pieces of adhesive, dust particles, or tiny components can sometimes get trapped between the new screen and the internal frame, creating pressure points that show up as bright spots.
An iPhone repair case demonstrated this perfectly. After installing a replacement screen, a white spot appeared in the upper left corner of the display. The repair technician opened the device again to investigate and found a small piece of waterproof adhesive that had been left stuck to the back of the new screen during installation. That adhesive piece was thin but just thick enough to create a pressure point between the screen and the frame. Removing the adhesive strip and reinstalling the screen cleanly eliminated the white spot completely.
This same principle applies to dust, small foam padding pieces, or even tiny screws that can fall into the device during disassembly. Anything trapped between the display and the frame creates uneven pressure that can manifest as a localized bright spot on the screen.
If your white spot on the phone screen appeared after a repair and is located near an edge or corner rather than the center, leftover adhesive or debris is a strong possibility. The adhesive application process during screen installation is most likely to leave residue near the edges where the adhesive strips are applied.
Check #3: Was the Battery Installed Incorrectly?
If your repair involved battery replacement along with the screen, or if the technician had to remove the battery to access the screen connectors, incorrect battery installation can cause display pressure damage that looks identical to other bright spot causes.
A documented iPhone repair showed exactly how this happens. After a screen replacement, a white spot appeared on the left side of the display. When the repair technician reopened the device, the battery had a slight bulge and was positioned in a way that pushed unevenly against the back of the display. The battery itself was new and not defective, but the way the battery sat in its compartment during installation created enough pressure against the display to cause a visible bright spot on the screen. Replacing the battery with another new unit and ensuring proper flat installation resolved the white spot issue.
Batteries are held in place with adhesive strips, and if those strips are not applied correctly or if the battery is not seated completely flat in its designated space, even a small amount of misalignment can create enough pressure to affect the display.
If your bright spot appeared after a repair that involved any battery work, and especially if the bright spot is located toward the center or lower half of the screen where the battery typically sits, incorrect battery installation should be high on your list of possible causes.
What to Do: Return to the Repair Shop Immediately
Here is what you need to understand about post-repair warranty coverage. Any reputable repair shop guarantees their work for at least thirty days, and most offer sixty to ninety day warranties on parts and labor. A white spot that appears within a day or two of repair is clearly a workmanship issue, not normal wear and tear or accidental damage on your part.
Before you go back to the repair shop, take clear photos of the bright spot on your screen. Photograph the spot against a white background and a black background so the issue is clearly visible in the images. Note the exact date you picked up your phone after the repair and the date the bright spot first appeared.
Return to the repair shop as soon as possible and explain that a white spot appeared immediately after the repair. Show them the photos and ask them to inspect the installation. Do not let the shop try to charge you for this. Fixing installation errors falls under their warranty obligation.
A competent phone repair technician will open the device, check screw lengths, inspect for debris or adhesive residue, verify battery positioning, and correct whatever installation error caused the bright spot. The fix itself usually takes fifteen to thirty minutes once the cause is identified.
If the repair shop refuses to address the issue under warranty or tries to blame the bright spot on something you did, take your phone to a different repair shop for a second opinion and consider leaving an honest review describing your experience. Post-repair bright spots are installation errors, and you should not have to pay twice to get a repair done correctly.
Repair or Replace? Here’s How to Decide (With Real Cost Estimates)
Once you know your bright spot is hardware damage that software fixes cannot resolve, the next question becomes whether repairing your phone screen makes financial sense or if replacing the entire device is the smarter choice. This decision depends on three factors: what the repair actually costs, how much your phone is currently worth, and whether you have any warranty coverage you can use.
Let me break down the real numbers so you can make an informed decision.
Professional Repair Cost Breakdown
Phone screen repair costs vary dramatically depending on what level of repair your screen actually needs, and most people do not realize there is a repair hierarchy that ranges from very affordable diagnostic fixes to expensive full screen replacements.
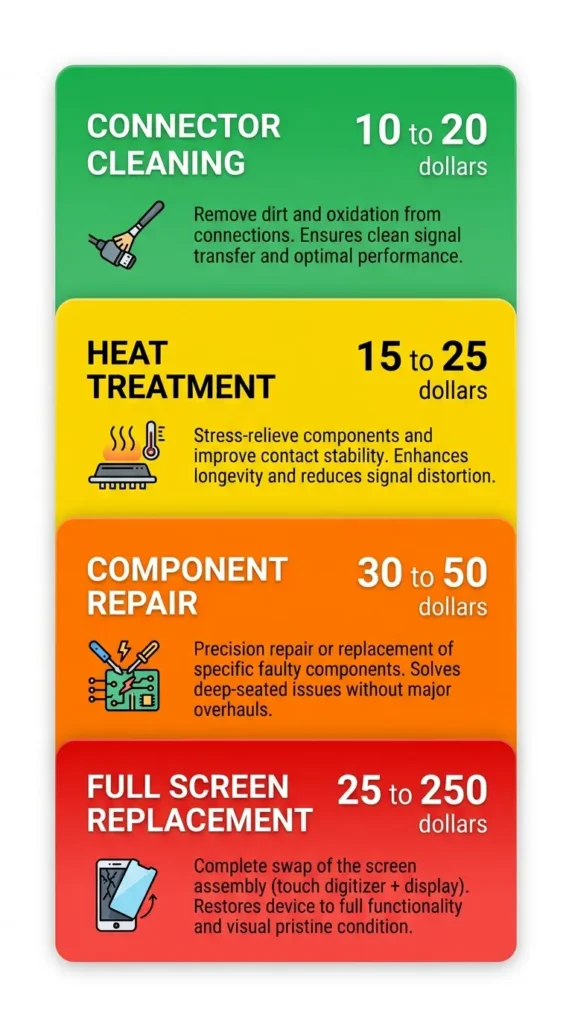
A mobile repair engineer with professional experience outlined the four-tier cost structure that most repair shops follow, and these numbers give you realistic expectations for what you should be paying.
Tier 1: Screen Connector Cleaning costs approximately ₹100 to ₹200 (roughly $10 to $20 USD). This involves opening the phone, disconnecting the screen flex cable, cleaning the connector with isopropyl alcohol to remove any oxidation or debris, and reconnecting the cable securely. Connector issues can sometimes cause display problems that look like screen damage but are actually just poor electrical contact.
Tier 2: Heat Treatment and Cable Re-Taping costs approximately ₹150 to ₹200 (roughly $15 to $25 USD). This repair involves removing the display, cleaning components behind the flex cable, applying controlled heat with a hot air tool to help reseat internal connections, and securing the cable more firmly with proper tape. This addresses moisture-related issues or loose connections that developed over time.
Tier 3: Component Replacement costs approximately ₹300 to ₹500 (roughly $30 to $50 USD). A technician uses a multimeter to identify shorted or failed components on the display flex cable, such as tiny resistors or capacitors, and replaces those specific components rather than the entire screen. This is advanced repair work that requires soldering skills and diagnostic equipment.
Tier 4: Full Screen Replacement varies widely depending on your device. Budget and mid-range Android phones typically cost ₹2,000 to ₹5,000 (roughly $25 to $60 USD) for screen replacement. Higher-end Android phones and older iPhones cost ₹5,000 to ₹10,000 (roughly $60 to $120 USD). Flagship phones like recent iPhone Pro models or Samsung Galaxy S series phones can cost ₹10,000 to ₹20,000 or more (roughly $120 to $250+ USD) for genuine screen replacements.
The phone screen repair cost you actually pay depends entirely on which tier your damage falls into. Always ask the repair shop to diagnose the issue first before agreeing to a full screen replacement, because you might only need a Tier 1 or Tier 2 fix. For comparison, check Apple’s Official Repair Pricing or your manufacturer’s authorized service costs to ensure you’re getting fair pricing from third-party shops.
Is Your Phone Worth Repairing?
Here is the rule I follow when deciding whether screen repair makes economic sense. If the phone screen repair cost exceeds fifty percent of what your phone is currently worth on the resale market, you should seriously consider putting that repair money toward a replacement phone instead.
Check what your exact phone model is selling for on the used market right now. Look at sites where people sell used phones and filter by your model, storage capacity, and condition assuming the screen were working. That resale value is your baseline.
If your phone would sell for ₹8,000 with a working screen and the screen replacement costs ₹5,000, repairing makes sense because you are preserving ₹8,000 of value for ₹5,000 of cost. But if your phone would only sell for ₹6,000 and the repair costs ₹5,000, you are spending almost as much as the phone is worth, and a better option might be selling the phone as is for parts (usually twenty to thirty percent of working value) and putting that money plus your repair budget toward a newer device.
Many phone manufacturers and carriers also offer trade-in programs where they accept phones with screen damage at reduced value. The trade-in credit combined with what you would have spent on repair might get you into a newer phone with warranty coverage and better specs.
Check Your Warranty Coverage First
Before you pay anything for screen repair out of pocket, verify whether you have any warranty coverage that might cover the phone screen repair cost partially or fully.
Manufacturer Warranty typically covers defects in materials and workmanship for one year from purchase date but explicitly excludes accidental damage like drops or pressure damage. However, if your bright spot appeared without any drop or impact and your phone is still within the warranty period, some manufacturers will cover display defects under warranty. It is worth calling to ask.
Extended Warranty Plans like AppleCare+ for iPhones, Samsung Care+, or Google Preferred Care include accidental damage protection with a service fee that is significantly lower than out-of-warranty repair costs. If you purchased one of these plans, use it. The service fee is usually ₹2,000 to ₹3,000 compared to ₹10,000+ for out-of-warranty flagship screen replacement.
Credit Card Purchase Protection is something many people forget about. Some credit cards offer automatic purchase protection or extended warranty coverage on items you buy with that card. Check your credit card benefits if you purchased your phone within the past year.
Check your phone warranty screen damage coverage before assuming you have to pay full price for repair.
DIY Repair Risks (Why I Don’t Recommend It for Most People)
I know the idea of ordering a replacement screen online and fixing your phone yourself is tempting, especially when you see how much cheaper the parts are compared to what repair shops charge. DIY phone screen replacement is possible, and resources like iFixit provide detailed repair guides with step-by-step instructions for many phone models.
But I need to be honest about the risks involved in DIY screen repair.
Opening your phone voids any remaining manufacturer warranty immediately. Smartphone screens are incredibly fragile during installation, and one wrong move can crack the new screen before you even finish the repair. You need specialized tools including heat guns, suction cups, prying tools, and precision screwdrivers that cost money to buy. The internal cables and connectors are tiny and easy to damage permanently if you apply pressure in the wrong direction or disconnect them incorrectly.
Most importantly, if something goes wrong during your DIY repair attempt, you can turn a repairable phone into a completely non-functional device, and repair shops will often refuse to fix DIY repair damage or charge significantly more because they have to undo your work first.
If you have prior phone repair experience, good fine motor skills, and you are working on an older budget phone where the risk of total loss is acceptable, DIY repair using iFixit guides can work. For everyone else, paying a professional is the safer choice.
Brand-Specific Bright Spot Issues (Samsung, iPhone, Nothing Phone)
Certain phone brands and models have higher rates of bright spot issues than others, and understanding whether your specific device has a known display problem can save you a lot of troubleshooting time. Some bright spots are manufacturing defects that affect particular models more than others, while other brands tend to develop bright spots primarily after third-party repairs.
Let me walk you through what I have seen with the three brands that come up most frequently in bright spot discussions.
Samsung Galaxy Devices: AMOLED Burn-In vs Bright Spots
Samsung Galaxy phones use AMOLED displays across most of their lineup, and AMOLED technology brings both advantages and specific vulnerabilities when it comes to display issues.
The Samsung Galaxy screen issue that gets confused most often with bright spots is actually AMOLED burn-in rather than true bright spot damage. Burn-in on Samsung AMOLED displays appears as faint ghost images or discolored patches where static elements like the keyboard, navigation bar, or status icons were displayed for thousands of hours. Burn-in looks different from a bright spot because burn-in has a recognizable shape matching whatever image was displayed repeatedly, while a true bright spot is usually a formless white or bright patch.
Older Samsung Galaxy models, particularly the S7, S8, and S9 series, developed AMOLED display degradation more frequently than newer models as the organic pixels aged. Newer Samsung Galaxy devices have significantly improved AMOLED panel longevity, but the technology is still vulnerable to pixel degradation over time.
If you have a Samsung Galaxy device with a bright patch on the Android screen and the phone is still under warranty, contact Samsung support or visit an authorized Samsung service center before going to a third-party repair shop. Samsung warranty coverage sometimes extends to display defects even outside the standard one-year period if the issue is determined to be a manufacturing defect rather than accidental damage.
iPhones: Post-Repair Issues Are Most Common
iPhones develop bright spots less frequently from manufacturing defects and much more frequently from problems that occur during third-party screen replacements. This pattern is consistent across both LCD iPhones (iPhone 8 and earlier) and OLED iPhones (iPhone X and newer).
The iPhone screen bright area fix cases I have seen most often involve post-repair installation errors. As I covered in the previous section, iPhone screen replacements done by non-authorized repair shops frequently result in white spots caused by wrong screw sizes, leftover adhesive behind the new screen, or battery positioning issues during reassembly. These problems happen because third-party repair technicians are working with aftermarket parts that sometimes have slight dimensional differences from genuine Apple screens, and the margin for error during installation is very small.
iPhone display damage from drops tends to show as full screen cracks rather than isolated bright spots, because iPhones use very strong glass that either survives an impact intact or cracks visibly. Bright spots without accompanying cracks on an iPhone usually point toward internal pressure issues or component failures rather than external impact.
If your iPhone is still covered under AppleCare+ or standard Apple warranty and a bright spot appeared without any drop or impact, book an appointment at an Apple Store or authorized service provider. Apple will run diagnostics and determine whether the display issue qualifies for warranty coverage.
Nothing Phone 1: A Recognized Display Panel Issue
The Nothing Phone 1 has a documented pattern of OLED screen bright spot reports from the user community, and this is worth knowing if you own this specific model.
In online communities dedicated to Nothing Phone devices, users have reported bright dots appearing on Nothing Phone 1 displays with enough frequency that the issue is recognized by experienced community members as a known display panel concern. The bright spots on Nothing Phone 1 devices typically appear as small dots rather than large patches, and they tend to show up near edges or corners of the display.
The Nothing Phone 1 uses an OLED panel, which means any bright spot that appears has the potential to spread if the issue is OLED pixel degradation rather than a stable defect. Community members with repair experience consistently recommend backing up data immediately when a bright spot appears and contacting Nothing support while the device is still within warranty period.
If you have a Nothing Phone 1 with an OLED screen bright spot and your device is less than one year old, contact Nothing customer support and describe the issue as a display panel defect. Provide photos showing the bright spot clearly. Because this issue has been reported by multiple users, Nothing support may be more likely to recognize the problem and offer warranty repair or replacement options.
Nothing Phone warranty coverage varies by region, but manufacturing defects including display panel issues are typically covered under the standard one-year warranty if you can demonstrate the bright spot appeared without physical damage to the device.
How to Prevent Bright Spots from Coming Back
Now that you understand why there is a bright spot on my phone screen and how different causes create display damage, the next step is making sure the problem does not come back after you fix it or does not happen to your next phone. Prevention comes down to avoiding specific behaviors that create pressure damage to phone screens and using protective measures correctly.
Let me share the exact habits that cause the majority of preventable bright spot cases.
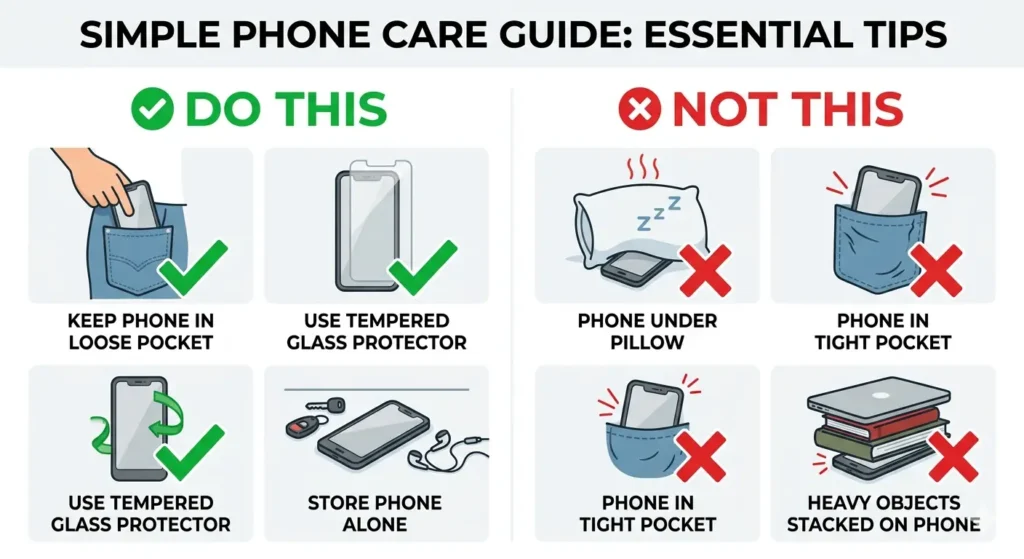
Avoid These Specific Habits That Cause Screen Damage
The most common cause of pressure damage to phone screens is not dramatic drops or accidents. The damage comes from small, repeated pressure applied over time in ways most people never think about.
Never sleep with your phone under your pillow or anywhere your body weight can press against the device while you sleep. A real repair case traced severe screen bleeding directly to this habit. The phone owner had been placing the phone under their pillow every night, and over weeks the repeated pressure from their head pressing down during sleep caused the display layers to separate and create visible white patches across the screen. The repair shop identified this sleeping habit as the cause immediately based on the damage pattern.
Avoid keeping your phone in very tight jeans pockets or back pockets where you might sit on the device. Constant pressure against a phone screen, even moderate pressure, stresses the display layers and can create pressure damage to the phone screen over time. Front pockets with enough room for the phone to sit without being squeezed are much safer.
Do not stack heavy objects on top of your phone, even briefly. Books, laptops, or other phones piled on top of your device create localized pressure points. Do not place your phone face down on hard surfaces and then rest your arms or other objects on the back, because that sandwiches the display between two hard surfaces with pressure from above.
Use a Quality Screen Protector (The Right Way)
A properly installed screen protector adds a sacrificial layer that can absorb minor impacts and distribute pressure more evenly across the display surface, reducing the chance of localized pressure damage.
Tempered glass screen protectors offer better impact protection than thin film protectors, but proper installation matters more than the type you choose. Before applying any screen protector, clean your screen thoroughly with the included alcohol wipe and microfiber cloth. Work in a dust-free environment like a bathroom with the shower run for a few minutes to settle airborne dust.
Align the screen protector carefully before letting it adhere, because lifting and repositioning after initial contact introduces air bubbles and dust. If you see a dust particle under the screen protector after application, use the included removal sticker to lift the protector slightly and remove the dust particle with tape before pressing the protector back down.
A screen protector with dust or bubbles trapped underneath creates small pressure points that can eventually cause the same display pressure damage you are trying to prevent.
Be Careful During DIY Repairs
If you ever attempt DIY screen replacement or open your phone for any reason, using the correct screw sizes in their designated locations is critical to preventing post-repair bright spots.
Organize screws carefully during disassembly. Many repair guides recommend using a magnetic mat with labeled sections or printing a screw map diagram and placing each screw on the diagram in its corresponding location as you remove them. Screws that look identical may actually be different lengths, and using a screw that is even one millimeter too long can pierce through the frame and create pressure against the display.
Work in a clean, well-lit space and follow detailed repair guides from sources like iFixit rather than attempting repairs based on memory or general knowledge. One wrong screw in one wrong location is all it takes to create a permanent bright spot on an otherwise perfectly functioning new screen.
Final Thoughts: What Most People Should Do
If you came here asking why there is a bright spot on my phone screen, you now have a complete answer covering causes, diagnosis, and solutions. Here is my honest advice on what to do next.
Start by backing up your data right now if you have not already, especially if you have an OLED screen. Try the software fixes I outlined in this article, because those cost nothing and take less than ten minutes total. If software fixes do not work, you are dealing with hardware damage.
At that point, check your warranty coverage before paying for anything. If you have AppleCare, Samsung Care, or any extended protection plan, use it. If you are outside warranty, get a repair quote from a reputable shop and compare that cost to your phone’s current resale value.
If the repair costs more than half of what your phone is worth, seriously consider putting that money toward a replacement device instead. If the repair costs less than half your phone’s value, fixing makes sense.
Most attempts to fix a bright spot on a phone screen at home beyond software methods either do nothing or make the damage worse. Let professionals handle hardware repairs unless you have prior experience.
Whatever you decide, do not ignore a bright spot that is spreading. OLED rot does not wait, and neither should you.
Frequently Asked Questions
Is the blinking white dot on my screen a defect or normal?
If the white dot only blinks during phone calls or when using certain apps like the camera, it is your proximity sensor working normally, especially on phones with under-display sensors like Google Pixel 5. If the dot stays visible constantly and does not blink, it is an actual screen defect. A blinking dot is a normal phone feature, not damage.
Will the bright spot on my phone screen spread and get bigger?
If you have an OLED or AMOLED screen, OLED rot can spread rapidly within hours or days, making the bright spot grow across the display. If you have an LCD screen, pressure-related bright spots usually stay stable unless the pressure continues. Backup your data immediately if you notice the bright spot spreading at all.
How do I know if it’s a software overlay or actual screen damage?
Take a screenshot of your screen. If the bright spot appears in the screenshot image, it is software related such as an app overlay or notification. If the spot does not appear in the screenshot but you still see it on your physical screen, it is actual hardware damage requiring repair
Can I fix a bright spot on my phone screen myself?
You can try software fixes yourself like OLED Saver app, clearing cache, resetting display settings, or removing your screen protector, and these work for stuck pixels and software glitches.
However, hardware damage like OLED rot, backlight damage, or pressure damage requires professional screen replacement. Never open your phone yourself unless you have prior repair experience.
How much does it cost to fix a bright spot on a phone screen?
Software fixes are free to try yourself. Professional diagnosis and connector cleaning costs ₹100-200, component repair costs ₹300-500, and full screen replacement varies from ₹2,000-4,000 for budget phones to ₹10,000-20,000+ for flagship models.
If repair costs exceed 50% of your phone’s current resale value, consider replacing the phone instead of repairing it.


