
Yes, you absolutely can reset your Android phone when locked, even if you’ve completely forgotten your PIN, pattern, or password. I know how frustrating it feels to be locked out of your own device whether it’s your current phone you use every day or an old Android sitting in a drawer that you want to bring back to life.
I’ve helped dozens of people through this exact situation, and I can tell you the process works on nearly every Android phone including Samsung Galaxy, Motorola LG, Nokia and Oppo devices. The reset process is universal across most Android brands with only minor button combination differences.
Here’s what I’m going to walk you through in this guide. I’ll show you four reliable methods to reset your Android phone when locked.
The most common method uses your phone’s hardware buttons to enter recovery mode, which works even when the screen is completely locked.
You can also reset remotely using Google Find My Device, use your computer if you had USB debugging enabled, or try brand-specific techniques for Samsung and other manufacturers.
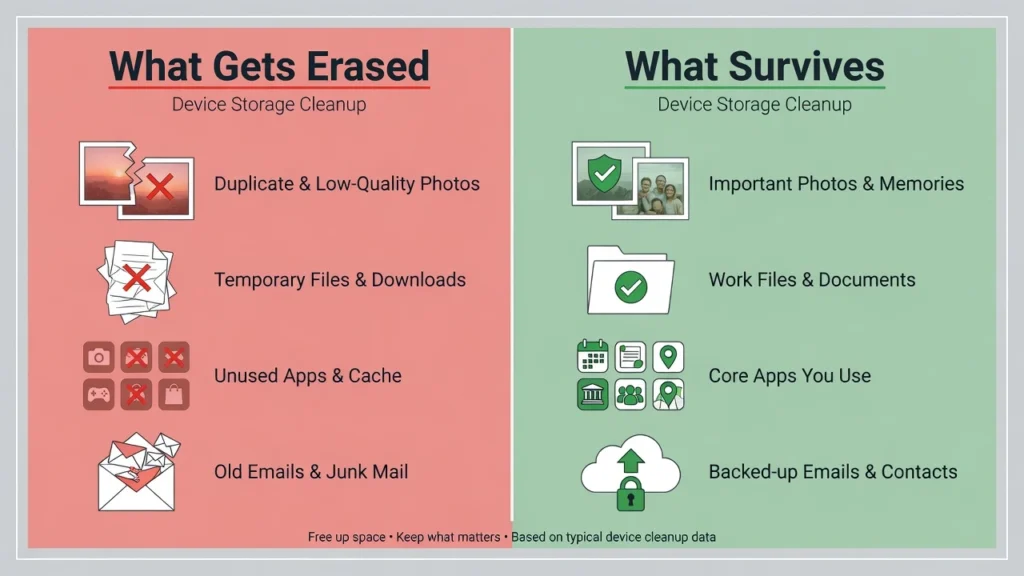
I need to be honest with you upfront about two important things. First, most of these methods will erase the data stored locally on your phone, including photos, apps, and files saved directly to your device. However, anything you backed up to your Google account like contacts, Gmail, calendar events, and Google Photos will come right back when you sign in after the reset.
Second, after you complete the factory reset, your phone will ask you to verify the Google account that was previously linked to the device. This is called Factory Reset Protection, and it’s a security feature built into the Android operating system. If you remember your Google account password, you’re fine. If you don’t, I’ll show you how to handle that situation too.
Let me take you through each method step by step so you can get back into your phone today
What Actually Happens to Your Data When You Reset a Locked Android
A factory reset performs a complete phone data wipe that erases everything stored in your phone’s internal storage.
I want to be completely honest with you about what you’ll lose and what you can get back, because this is the question that worries people the most before they reset.
When you factory reset a locked Android phone, the reset deletes all locally stored photos that weren’t backed up, downloaded music and video files installed apps text messages saved only on your device, and any documents or files sitting in your phone’s local folders.
The phone also wipes all your settings, your lock screen credentials, and any app data that wasn’t synced to the cloud.
The internal storage gets completely cleared back to how it looked the day you first turned on your phone.
Here’s the good news: Anything connected to your Google account survives the reset and comes right back when you sign in again.
Your Gmail messages, Google Contacts, calendar events, Google Drive files, Chrome bookmarks, and purchased apps from the Play Store all restore automatically. If you had Google Photos set to back up your pictures, those photos are safe in your cloud backup and will sync back to your phone after the reset.
The key question you need to ask yourself right now is whether you had Android backup and restore enabled before you got locked out. Most Android phones enable Google’s cloud backup by default, but not everyone keeps it active.
If you’ve been using your Google account regularly for email and app downloads, there’s a very good chance your most important data is already safely backed up.
I’ve seen people panic thinking they’ve lost everything, only to find that almost all their important information comes flooding back as soon as they sign into their Google account after the reset. The phone data wipe only affects what was stored locally and never synced to the cloud.
Your digital life that lived in the cloud stays completely safe because of data encryption and Google’s backup systems.
Take a moment to think about what you use on your phone. If you rely heavily on Gmail, Google Calendar and apps from the Play Store you’re in much better shape than you might think. The reset will feel like starting fresh, but your core information will restore itself within minutes of signing back in
If you’re concerned about what data survives the reset, you might also want to understand what apps are taking up space on your phone and which ones you actually need.
I’ve written a complete guide on how to delete apps on Android that explains which apps are safe to remove and which ones you should keep.
This knowledge helps you make better decisions about what to reinstall after your reset. Plus, removing unnecessary apps before a reset means less data to worry about losing in the first place.
How to Reset a Locked Android Phone Using Recovery Mode
Recovery mode is the most reliable way to factory reset your locked Android phone because it works without needing any passwords, PINs, or screen access at all. I’ve used this technique on dozens of locked phones, and the process succeeds on nearly every Android device regardless of brand or model.
The beauty of this method is that you’re accessing a special boot menu built directly into your phone’s system partition. The Android recovery menu exists completely outside your normal operating system, which means your lock screen can’t block you from reaching it.
You control everything using physical buttons, so even a completely unresponsive touchscreen won’t stop you.
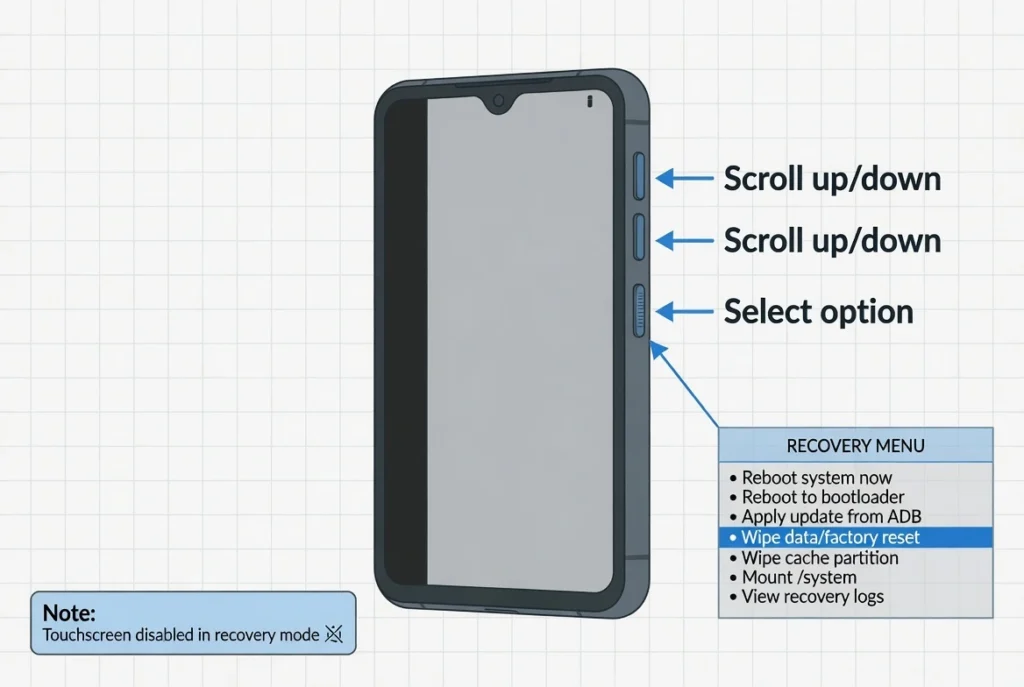
Here’s one critical thing that catches almost everyone off guard: Your touchscreen does not work inside the recovery menu.
You’ll use your Volume buttons to scroll up and down through the menu options, and you’ll press the Power button to select whatever option is highlighted. I’ve watched people tap their screens for minutes wondering why nothing happens, so save yourself that frustration and remember this from the start.
The Step-by-Step Recovery Mode Reset (Works on Most Android Phones)
Let me walk you through exactly how to factory reset your locked Android phone using the recovery mode method. I’m going to give you the universal process that works on most devices, and then I’ll show you the specific button combinations for your brand in the next section.
Step 1: Power off your phone completely by pressing and holding the Power button until your screen goes black. If your phone is already frozen or won’t respond to the Power button, pull the battery out if possible, wait 10 seconds, and put the battery back in.
For phones with sealed batteries, hold Power and Volume Down together for about 15 seconds until the phone shuts down. Wait at least 30 seconds after your screen goes black before moving to the next step. This waiting period ensures your phone completes a full shutdown, which makes entering recovery mode and the power button reset process much more reliable
Step 2: Boot into recovery mode with the button combination. For most Android phones, you’ll press and hold Volume Up and Power at the same time. Keep both buttons held down for about 10 to 15 seconds. You’ll see your phone’s logo appear first, and then after 3 to 5 more seconds, the Android recovery menu should appear with a list of options and a small Android robot icon at the top
Step 3: Navigate to the Wipe data factory reset option in the Android recovery menu. Use your Volume Down button to scroll down through the menu until the “Wipe data/factory reset” option is highlighted. The highlighted option usually appears in a different color or has a selection box around it. Remember, your touchscreen is completely disabled in this Android recovery menu, so only the physical buttons work here
Step 4: Select the wipe data option. Press your Power button once to select the highlighted option. The Android recovery menu will ask you to confirm because this action cannot be undone. You’ll see a confirmation screen with options like “Yes” or “Factory data reset.”
Step 5: Confirm the factory reset. Use your Volume buttons again to highlight “Yes” or the confirmation option, then press Power to confirm. Your phone will immediately begin the phone data wipe process.
Step 6: Wait for the data wipe to complete. Here’s where I need you to stay calm and patient. The phone data wipe can take up to 3 minutes depending on how much information was stored on your phone. Your screen might appear completely frozen during this time, showing just the Android logo or a progress bar that doesn’t seem to move. Do not turn off your phone and do not pull the battery. The wipe process is working even when the screen looks stuck.
Step 7: Wipe cache partition for a cleaner reset. Once the data wipe finishes, you’ll return to the main Android recovery menu. Before you reboot, I recommend one bonus step that most people skip. Use your Volume buttons to scroll to “Wipe cache partition” and select this option with your Power button. This step clears out temporary system files that can sometimes cause problems after a factory reset. The cache wipe only takes about 10 to 20 seconds.
Step 8: Reboot your phone. Finally, scroll back to the top of the recovery menu and select “Reboot system now.” Press Power to confirm. Your phone will restart, and you’ll see the initial setup screen just like when the phone was brand new. The entire recovery mode process usually takes about 5 to 7 minutes from start to finish, and your phone will boot up completely unlocked and ready for you to set up from scratch
Button Combinations by Brand (Samsung, Motorola, LG, Nokia, Oppo and More)
Different Android brands use slightly different volume button combinations to enter recovery mode, and this is where most people get stuck. I’m going to give you the exact button sequences for every major brand so you know exactly what to press for your specific phone.
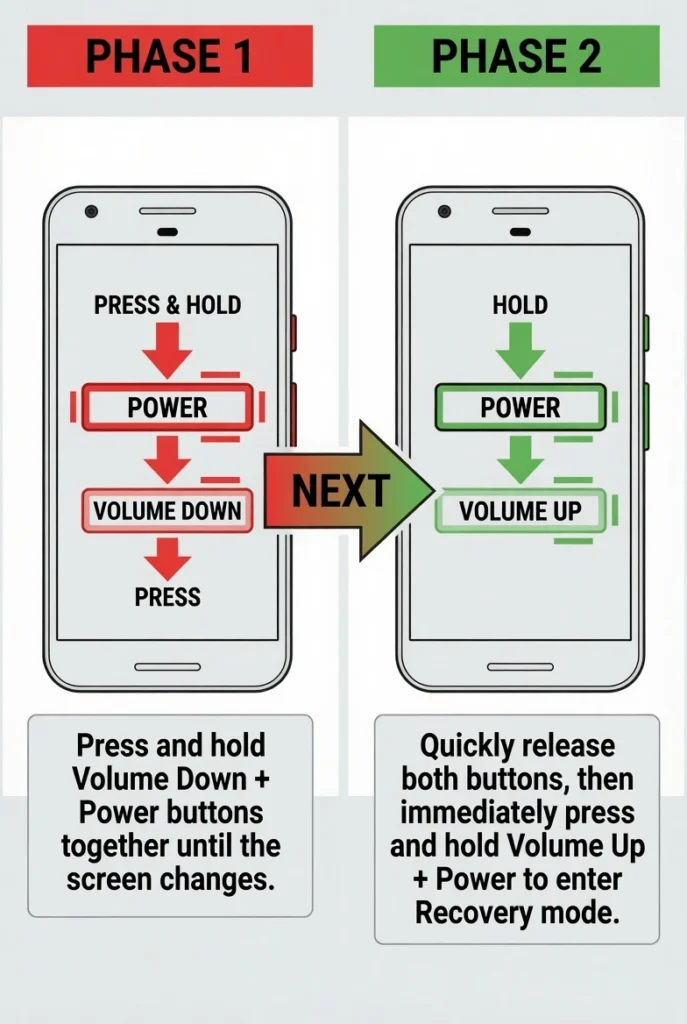
Samsung factory reset phones require a special two-phase technique that almost no one knows about. First, you need to force your Samsung phone to power off by holding Volume Down and Power together until the screen goes completely black. This usually takes about 7 to 10 seconds.
The moment your screen goes black, immediately release both buttons and quickly switch to holding Volume Up and Power at the same time. This volume button combination is unique to Samsung. Keep both buttons held down together until you see the Samsung logo and then the recovery menu. If you see the normal Samsung boot screen instead of recovery mode, you switched the buttons too slowly. Just power off again and try switching faster.
For Samsung Galaxy Note 8 and some other older Samsung models, you’ll need to add the Bixby button into your combination. Hold Volume Up, Power, and the Bixby button all at the same time until recovery mode appears. The Bixby button is the dedicated physical button on the left side of these older Samsung Galaxy devices.
Motorola factory reset uses a different volume button combination than Samsung. Turn off your Motorola completely, then press and hold Volume Down and Power at the same time for about 10 seconds. You’ll see the boot options menu first, then use Volume Down to highlight “Recovery mode” and press Volume Up to select it.
LG phones typically use Volume Down and Power held together, but you need to watch for the LG logo. Hold both buttons until you see the LG logo appear, then immediately release both buttons for just one second and then press and hold them again until recovery mode appears. I know this sounds strange, but LG requires this quick release and re-press technique on most of their models.
Nokia phones follow the standard Volume Up and Power combination. Power off your Nokia phone completely, then hold Volume Up and Power together until you see the Android recovery menu.
Oppo, Realme, Vivo, and OnePlus phones each have their own specific volume button combinations detailed in the table below
Oppo and Realme phones use Volume Down and Power held together. Keep both buttons pressed for about 10 to 15 seconds until you enter recovery mode.
Vivo phones also use Volume Up and Power held simultaneously until the recovery menu appears.
OnePlus phones use Volume Down and Power together, similar to Motorola.
Here’s a quick reference table for the most common brands:
| Phone Brand | Button Combination | Special Notes |
|---|---|---|
| Samsung (newer models) | Volume Down + Power (to power off), then Volume Up + Power | Two phase technique required |
| Samsung Note 8 | Volume Up + Power + Bixby | Three buttons at once |
| Motorola | Volume Down + Power | Select Recovery from boot menu |
| LG | Volume Down + Power, release and re-press | Quick release technique |
| Nokia | Volume Up + Power | Standard method |
| Oppo | Volume Down + Power | Standard method |
| Vivo | Volume Up + Power | Standard method |
| OnePlus | Volume Down + Power | Standard method |
| Google Pixel | Volume Down + Power | Standard method |
If your brand isn’t listed here, start with Volume Up and Power as your first attempt, since that’s the most common Android standard. If that doesn’t work after 15 seconds, try Volume Down and Power instead.
If the Button Combination Isn’t Working
I know how frustrating this gets when you hold the buttons and nothing happens. Let me give you the troubleshooting steps that solve this problem almost every time.
First, make absolutely sure your phone is completely powered off before you try the button combination. A phone that’s just sitting at a locked screen is not the same as a phone that’s fully shut down. Hold your Power button for at least 10 seconds, or use the Power and Volume Down combination to force a shutdown, then wait a full 30 seconds before attempting to boot into recovery mode.
Second, you might be releasing the buttons too early. Keep holding both buttons pressed down firmly for at least 10 to 15 seconds even after you see the first logo appear. Most phones show their brand logo first and then take a few extra seconds to actually enter recovery mode. If you let go as soon as you see the logo, the phone will just boot normally.
Third, try the alternative volume button combination. Some phone models use Volume Down instead of Volume Up even within the same brand family. If Volume Up and Power didn’t work, power off again and try Volume Down and Power. I’ve seen plenty of phones that officially should use one volume button combination but actually respond to the other.
Fourth, make sure your battery has at least a little charge left. If your battery is completely dead, the phone won’t have enough power to boot into recovery mode even if you press the right buttons. Plug your phone into a charger, wait about 10 minutes, and then try the button combination again while the phone is still connected to the charger.
If you get an error message during the Android recovery menu process, don’t panic. Simply release all the buttons, let your phone reboot normally back to the lock screen, power it off again, and start the process over. Sometimes the Android recovery menu just needs a second attempt to properly load the factory reset option.
Check the brand-specific button combinations in the table above one more time to make absolutely certain you’re using the right sequence for your exact phone model. The Samsung two-phase technique especially trips people up because it’s so different from every other brand.
Hard Reset vs Factory Reset: These Are Not the Same Thing
A hard reset and a factory reset are two completely different actions, and I need to clear up this confusion right away because many people search for how to hard reset Android phone when locked, thinking it will bypass the android lock screen without losing data. Unfortunately, that’s not how a hard reset works.
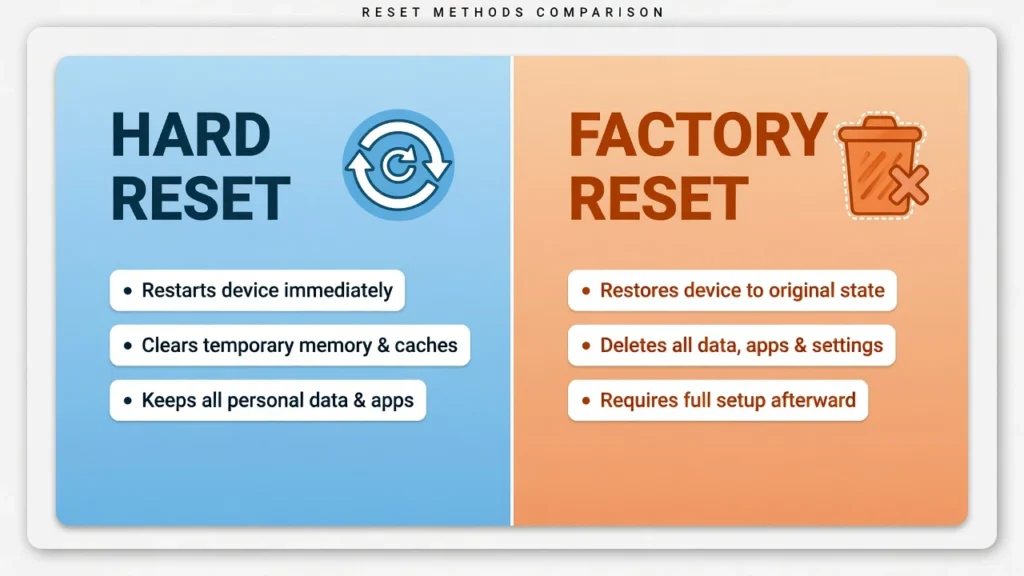
A hard reset is simply a forced restart of your phone. You perform a hard reset by holding Volume Down and Power together for about 10 seconds until the phone reboots. This power button reset process doesn’t erase anything and doesn’t bypass any locks. All a hard reset does is force the phone to turn off and restart, which can fix frozen screens, unresponsive apps, or a phone that won’t respond to normal button presses.
A factory reset, on the other hand, completely erases your phone and returns it to the state it was in when you first took it out of the box. Factory reset removes the lock screen, deletes all your data, and requires you to set up the phone from scratch. The two processes have completely different purposes and completely different results.
If your phone is frozen or acting glitchy but you can still unlock it normally, a hard reset might solve the problem without losing any data. But if you’re locked out and need to get past the android lock screen, a hard reset won’t help you at all. You’ll need to do a full factory reset using recovery mode like I explained in the section above.
Here’s a quick comparison so you know exactly which one you need:
Hard reset: Forced restart using the volume button combination and power button. No data loss. Does not remove the lock screen. Fixes freezing and performance issues.
Factory reset: Full data wipe through recovery mode. Erases everything. Removes the lock screen completely. Used when you’re locked out or want to completely clear the phone.
I’ve seen people waste time trying to hard reset their locked phones over and over, thinking it will eventually unlock the device. It won’t. The hard reset just keeps restarting the phone to the same lock screen every time. If you’re truly locked out, you need the factory reset process.
One last thing I want to mention is that performing a hard reset every few weeks can actually help keep your Android phone running smoothly. Restarting your phone clears temporary files and refreshes the system, which can prevent slowdowns and app crashes. I do this on my own phone regularly as part of basic maintenance, and I’ve noticed it helps performance stay consistent over time.
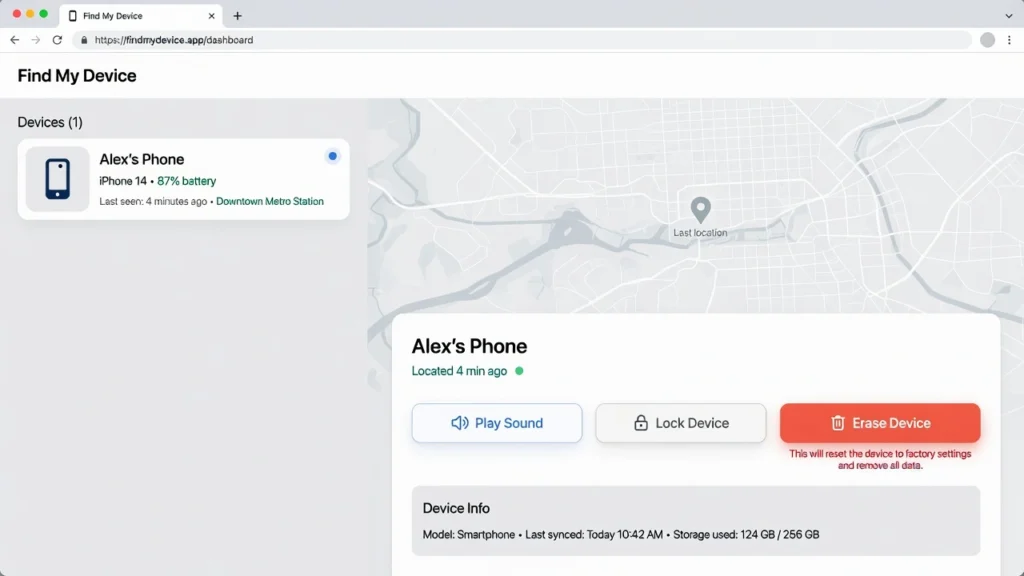
Resetting Your Locked Android Remotely with Google Find My Device
Google Find My Device is a remote erase tool that lets you reset your locked Android phone from any computer or another device without ever touching the phone itself. I like this method because it works even if you can’t physically access your phone’s buttons or if you’re far away from the device.
The catch is that Google Find My Device only works if certain conditions were met before your phone got locked. Your Google account needs to have been signed in on the phone, the device needs to be connected to the internet right now, and Find My Device needs to have been enabled in your phone’s settings.
The good news is that Find My Device is turned on by default for most Android 5.0 and newer devices, so there’s a decent chance it will work for you. Here’s how to use Google Find My Device to erase your Android phone remotely
Step 1: Go to Google Find My Device on a computer
Open any web browser on your computer or tablet and navigate to Google’s Find My Device portal (typically accessible through google.com/android/find or by searching “Find My Device”). You don’t need to be on the same network as your locked phone.
Step 2: Sign in with your Google account
Log in with the same Google account android that was linked to your locked phone. If you have multiple Google accounts, make sure you use the correct one. If you don’t remember which account was on your phone, this method won’t work.
Step 3: Select your device from the list
Once you sign in, Google will show you all the Android devices linked to that account. Find your locked phone in the list and click on it. The page will show the last location where the phone was detected and its current status.
Step 4: Choose “Erase” or “Erase this device”
On the right side of the screen, you’ll see options including “Erase.” Click this button and confirm that you want to erase the device. Google will ask for confirmation because this action is permanent. After you confirm, Google sends a command to your phone to factory reset it remotely.
Step 5: Wait for the erase to complete
If your phone is online and connected to the internet, the remote erase should start right away. You might see a message saying “Erasing in progress” or “Pending.” The actual wipe can take a few minutes depending on how much data is on the phone. The phone will restart after the erase completes and you’ll be taken to the initial setup screen just like when you first turned on the device
When Find My Device Won’t Work (And What to Do Instead)
I need to be honest with you. Google Find My Device doesn’t always work, and it’s important to know why before you get frustrated.
Reason 1: Your phone is offline or not connected to the internet
If your locked phone isn’t connected to WiFi or mobile data, Google Find My Device can’t send the erase command to it. The phone has to be online for this method to work. If your phone was powered off or the battery died before you could set it up, this won’t help.
What to do instead: Use the recovery mode factory reset method from Section 2 above, or try Samsung Find My Mobile if you have a Samsung phone.
Reason 2: Your Google account wasn’t signed in on the phone
If you never set up a Google account on this phone or you removed it before it got locked, Find My Device won’t be able to locate or control the device. The Google account android needs to have been actively used on the phone.
What to do instead: You’ll need to use recovery mode to factory reset the phone physically.
Reason 3: Find My Device was disabled in settings
Some people disable Find My Device in their phone’s security settings because they think it’s unnecessary. If it was turned off on your phone, Google won’t be able to send commands to it.
What to do instead: Recovery mode is your next best option.
Reason 4: You forgot your Google account password
Even if Find My Device can locate your phone, you need to sign into the Google account to use it. If you don’t remember the password and can’t reset it, you can’t access Find My Device.
What to do instead: Try to reset your Google account password through Google’s account recovery page. Once you regain access to your account, you can use Find My Device. If that doesn’t work, use recovery mode instead.
If you’re having trouble recovering your Google account, Google has a dedicated support page that walks you through the account recovery process step by step. You can visit Google’s official account recovery help page to answer security questions, verify your identity through a recovery email, or confirm through a recovery phone number.
This page has the most up to date recovery options and is maintained directly by Google, so you know you’re getting accurate information. The recovery process usually takes 15 to 30 minutes depending on which verification method you use.
Samsung Find My Mobile: A Backup Option for Samsung Users
Here’s something I don’t see mentioned anywhere else. If you have a Samsung Galaxy phone, you have a second remote erase option that’s completely separate from Google Find My Device. Samsung’s own service is called Samsung Find My Mobile, and it works even when Google Find My Device doesn’t.
Go to smartthingsfind.samsung.com and sign in with your Samsung account instead of your Google account. If you set up Find My Mobile when you first got your Samsung phone, the service will locate your device and let you erase it remotely just like Google’s tool does.
The advantage is that Samsung Find My Mobile sometimes works when Google Find My Device fails because they use different infrastructure and different account requirements. If you have a Samsung Galaxy phone and Google’s method didn’t work, this is absolutely worth trying as a backup before you resort to recovery mode.
How to Reset Android Phone When Locked Using a Computer (ADB Method)
If you have a computer nearby, there’s a technical method you can use to reset your locked Android phone without touching the device at all. The method uses something called Android Debug Bridge, which is Google’s developer tool for communicating with Android devices from a computer.
I’ll be honest with you right away: this is the most technical approach I’m covering in this article. It requires command line knowledge and a bit of patience.
Most people will have better luck with the recovery mode method from Section 2. But if you’re comfortable with computers and command lines, the ADB method is powerful and effective.
The big catch with ADB is that USB debugging has to have been enabled on your phone before it got locked. USB debugging is a developer setting that most people never turn on. If you never enabled it, this method won’t work for you and you should skip straight to recovery mode instead.
Before You Try ADB: The One Thing You Need to Check
Let me save you time right now. USB debugging must have been turned on in your phone’s Developer Options before the lockout happened. If you never went into Settings, tapped About Phone, and enabled Developer Options, then USB debugging was never active on your phone.
Here’s why this matters. When you connect your locked phone to a computer, the computer tries to communicate with the phone using ADB commands android.
That communication only works if USB debugging was previously enabled. Without it, your computer won’t be able to send any commands to the device at all.
If you’re not sure whether USB debugging was on, there’s only one way to find out. Try the steps below and see if your computer recognizes the phone when you plug it in. If the phone doesn’t show up in the list of connected devices, USB debugging wasn’t enabled and you should move on to recovery mode instead.
Don’t waste an hour trying this method if USB debugging is disabled. The recovery mode method from Section 2 will work regardless of what settings were enabled, so jump back there if ADB doesn’t recognize your device.
How to Use ADB to Reset Your Locked Android Phone
I’m going to walk you through this assuming you already know your way around a computer command line. If you’re not comfortable with command prompts, this section might feel overwhelming. That’s okay. The recovery mode method is just as effective and much simpler.
Step 1: Download and install Android SDK Platform Tools
Go to developer.android.com/tools/releases/platform-tools and download the Platform Tools package for your operating system (Windows, Mac, or Linux). Extract the folder to an easy to find location on your computer like your Desktop or Documents folder.
Step 2: Connect your locked phone to the computer with a USB cable
Plug your Android phone into the computer using a USB data cable. A notification might appear on the phone asking about the connection. If you see a prompt asking whether to allow USB debugging, tap Allow or Yes. If no prompt appears, USB debugging might not have been enabled.
Step 3: Open command prompt in the Platform Tools folder
On Windows, hold Shift and right click inside the Platform Tools folder, then select Open command window here or Open PowerShell window here. On Mac or Linux, open Terminal and navigate to the Platform Tools folder using the cd command.
Step 4: Check if your phone is recognized
Type the command adb devices and press Enter. Your phone should appear in the list if the connection is working and USB debugging is enabled. If nothing shows up, ADB can’t communicate with your phone and this method won’t work.
Step 5: Run the factory reset command
If your phone appears in the devices list, type this command and press Enter:
adb shell am start -n com.android.settings/com.android.settings.MasterClear
This tells the Android Debug Bridge to open the factory reset menu on your phone. After you run this command, the phone should show a factory reset confirmation screen. Select Erase Everything and confirm.
Step 6: Wait for the reset to complete
The phone will begin the factory reset process and restart. Once it’s finished, you’ll be at the setup screen.
The Android Debug Bridge method is powerful because it bypasses the lock screen completely at the system level. But honestly, unless you already know how to use a command line, the recovery mode method is faster and less frustrating.
Those “Secret Code” Unlock Methods Online: Do They Actually Work?
You’ve probably seen YouTube videos claiming that typing certain codes into your emergency dialer can unlock any Android phone instantly. These videos get millions of views and promise a quick screen lock bypass without any hassle.
I need to be completely honest with you: these secret codes almost never work on modern Android phones and I don’t want you wasting an hour trying them when you could be resetting your phone using methods that actually succeed.
These emergency dialer codes circulate constantly online, and I understand why they’re so tempting. The videos show someone typing in a mysterious code, and suddenly the phone unlocks or reboots. It looks magical. But here’s the reality.
These codes are specific to certain firmware versions, older Android operating system builds, or devices that have developer modes enabled. On most modern Android phones manufactured in the last few years, typing these codes does absolutely nothing. At best, the phone might just reboot. At worst, you waste 30 minutes trying different combinations while your locked phone sits there unchanged.
The reason these codes worked on older phones is that Android used to have more backdoors for developers and manufacturers.
But Google has closed almost all of those security holes in newer versions of Android. Phone manufacturers have also locked down their systems. What worked on an Android phone from 2015 simply doesn’t work on a 2024 model.
I’m telling you this because I’ve seen people try these secret codes for hours before finally giving up and trying the legitimate reset methods that actually work.
I don’t want that to be your experience. If you search for “reset phone without password” you’ll find dozens of YouTube videos promoting these codes, and I get why they’re appealing. But they’re not reliable, and reliability is what you need right now.
The methods I’ve covered in this article recovery mode, Google Find My Device, and ADB—are the techniques that work consistently across all modern Android devices. These are the methods that don’t depend on your phone’s firmware version or your device model.
They work because they operate at the system level, not through some clever workaround that Google has already patched.
If you spent time trying the emergency dialer codes and they didn’t work, don’t worry. That’s the normal experience. Jump back to Section 2 and use the recovery mode method instead. The android lock screen will come off, and you’ll have your phone back to factory settings within 20 minutes.
Is There Any Way to Reset a Locked Android Without Losing Data?
I understand why you’re asking this question. You’re hoping there’s a magic solution that will unlock your phone and keep all your photos, messages, and apps completely safe. The honest answer is that for most modern Android phones with a true lock screen, no data-safe bypass exists. But before you feel completely defeated, let me explain what you can actually save and what your real options are.
When you’re locked out of an Android phone with a PIN, pattern, or password, there’s no legitimate way to bypass that screen lock without losing the data stored in your internal storage android. The lock is there for security, and Android protects it fiercely. Any method that claims to unlock your phone without a reset is either fake or exploits a security hole that Google has already patched on newer devices.
Here’s the good news though. A factory reset doesn’t actually erase everything permanently. Anything you had backed up to your Google account survives the reset completely. Your Gmail messages, Google Contacts, calendar events,
Drive files and purchased apps from the Play Store all come straight back when you sign in after the reset. If you had Google Photos backing up your pictures, those photos are waiting safely in the cloud.
The data that gets erased during a factory reset is only what was stored locally on your internal storage android and never synced to Google.
That includes locally saved photos that weren’t backed up, downloaded music files, text messages, and app data from apps that don’t sync to the cloud. It feels like a total loss, but it’s actually much smaller than most people think.
So while you can’t reset your phone without losing some data, you’re probably losing far less than you fear. The most important stuff survives.
Safe Mode: When It Helps and When It Doesn’t
There’s one scenario where you might be able to unlock android phone without a full factory reset. If your lock screen is being controlled by a third-party app instead of Android’s built-in lock, Safe Mode might bypass it completely.
Safe Mode disables all third-party apps on your phone while keeping the core Android system running. If someone installed a third-party lock screen app and that’s what’s locking you out, android safe mode will bypass it and let you access your phone normally. Your data stays completely intact because you’re not erasing anything.
Here’s how to boot into android safe mode: Power off your phone completely. Once it’s off, press and hold the Power button. When you see the startup log, hold down the Volume Down button and keep holding it until the phone finishes booting. You should see “Safe Mode” displayed at the bottom of the lock screen when it starts up.
If android safe mode works and your phone unlocks, congratulations. Your data is safe. You can then go into Settings, uninstall the problematic third-party lock app, and reboot normally.
But I need to be clear about the limitation. Android safe mode does not bypass Android’s built-in PIN, pattern, or password lock.
If your phone is locked with the standard Android lock screen that came with the operating system, Safe Mode won’t help you. You’ll still need to do a factory reset using recovery mode.
The reason I mention android safe mode at all is because it works for a real but small subset of people. If your phone was locked by a third party app instead of the native lock screen, this method saves you from losing data entirely. It’s worth trying before you commit to a full factory reset.
If android safe mode doesn’t work or you don’t see a difference, you know the lock is coming from Android itself and you’ll need to proceed with one of the factory reset methods from earlier in this article.
The FRP Trap: What Happens After You Reset (And How to Get Past It)
Here’s something almost no article warns you about. After you successfully factory reset your locked Android phone, you’re going to face a second lock screen. This is called Factory Reset Protection, and it’s a security feature Google built into Android to prevent thieves from stealing your phone and erasing it to resell it.
Factory Reset Protection requires you to sign back in with the Google account that was previously linked to your phone. If you remember that account and password, you’re fine.
The setup takes 30 seconds and you’re done. But if you don’t remember the account details, your phone becomes locked in a completely different way. You’ll be staring at a screen asking for Google account verification and unable to proceed.
I’m mentioning this upfront because I don’t want you to be shocked when it happens. You’ll reset your phone successfully, it will restart and then immediately ask for your previous Google account password. This is normal. This is by design. And there are solutions depending on whether you remember your account or not.

Scenario 1: You Remember Your Google Account and Password
If you know the email address and password for the Google account that was on your phone, this is straightforward. When your phone boots up after the reset, you’ll see a screen that says “This device was reset. To continue, sign in with a Google Account that was previously synced on this device.”
Enter the email address of your Google account android and tap Next. Then enter your password when prompted. If you have two-factor authentication enabled on that account, you’ll need to verify it through your phone number or a recovery code.
Once you complete the verification and Google account verification process, the phone unlocks completely and takes you to the home screen.
From there, your phone will start restoring all your backed up data. Your Gmail messages, Google Contacts, calendar events, Google Drive files, and purchased apps will all sync back automatically over the next few minutes
This is the ideal scenario and it happens smoothly for most people.
Scenario 2: You Don’t Remember Your Google Account or Password
This is trickier but not hopeless. If you forgot the Google account password or you’re not even sure which account was on the phone, you have several options.
Option 1: Use “Use my Google account instead”
On the FRP lock screen, look for an option that says “Can’t access your account?” or “Use my Google account instead.”
Tap this option and the phone will let you sign in with a different Google account. Once you sign in with any active Google account, the phone will complete the setup. You won’t have access to your old backed up data, but the phone will be usable again.
Option 2: Recover your Google account through Google’s account recovery page
Go to accounts.google.com/signin/recovery on a computer. Follow Google’s steps to recover access to your account. You’ll need to verify your identity by answering security questions, providing a recovery email, or confirming through a recovery phone number. Once you regain access to your account, you can sign back into your phone with the recovered password.
One thing many people don’t realize after resetting their phone is that hidden apps might reappear when your Google Play Store account restores. If you had apps installed that you forgot about or apps you never use, they’ll come back during the restoration process.
I recommend reading my guide on how to find hidden apps on Android so you know how to identify and remove any unwanted apps that restore after your reset. This saves you storage space and keeps your phone clean going forward.
Option 3: Contact Google Support
If account recovery doesn’t work, you can reach out to Google directly. This takes longer but sometimes Google can help you regain access to an account you’ve lost touch with. It usually requires providing proof of ownership or identity.
Option 4: Factory Reset Protection removal tools (last resort)
If you’ve tried everything above and still can’t access your Google account, there are third party software tools that can remove the FRP lock. These tools work on Samsung, Xiaomi, Vivo, Oppo and most major Android brands. Wondershare’s Dr.Fone is one example that supports over 2,000 different Android models.
I’m mentioning this option because it exists and it works for people in genuine emergency situations. However, these tools cost money and they’re not something I recommend unless you’ve exhausted all other options. Use legitimate account recovery first.
If that truly fails, then consider a professional tool as a last resort.
The key point is this: Factory Reset Protection is a security feature that exists on your phone. It’s not a bug or a trap that competitors set up.
It’s protection that Google built in to keep your device safe. So while it’s frustrating when you don’t remember your account, understand that it’s there for good reasons. And in most cases, you can get past it with your account password or through account recovery.
Getting Your Data Back After a Factory Reset
Once your phone finishes the factory reset and you sign back in with your Google account android, the restoration process starts automatically. This is where you get most of your digital life back, and it happens faster than you might expect.
When you first boot up your reset phone and sign into your Google account android, the system immediately starts syncing your backed up information.
Your Gmail messages reappear in your email app. Your Google Contacts populate your contact list.
Calendar events sync back. Chrome bookmarks return. All your purchased apps from the Play Store become available for download again.
This Android backup and restore process powered by cloud backup technology, typically takes between five and fifteen minutes depending on how much data you have and your internet speed.
Google photos is another major recovery point. If you had Google Photos set to automatically back up your pictures and videos, all those images sync back to your phone as soon as you sign in. You’ll see them reappear in your Photos app over the next few minutes.
Google Drive files restore immediately as well. Any documents, spreadsheets, or files you stored in Drive are still there and accessible through the Drive app.
Nothing gets deleted from your cloud backup storage just because you factory reset your phone
What Gets Restored and What Doesn’t
I want to be honest about what survives and what doesn’t so you’re not disappointed later.
What comes back automatically:
Your Gmail inbox and all email messages. Google Contacts and your entire contact list. Calendar events and reminders. Chrome browser bookmarks and browsing history. Purchased apps and games from the Play Store. Google Drive files and documents.
Google Photos if you had backup enabled. Wi-Fi passwords that were synced to your Google account. Your app settings and preferences for apps that support Google backup.
What does NOT come back:
Locally saved photos that were never backed up to Google Photos. Downloaded music and video files stored on your phone. Text messages saved only on your device unless you use Google Messages with backup enabled.
App data from apps that don’t support cloud syncing. Notes or voice memos saved locally. Any files or documents stored in your phone’s internal storage that weren’t uploaded to Drive. Passwords for websites and apps that you didn’t save to your Google password manager.
The difference between what restores and what doesn’t comes down to one thing: was it backed up to Google’s cloud services? If yes, it comes back. If it only lived on your phone’s internal storage, it’s gone.
The Restore From Backup Prompt
During the initial setup after your reset, you might see a prompt that asks if you want to restore from a backup. This screen appears because Google detected that you have a backup of your phone settings from before.
Tap Yes or Restore to bring back your system preferences like brightness, notification settings, accessibility options, and other customizations you had configured.
This step is optional but I recommend doing it because it speeds up getting your phone back to how you had it set up before. It saves you from having to reconfigure everything manually.
After you complete the setup and restoration, give your phone 15 to 20 minutes to fully sync everything in the background. Apps will download. Photos will load.
Your email will populate. By the time the sync finishes, your phone feels almost like it did before the reset, minus the locally stored files that didn’t have cloud backups.
How to Make Sure This Never Happens Again
Now that you’ve gone through the stress of resetting your locked phone, I want to help you avoid this situation in the future. The good news is that preventing lockouts is much simpler than fixing them. A few smart setup choices now can save you hours of frustration later.
The first thing I recommend is enabling Smart Lock on your Android phone. Smart Lock is a feature that lets you bypass your PIN or pattern in specific trusted situations.
You can set up trusted places like your home where the phone automatically unlocks when you’re connected to your home WiFi network. You can also add trusted devices like your smartwatch or car, so the phone stays unlocked when it detects these devices nearby.
This smart lock android feature gives you convenient access without sacrificing security because the phone still requires the PIN if you’re away from these trusted locations.
Beyond smart lock android, keep a backup PIN or pattern alongside your biometric unlock. If you only use fingerprint or face recognition and those fail for any reason, you’ll need a backup way to get into your phone.
That backup should be something you write down and remember. Don’t rely on your memory alone because you might forget it under stress.
Make absolutely sure that cloud backup is turned on and stays active. Go into your Settings, find Backup and account, and confirm that Google backup is enabled.
This ensures your Gmail, Contacts, Calendar, Google Drive files and app data are continuously backed up to the cloud. If you ever need to factory reset, your most important data survives.
Finally, write down your Google account email and password somewhere safe outside your phone. Keep it in a notebook, a password manager or tell a trusted family member.
If you ever get locked out, you’ll need this information to sign in after a reset. Without it, you’ll face the Factory Reset Protection issue I explained in Section 8.
These four steps take maybe 15 minutes to set up, and they transform your phone from vulnerable to protected. I do all of these on my own phone, and I sleep better knowing that even in a worst-case scenario, I can recover quickly
Can I reset my Android phone without knowing the PIN or password?
Yes, recovery mode factory reset works without any PIN knowledge on virtually all Android phones. Google Find My Device is also an option if a Google account was linked to your phone.
Will a factory reset remove the lock screen on my Android phone?
Yes, factory reset wipes all lock screen credentials completely. However, you’ll face Factory Reset Protection after the reset, which requires your previous Google account password to proceed.
Why won’t my Android phone enter recovery mode when I hold the buttons?
Button combinations vary by brand, and Samsung requires a two-phase sequence. Some models use Volume Down instead of Volume Up. Release all buttons and retry, or check the brand-specific table in Section 2 for your exact device.
What is FRP lock and what do I do if my phone asks for a Google account after resetting?
FRP is Factory Reset Protection, Android’s security feature requiring the previously linked Google account after a reset. If you know your credentials, sign in during setup, or use Google’s account recovery page if you forgot the password.
Can I factory reset my Android phone when locked without a computer?
Yes, recovery mode requires no computer at all. Hold the button combination, navigate with Volume buttons, select Wipe data/factory reset, and confirm. Google Find My Device also works from any browser.


