
What Do Horizontal Lines on Your Lenovo Screen Actually Mean?
If you’re seeing horizontal lines across your Lenovo laptop screen right now, I know how frustrating that is. I’ve dealt with this exact problem on multiple Lenovo laptops and I can tell you that those lines are trying to tell you something specific about what’s going wrong.
Horizontal lines on a Lenovo laptop screen typically indicate either a software conflict with your display driver or a physical hardware failure in your screen’s cable or LCD panel. Screen flickering horizontal lines paired with other symptoms help narrow down the exact cause.
The good news is that you can figure out which one it is in just a few minutes and that diagnosis will save you hours of trying fixes that won’t work for your specific situation
Let me explain what those lines actually look like and what they mean. Some people see thin dark lines that flicker or come and go when they move their laptop lid. Others see thick colored bars that stay in one spot, usually at the bottom or middle of the screen.
Some report blurry lines on laptop screen appearing alongside the straight lines. I’ve even seen cases where the lines start small and then gradually spread, leaking pixels like ink bleeding through paper.
That last symptom is what one user on Reddit described perfectly when they said their Lenovo screen had lines that “gradually leak pixels
When I look at a screen covered with dense white horizontal lines that make it almost impossible to see anything underneath,
I immediately know that’s severe hardware failure. Laptop LCD panel damage at this level means the physical panel itself is broken, and no amount of driver updates or settings changes will fix it.
I saw this exact pattern on a Lenovo ThinkPad X240 that came into a repair shop and the diagnosis was clear: either the display cable was broken or the screen was physically damaged
On the other hand, if you’re seeing lines that appear mostly when you’re using Windows, but they disappear when you enter your laptop’s BIOS screen or Safe Mode,
that’s usually a software or driver conflict. Your LCD hardware is fine, but BIOS settings laptop screen behavior tells you the hardware works correctly and something in Windows is sending the wrong signals to your display
Location matters too. If you’re seeing horizontal lines specifically at the bottom and middle portions of your screen and you own a Lenovo LOQ laptop from late 2023 or early 2024, you’re dealing with a known manufacturing defect.
The internal gate drivers inside the LCD panel fail on certain LOQ batches, and this creates those characteristic horizontal bars.
Lenovo has been covering this under warranty in many cases, often preventing laptop screen replacement cost of hundreds of dollars, so don’t start troubleshooting until you check your warranty status first.
Lenovo has been covering this under warranty in many cases, so don’t start troubleshooting until you check your warranty status first.
The color of the lines also gives clues. Black or dark gray lines usually mean your display cable is loose or damaged from the repeated opening and closing of your laptop lid. White lines that cover the entire screen point to total LCD panel failure.
If you see multicolored lines in red, green, and blue, that often indicates a graphics card driver conflict or GPU struggling to properly render the display.
And if you see multicolored lines, red, green, blue, that often means your graphics processing unit or GPU is struggling.
Here’s what I want you to understand before we go any further. This guide is going to help you identify which category your problem falls into within the next few minutes.
Once you know whether it’s software or hardware, you’ll know exactly which fixes to try and which ones to skip.
That way, you won’t waste time reinstalling drivers when your screen cable is loose and you won’t pay for an expensive repair when a simple Windows display settings fix or driver update would have resolved everything
The key difference between software and hardware screen problems comes down to one thing: consistency. Software issues tend to appear and disappear based on what you’re doing, which apps you’re running, or whether you’re in Windows or BIOS.
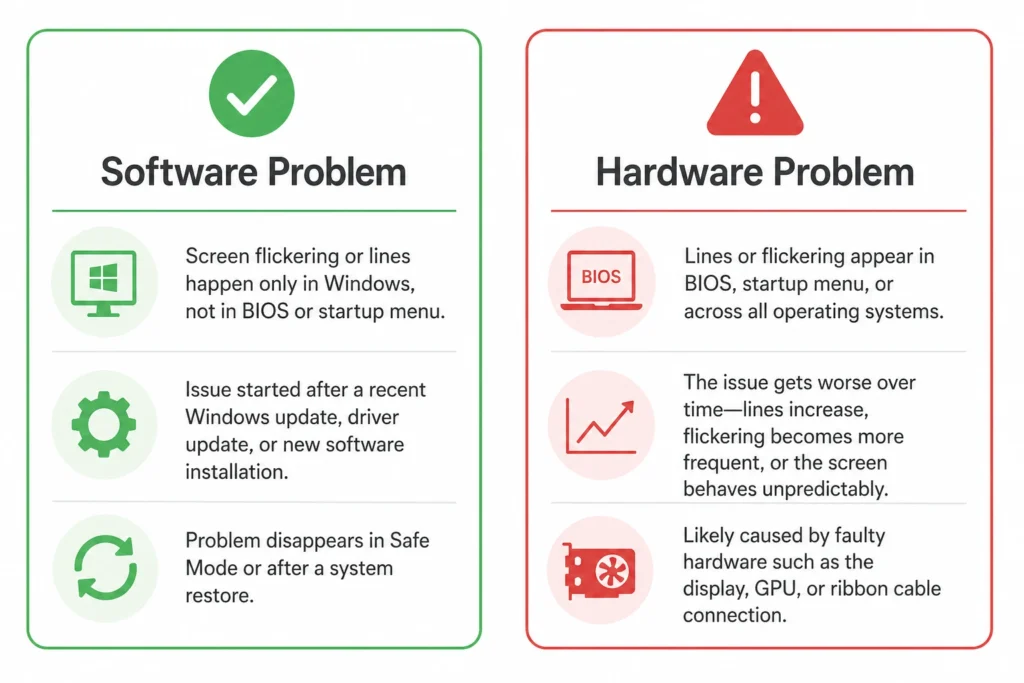
Hardware issues are almost always consistent. The lines stay there no matter what screen you’re looking at, and they often get worse over time instead of better.
I’ve learned from experience that pixel bleeding, where horizontal lines slowly spread and create ghost images or color distortion around them, is one of the clearest signs that your Lenovo laptop display problem is hardware based.
This pixel bleeding laptop screen symptom indicates progressive LCD panel damage. When the gate drivers inside the LCD panel start failing, the damage spreads row by row, which is why you see lines gradually expanding. No software fix will stop that progression.
When the gate drivers inside the LCD panel start failing, the damage spreads row by row, which is why you see lines gradually expanding. No software fix will stop that progression.
So take a close look at your screen right now. Are the lines flickering and changing, or are they static and permanent? Do they appear on the BIOS screen before Windows even loads, or do they only show up once you’re logged in?
Are they getting worse day by day, or do they come and go randomly? Your answers to these questions will point you in the right direction, and in the next section, I’ll show you a five-second test that definitively tells you whether you’re dealing with software or hardware
What Causes Horizontal Lines on a Lenovo Laptop Screen?
Horizontal lines on a Lenovo laptop screen can come from either software issues like corrupted drivers and incompatible apps, or from hardware problems like damaged display cables and failing LCD panels. Understanding which category your problem falls into is crucial because the fixes for one are completely different from the fixes for the other.
I’ve found that screen flickering horizontal lines with distinct parallel lines are more often a hardware warning sign than general all over laptop display flickering. When your display driver is acting up, you usually see the whole screen flicker or shimmer.
But when you see distinct horizontal lines, especially lines that stay in the same spot or gradually spread, that’s often your laptop telling you something physical is broken inside.
The reason this distinction matters is timing and consistency. Software problems tend to come and go. They might be worse on certain days, better after a restart, or triggered by specific applications. Hardware problems are relentless.
Those lines will be there when you turn on your laptop, there when you check email, and there when you shut it down. They don’t improve, and they usually get worse.
Let me break down what causes these lines and help you figure out which situation you’re in.
Software-Related Causes (Drivers, Apps, Settings)
Your display driver is the piece of software that tells your graphics card how to talk to your screen. When that driver is outdated, corrupted, or incompatible with your operating system,
your Lenovo laptop screen shows horizontal lines as a symptom of that miscommunication. Display driver update Windows solutions often resolve this symptom
I’ve noticed that generic Windows drivers are a particularly common culprit on Lenovo IdeaPad and Lenovo ThinkPad models.
Lenovo laptops have specific display configurations, and when Windows installs a generic driver that doesn’t account for those configurations, you get flickering lines. This is why using Lenovo’s official drivers matters so much, but I’ll get into that fix later.
This is why using Lenovo’s official drivers matters so much, but I’ll get into that fix later.
Incompatible applications running in the background can also trigger horizontal lines. I’m talking about third-party antivirus software, cloud storage utilities like iCloud, or old system maintenance programs that you installed years ago and forgot about.
These applications sometimes create a graphics card driver conflict, interfering with how your display driver works and creating visual glitches
Refresh rate settings laptop configuration plays a role too. If your laptop is trying to run your display at a refresh rate it doesn’t support smoothly, you’ll see lines or flickering as a result. The same goes for adaptive brightness Lenovo feature on your system. These features sometimes clash with your graphics driver and cause display problems
Recent Windows updates can also be the culprit. Sometimes Microsoft releases an update that changes how display drivers work, and if your specific graphics card driver hasn’t been updated to match, you get lines on your screen. This is usually temporary and fixes itself once Lenovo or your graphics card manufacturer releases a compatible driver update.
Hardware-Related Causes (Cable, Panel, GPU)
Hardware problems are where horizontal lines become more serious. A loose display cable laptop problem is more severe than software conflicts.
The display cable inside your Lenovo laptop, technically called an eDP cable or ribbon cable, runs from your motherboard to your LCD screen through the hinge area. Every time you open and close your laptop, that cable flexes slightly
Over time, especially if you’re rough with your lid or if the cable was routed poorly from the factory, that cable can get pinched, twisted, or damaged.
When the eDP cable is compromised, your display loses connection or gets corrupted signals, and you see horizontal lines as a result. I’ve seen cases where the cable was literally wedged underneath the corner of the cooling fan, getting pinched every time the fan spun up.
The LCD panel itself can fail too. This is the actual screen component that produces the image you see. Inside every LCD panel are millions of tiny gate drivers that control individual pixels. When these internal gate drivers start to fail, you see horizontal lines appear.
What starts as a few thin lines can gradually spread and leak pixels, creating colored ghosting and making the screen increasingly unusable.
I want to be specific about this because it matters. If you own a Lenovo LOQ laptop manufactured between late 2023 and early 2024, you’re dealing with a higher risk of LCD panel failure.
These specific LOQ batches have a known issue where internal gate drivers fail prematurely, causing black and colored horizontal lines to appear across the bottom and middle of the screen. This isn’t user error. This is a manufacturing defect that Lenovo has been fixing under warranty.
Your graphics processing unit (GPU) can occasionally be the cause as well, though this is less common than cable or panel issues.
If your GPU is starting to fail, it sends corrupted data to your display, which can show up as horizontal lines. In this case, the external monitor test laptop method would show lines on external monitors too if you connected one, confirming a GPU problem rather than a panel failure.
The progression of lines tells you something important. Lines that gradually leak pixels and spread over days or weeks indicate a failing LCD panel that’s getting worse.
This kind of progressive failure is hardware damage, and it won’t stop on its own. Lines that appear suddenly and then stop after a restart usually point to software issues that can be fixed with driver updates or by removing a problematic application.
When you see dense white horizontal lines covering most of your display and making it nearly impossible to see anything underneath, that’s severe hardware failure. At that point, no driver update or software fix will restore your screen.
You’re looking at physical damage that needs repair or replacement.
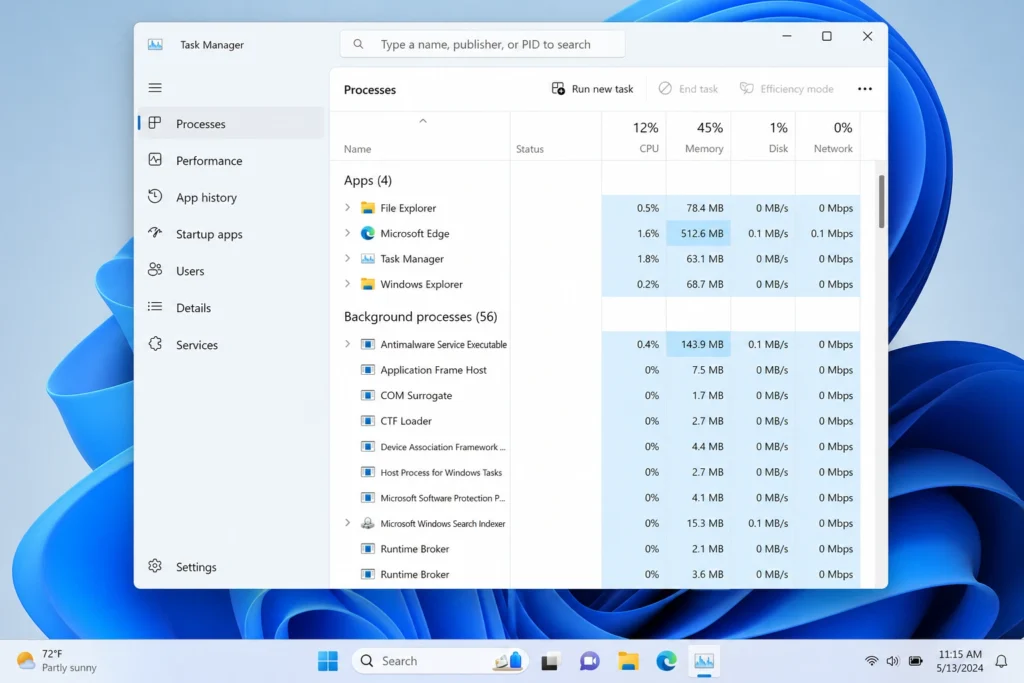
This is why testing matters so much. The Task Manager test I showed you earlier tells you whether the core display system is broken or whether something running on top of it is causing problems. That answer guides everything you try next and saves you from wasting time on the wrong type of fix.
Try This 5-Second Fix Before Anything Else
There’s a keyboard shortcut that most people have never heard of, but it solves screen flickering problems more often than you’d expect. I’m talking about pressing Windows + Ctrl + Shift + B, and it takes literally five seconds to try.
This shortcut restarts your graphics driver without restarting your entire laptop. Think of it like giving your display driver a quick reset. Your driver is the software that tells your graphics card how to communicate with your screen.
Sometimes that driver gets stuck or confused, and when it does, you see those horizontal lines flickering across your display. This shortcut forces the driver to refresh and start fresh.
Here’s what happens when you press the keys. Your screen will go black for about one or two seconds. You might hear a beep or see the screen flash.
Then your display comes back to life. If your horizontal lines were caused by a temporary driver glitch, they’ll be gone. If they were caused by something deeper, the lines will still be there when your screen comes back.
The reason I’m telling you to do this first is because it has zero risk. You’re not installing anything. You’re not changing any settings. You’re not uninstalling drivers or messing with your system. You’re just restarting a piece of software that’s already running.
If it doesn’t work, nothing bad happens. Your laptop goes right back to the same state it was in before you pressed those keys.
I’ve seen this shortcut fix screen flickering problems on Lenovo laptops more times than I can count. Sometimes the driver just needs that reset to work properly again. It’s quick, it’s safe, and it works often enough that it’s absolutely worth trying before you move on to anything more complicated.
Press Windows + Ctrl + Shift + B right now. Don’t worry about what’s on your screen. Just hold those keys down together for a second, then release them. Watch what happens.
Does your display return to normal? If yes, you’ve just solved your problem without doing anything else. If no, at least you know your issue isn’t a simple driver glitch, and you can move forward with more targeted fixes.
The screen flickering fix you’re looking for might literally be just one keyboard shortcut away.
Hardware or Software? Run These Two Tests to Know for Sure
You can figure out whether you’re dealing with a hardware problem or a software problem by running two simple hardware diagnostic tests on your Lenovo laptop. These tests take about ten minutes total, and they’ll give you a definitive answer that eliminates all the guesswork.
The reason these tests matter is because they isolate your components one at a time. If your horizontal lines appear in BIOS before Windows even loads, that tells you something completely different than if the lines only show up once you’re in Windows.
The same logic applies with the external monitor test laptop method. By testing your display in different environments, you narrow down exactly which piece of your system is failing
The same logic applies to external monitors. By testing your display in different environments, you narrow down exactly which piece of your system is failing.
Screen line problems are not unique to Lenovo. If someone in your household is dealing with a similar issue on a Dell laptop, the diagnostic approach is almost identical.
A single black line on a Dell screen can come from a loose display cable or a driver conflict, and the first step is the same 60-second hardware versus software test covered in this guide. We have a dedicated article that walks through black line on Dell laptop screen fixes in the same step-by-step format if you need it.
I’ve used these tests dozens of times, and they’ve never steered me wrong. Let me walk you through both of them.
Test #1: Check Your Screen in BIOS (Before Windows Loads)
BIOS is the firmware that runs before Windows loads. It’s the screen you see with the Lenovo logo and the boot options. If your horizontal lines appear in BIOS, that tells you the problem is with your hardware because BIOS settings laptop screen display doesn’t use your Windows display driver at all—it uses the motherboard firmware directly
Here’s how to do this test. Restart your Lenovo laptop completely. As soon as you see the Lenovo logo appear, start pressing F1, F2, or Delete repeatedly.
Different Lenovo models use different keys, but it’s usually one of those three. You’re trying to get into the BIOS setup menu. Keep pressing until you see the blue BIOS screen with all the settings options appear.
Once you’re in BIOS, look at the screen carefully. Do you see those horizontal lines here too? Are they in the same spots, or is the BIOS menu completely clear and readable?
If the horizontal lines are visible in BIOS, then your display problem shown in BIOS is hardware-based. Your display cable or LCD panel is physically failing, and software updates won’t fix it.
You can skip ahead to the section about when to replace your screen because no driver update or software trick will help. This is a hardware issue that requires physical repair
If the BIOS screen is completely clear and the lines are gone, then you know the problem is software related. Your hardware is fine. The issue is something in Windows or a driver conflict. Exit BIOS by pressing Escape or following the on-screen instructions to exit without saving changes. Then you know you can proceed with software fixes.
This test is incredibly valuable because it takes hardware failure completely off the table if your BIOS is clear. It’s the fastest way to know whether you should be looking at your display driver or looking at your physical components.

Test #2: Connect an External Monitor (HDMI Test)
This test requires a TV, monitor, or any other display with an HDMI port. If you don’t have one available, see if a friend or family member has one you can borrow for ten minutes.
Connect an HDMI cable from your Lenovo laptop to the external display. Your laptop might automatically show the same image on both screens, or you might need to press Windows + P to bring up the display options.
Choose either Extend or Duplicate mode so you can see both your laptop screen and the external screen at the same time.
Now look at the external monitor. Does it show the same horizontal lines that your Lenovo laptop screen is showing, or is the external monitor completely clear and normal?
If your external monitor is clear and shows no lines at all, then the problem is with your internal screen hardware. Either your laptop LCD panel is failing or the display cable connecting the screen to your motherboard is damaged.
Your GPU and graphics driver are working fine because the external monitor displays perfectly. This means you’re looking at an internal display component failure, and that requires screen replacement or cable repair.
If both your Lenovo laptop screen and the external monitor are showing the same horizontal lines at the same time, then the problem is likely your graphics processing unit (GPU). Your GPU is sending corrupted signals to any display connected to it. This is less common than a cable or panel failure, but it’s still a hardware issue that typically requires professional repair or motherboard replacement
This is less common than a cable or panel failure, but it’s still a hardware issue that typically requires professional repair or motherboard replacement.
If neither your laptop screen nor the external monitor shows any lines, and both are displaying normally, then you know the problem was temporary.
It might have been a driver glitch that the graphics reset shortcut already fixed, or it might be an issue that comes and goes. Try using your laptop normally for a few days and see if the lines return. If they don’t, you’ve solved your problem.
These two tests form a decision tree that leads you directly to the right solution. BIOS test plus external monitor test equals a complete hardware diagnosis.
Once you know whether you’re dealing with hardware or software, you know exactly where to focus your troubleshooting efforts and you won’t waste time trying fixes that won’t work for your specific situation.
If It’s a Driver Issue: Fix It in 3 Steps
If your tests showed this is a driver problem, you’re in good shape because driver issues are fixable. The key difference between fixing a Lenovo laptop and fixing other brands is knowing where to get the right driver.
I learned this the hard way after watching people reinstall the same broken driver over and over, wondering why the problem never went away.
The biggest mistake I see people make is downloading drivers from Windows Update. Windows Update gives you a generic driver that works for most laptops, but Lenovo laptops have specific display configurations that need Lenovo-validated drivers.
Display driver update Windows methods that use generic drivers often create what people call “ghost flickering” where the lines come back even though you thought you fixed the problem on a Lenovo IdeaPad or ThinkPad. I’m going to show you how to get the right driver and install it correctly
Step 1: Download the Lenovo-Validated Driver (Not Windows Update)
This is the most important step, and it’s where most people go wrong. Your Lenovo laptop needs a display driver specifically designed for your model, not a generic Windows driver. Lenovo tests their drivers on their specific hardware configurations.
Generic Windows drivers don’t account for those configurations, which is why they cause recurring flickering problems on IdeaPad and ThinkPad models
Generic Windows drivers don’t account for those configurations, which is why they cause recurring flickering problems on IdeaPad and ThinkPad models.
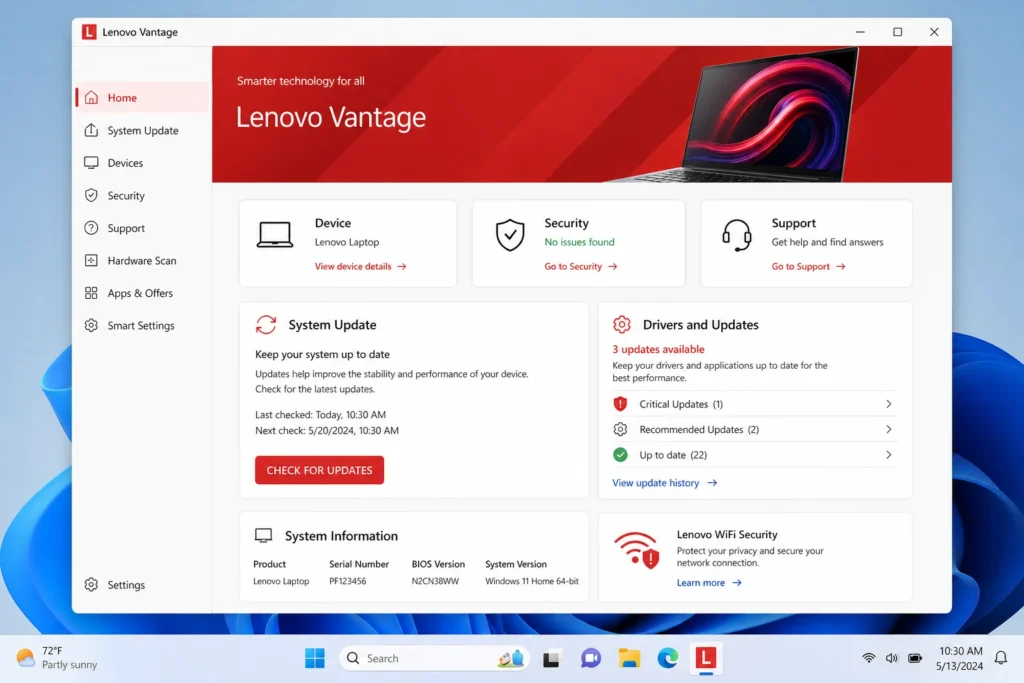
You have two ways to get the right driver. The easiest way is through Lenovo Vantage, which is an app that usually comes preinstalled on Lenovo laptops. Open Lenovo Vantage on your laptop. Look for a section called Drivers & Updates or System Updates.
Click into that section, and you should see your display driver listed there. Lenovo Vantage will show you if an update is available. Click Download or Update, and let it download the latest version of your graphics driver.
If you can’t find Lenovo Vantage or it’s not working, there’s a second way. Go to lenovo.com/support directly in your web browser.
You’ll need your laptop’s serial number, which you can find on a sticker on the bottom of your laptop or in System Information on your computer. Enter your serial number, and the website will show you all the drivers available for your specific model. Look for display driver, graphics driver, or video driver in the list. Download the latest version available for your operating system.
If you prefer to download the driver directly without using Lenovo Vantage, Lenovo maintains a dedicated support portal where you can search by your laptop’s serial number and download the exact validated display driver for your specific model.
This is the safest way to get the right driver because every file on the portal is tested and approved by Lenovo’s engineering team for your hardware. Visit Lenovo’s official driver support page to find your model and download the correct graphics driver before following the installation steps below.
Once you have the driver downloaded, run the installer file. It will guide you through the installation process. Your screen might flicker or go black during installation, which is completely normal. Let the installation finish completely.
You might be asked to restart your laptop, and you should do that. After the restart, your horizontal lines should be gone.
If this solves your problem, great. You’re done. If the lines are still there or if your screen is so badly flickered that you can’t navigate to download the driver, move to Step 2.
Step 2: Uninstall Your Current Driver in Safe Mode (For Severe Flickering)
Sometimes your current driver is so corrupted that installing a new one doesn’t fix the problem because the old driver interferes. In this case, you need to uninstall your current driver completely and let Windows reinstall a fresh one.
If your screen is flickering so badly that you can barely see, you’ll need to do this in Safe Mode, which loads Windows with minimal drivers and graphics.
The challenge is getting into Safe Mode when you can barely see your screen. There are two methods depending on how bad your flickering is.
If your screen is still somewhat usable and you can see the Windows Start menu, hold down the Shift key on your keyboard, then click the Power button in the bottom right corner of your screen
. A menu will appear with options. Click Restart. Your laptop will restart and take you to the Advanced Options screen with a blue background. Click on Troubleshoot,
then Advanced options, then Startup Settings. Click Restart. Your laptop will restart again, and you’ll see a list of numbers. Press the number 4 to select Safe Mode. Your laptop will boot into Safe Mode with a black background and fewer features.
If your screen is so badly flickered that you can’t see anything or click anything, use the forced shutdown method. Hold down your laptop’s power button until it completely shuts down. Wait a few seconds, then turn it back on.
As soon as you see the Lenovo logo, immediately hold down the power button again until the laptop shuts off. Repeat this two more times. On the fourth time you turn it on, instead of shutting it down, let it boot normally.
This repeated interruption should trigger the Advanced Options blue screen. Follow the same steps as above to get to Safe Mode.
Once you’re in Safe Mode, right-click on the Start button and open Device Manager. Look for Display adapters in the list and click the arrow to expand it. Right-click on your graphics driver or display adapter, usually something like Intel Graphics, NVIDIA, or AMD Radeon.
Select Uninstall device. A dialog will appear asking if you want to remove the driver software. Check the box that says Attempt to remove the driver for this device, then click Uninstall. This removes the corrupted driver completely.
Now restart your laptop normally. Windows will detect that your display adapter is missing and will automatically reinstall a basic driver. Your screen should work without the heavy flickering, though it might look a bit different or perform a little slower.
Once you’re back in normal Windows, you can install the Lenovo-validated driver from Step 1 to replace the basic driver with the proper one.
Step 3: Try an Older Driver Version or Basic Display Adapter
If you’ve installed the latest Lenovo driver and you’re still seeing horizontal lines, the issue might be a bug in the latest driver version. Some driver updates cause problems on certain laptop configurations. In this case, you can try an older version of the same driver or use a temporary fallback driver.
Right-click on the Start button and open Device Manager again. Expand Display adapters. Right-click on your graphics driver and select Update driver.
In the window that appears, click Browse my computer for drivers. Then click Let me pick from a list of available drivers on my computer. You’ll see a list of driver versions available. Try selecting an older version of your driver and click Next to install it.
If no older versions appear in that list, or if they don’t work either, select Microsoft Basic Display Adapter from the list.
This is a generic fallback driver that comes with Windows. It will make your display work smoothly, though you might notice reduced graphics performance or lower screen resolution.
The advantage of this method is that if the Basic Display Adapter works with no flickering, you know for certain that your problem is with the specific graphics driver, not with your hardware.
Use the Basic Display Adapter temporarily while you contact Lenovo support. Tell them you have horizontal lines that only appear with your graphics driver but disappear with the Basic Display Adapter. Provide them your laptop model and Windows version.
They can often provide an older stable driver version or help you troubleshoot further.
These three steps cover nearly every driver-related solution. If you’ve tried all three and the lines persist, then your problem is likely hardware-based, and you should move on to the hardware repair sections of this guide.
If It’s a Bad App: Find and Remove the Culprit
When your Task Manager test showed that Task Manager stays stable while everything else flickers, you have an incompatible application running in the background.
This is actually good news because removing an app is much easier than dealing with hardware failure. The trick is finding which app is causing the problem, because it’s often something you installed weeks ago and completely forgot about.
I’ve tracked down the culprit app in countless cases, and I can tell you that it’s almost always something you installed right before the flickering started.
The app might be running silently in the background, doing something that conflicts with how your display driver communicates with your screen. The good news is that finding it is straightforward if you know where to look.
Sort Your Apps by Install Date to Find the Troublemaker
The fastest way to identify the problem app is to look at what you installed recently. Open the Start menu and type Control Panel. Click on Control Panel to open it. Look for Programs or Programs and Features, depending on your Windows version. Click on that option.
You’ll see a list of every application installed on your Lenovo laptop. This list can be long, but there’s a trick to narrow it down. Look at the column headers at the top of the list. You should see columns for Name, Publisher, Installed On, and Size.
Click on the Installed On column header. This sorts your entire application list by installation date, with the most recently installed apps at the top.
Now look at what you installed in the days or weeks before your horizontal lines started appearing. Do you see anything suspicious? Look for apps you don’t remember installing or apps that shouldn’t affect your display. Common culprits include antivirus software, cloud storage apps, system utilities, or anything you downloaded to try out and forgot about.
Once you have a suspect, uninstall it. Right-click on the app and select Uninstall. Follow the prompts to remove it completely. Restart your laptop.
Check your screen. Did the flickering stop? If yes, you’ve found your culprit. If the lines are still there, go back to Control Panel and uninstall the next most recently installed app. Keep testing one app at a time until the flickering disappears.
Common Apps That Cause Lenovo Screen Flickering
Some applications are notorious for causing display conflicts on Lenovo laptops. If you see any of these installed on your system, they’re worth removing first.
Apple iCloud is one of the biggest offenders. The iCloud sync client sometimes conflicts with how Windows communicates with your display even though it has nothing to do with your screen. If you installed iCloud to sync photos from your iPhone or iPad, that could be your problem.
Third-party antivirus software causes display issues more often than you’d think. Norton, McAfee, Avast, and Kaspersky antivirus programs sometimes run background scanning processes that interfere with your graphics driver.
This is especially common if you installed the antivirus as part of a trial period. Uninstall it and use Windows Defender, which is built into Windows and doesn’t cause these conflicts.
Old Lenovo utility programs can also be problematic. If your laptop came with bloatware like Lenovo Vantage, Lenovo Settings, or other pre installed utilities from years ago, try uninstalling them.
Lenovo Vantage is actually useful for driver updates, but older versions sometimes cause display problems.
Gaming software and RGB lighting control programs are another category to watch. If you use software to control keyboard lighting, LED effects, or gaming settings, uninstall it and see if the flickering stops. These programs directly interact with your hardware at a deep level and can conflict with your display driver.
One more thing that catches people off guard: disable Windows Error Reporting Service if you haven’t already. This is a Windows background service that sometimes causes display glitches. Press the Windows key, type msconfig, and press Enter.
Go to the Services tab. Look for Windows Error Reporting Service in the list. Uncheck the box next to it. Click Apply, then OK. Restart your laptop. This won’t hurt anything, and it removes one more potential source of conflict.
Remove apps one at a time and restart between each removal so you can identify exactly which one is causing the problem. Once you find the troublemaker and uninstall it, your Lenovo laptop screen should return to normal.
If you removed multiple apps and the problem is still there, then you might actually be dealing with a driver issue or hardware problem, and you should go back to the previous sections of this guide to try those fixes instead.
Adjust These 3 Settings (Quick Wins)
Sometimes horizontal lines on your Lenovo laptop are caused by simple Windows display settings that got misconfigured or set to values your screen doesn’t like. These three settings are quick to check and even quicker to fix. I’ve solved flickering problems just by adjusting one of these without touching drivers or removing apps.
The reason these settings matter is that your display needs specific instructions to work properly. When those instructions are wrong or mismatched, your screen shows glitches.
The good news is that you can change these settings in about five minutes, and if one of them is the culprit, your problem disappears immediately
Set Your Refresh Rate to the Right Number
Your screen refresh rate is how many times per second your display redraws the image. Think of it like a flip book where each page is a new frame. If you set the wrong refresh rate, your display tries to refresh too fast or too slowly for your hardware, and you get flickering lines as a result.
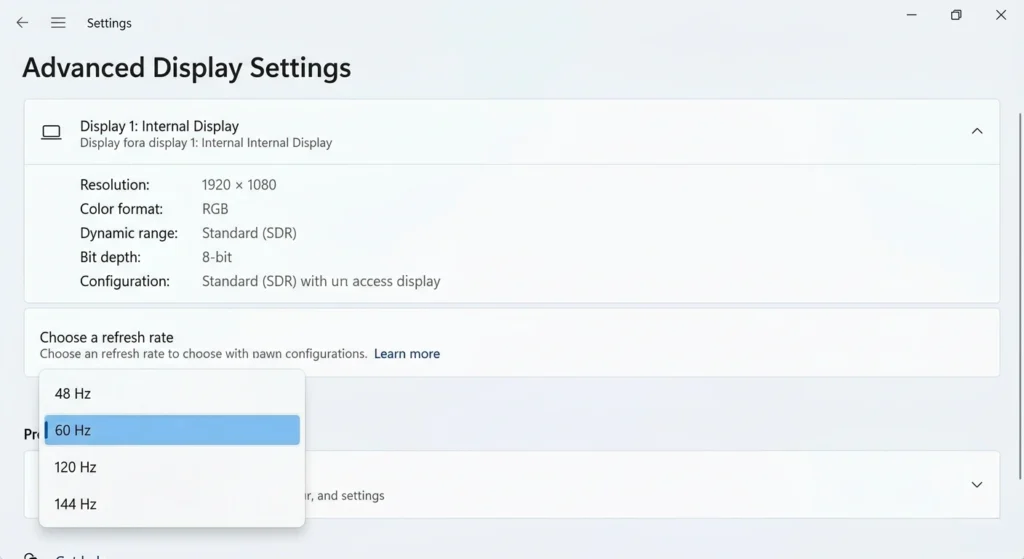
Open the Start menu and type Display settings. Click on Display settings to open it. In the Display settings window, scroll down and look for Advanced display settings. Click on that option.
You’ll see a list of displays connected to your Lenovo laptop. Click on the display you want to adjust (usually it’s labeled Display 1).
Look for a section called Refresh rate. Your current refresh rate is probably listed there. You want to set your refresh rate settings laptop configuration to either 60 Hertz or whatever your laptop screen’s native refresh rate is.
Most Lenovo laptop displays work best at 60Hz, though some gaming laptops like the LOQ models might have higher refresh rates like 120Hz or 144Hz. The important thing is to choose a stable value that’s designed for your specific screen, not a default or automatic setting
Click on the Refresh rate dropdown and select 60 Hertz. If your screen supports a higher native rate and you want to use it, select that instead. Click Apply, then OK.
Your screen might flicker or go black for a second as the change takes effect. If the horizontal lines disappear after this change, you’ve found your answer. If not, move to the next setting.
Turn Off Lenovo Adaptive Brightness
Lenovo laptops have a feature called adaptive brightness that automatically adjusts your screen brightness based on the lighting in your room. This is designed to save battery life and reduce eye strain, but on some Lenovo models, it causes flickering during the brightness transitions.
Open the Start menu and type Display settings again. In the Display settings window, look for a Brightness section near the top.
You should see an option that says Change brightness automatically or Automatically adjust brightness. Toggle this off.
If you’re using Windows 10, the path might be slightly different. Go to Settings, then System, then Display, and look for a brightness setting there. Look for anything that mentions automatic brightness adjustment or adaptive brightness. Turn it off.
The reason this helps is that adaptive brightness is constantly communicating with your display to adjust brightness levels.
If your display driver isn’t properly configured, these constant adjustments create visual glitches. By disabling adaptive brightness, you eliminate that communication, and the flickering often stops. You can always manually adjust your brightness using the brightness keys on your keyboard if you need to change it.
Check Your Screen Resolution
Your display resolution is the number of pixels your screen displays. If your resolution is set to a value your laptop screen doesn’t support well, you get visual artifacts including flickering lines.
Go back to Display settings. Look for Display resolution. You should see a dropdown showing your current resolution, and there should be a note next to it saying “Recommended.” Click on the dropdown and select the option marked as Recommended. This is the native resolution your screen is designed to run at.
Click Apply. Your screen might flash or adjust for a moment. This is normal. Check if your horizontal lines are gone. If this was the problem, they should disappear immediately.
Resolution mismatches are less common than refresh rate issues, but I’ve seen them cause flickering on Lenovo laptops that have been set up by other people or have had multiple monitors connected and disconnected over time. Resetting the resolution to the recommended value clears up that kind of problem quickly.
These three settings are your easiest wins. If any of them solve your problem, you’re done. If all three are already set correctly and your horizontal lines persist, then you’re probably dealing with a driver conflict or a hardware issue, and you should continue with the other sections of this guide.
If Software Fixes Don’t Work: Physical Hardware Checks
At this point, if you’ve tried the software fixes and your Lenovo laptop screen is still flickering with horizontal lines,
you’re dealing with a physical hardware problem. Before you accept that your screen needs replacement, there are a few physical diagnostic tests you can do to pinpoint exactly what’s broken and potentially save yourself some money.
These tests don’t require opening your laptop or buying special tools. They’re simple observations that tell you whether your display cable is damaged, whether a static charge is causing temporary glitches, or whether you have a more serious internal failure.
I’ve used these tests to help people understand their exact situation so they know whether to attempt a DIY repair or call a professional.
The Lid Movement Test (Detects Cable Damage in the Hinge)
The display ribbon cable, technically called an eDP cable, runs from your motherboard through the hinge area to your LCD panel.
Every time you open and close your Lenovo laptop lid, that cable flexes slightly. Over months and years of opening and closing, the cable can become damaged or pinched.
Here’s how to test for this. Keep your laptop powered on and your screen visible. Slowly and gently open your lid from its current position to fully open.
Watch the flickering carefully. Does it change intensity? Does it improve or worsen? Now slowly close the lid back down while still watching. Is the flickering affected by the lid position?
If the flickering gets worse at certain angles, stops completely when the lid is fully open or fully closed, or changes noticeably as you move the lid,
then your display ribbon cable is likely damaged or poorly routed. The cable is being pinched or stretched at certain positions, which interrupts the signal to your screen.
I’ve seen this pattern countless times on ThinkPad models from repeated hinge wear. The cable degrades gradually over time as the hinge flexes it thousands of times. I’ve also seen it on newer Lenovo laptops where the cable was routed too tightly from the factory and gets pinched when the screen rotates.
If the flickering remains exactly the same no matter what angle you open the lid to, then your problem is probably not a hinge related cable issue. Your LCD panel itself might be failing, or your graphics processing unit might be having problems.
This test is valuable because it’s non-destructive. You’re just observing your screen’s behavior under different conditions. If the lid test is positive, you know you need a display cable replacement, which is a repair you can have done professionally or attempt yourself if you’re comfortable with disassembly.
Try a Hard Reset (Clears Static Charge Glitches)
Sometimes hardware glitches are caused by residual electrical charge building up in your system. A hard reset drains that charge and can fix intermittent flickering problems. This is one of the most overlooked troubleshooting steps, and it takes only two minutes.
Completely shut down your Lenovo laptop. Don’t put it to sleep or hibernate. Actually shut it down. Once it’s fully off, unplug the AC adapter from the laptop. Remove any USB devices plugged into the ports.
If your laptop has a removable battery, take it out (though most modern Lenovo laptops have built-in batteries, so this won’t apply to you).
Now hold down the power button for a full thirty seconds. Count them out. Don’t press it repeatedly. Hold it continuously.
This drains any residual electrical charge from your system’s capacitors. After thirty seconds, release the button.
Reconnect your AC adapter and turn on your laptop normally. Check your display. Is the horizontal line flickering gone?
This hard reset occasionally fixes display problems that seem like hardware failures but are actually just static charge interference. I can’t guarantee it will work, but the risk is zero and the time investment is minimal. The worst that happens is your laptop boots up normally and nothing changes.
Lenovo Yoga Users: Check for Cable Routing Issues
If you own a Lenovo Yoga laptop with a rotating or foldable screen, there’s a specific hardware problem I want you to know about. The Yoga design is flexible and clever, but that flexibility creates tight spaces inside where cables can get pinched.
I found a real case study from someone who owned a Lenovo Yoga 730 and experienced severe flickering. The person went to a professional technician, who performed a BIOS update hoping that would fix the problem.
The BIOS update did nothing because the problem wasn’t software at all. The display cable was wedged underneath the corner of the cooling fan inside the laptop. Every time the fan spun up, it pinched the cable tighter, causing the screen to flicker more intensely.
The person opened the laptop themselves, found the issue, and loosened the cable routing so it had more slack. The fix took about five minutes, and the flickering disappeared completely. The BIOS update that a professional recommended didn’t help, but identifying and fixing the actual physical problem did.
If you have a Yoga model and you’re comfortable with opening laptops, you can check this yourself. You’ll need a small Torx screwdriver and a bit of patience.
Remove the screws from the bottom cover, take the back panel off and look at how the display cable is routed through the hinge area. Does it have adequate slack, or does it look pulled tight and pinched underneath other components?
I want to be clear: opening your laptop will likely void any remaining warranty coverage. Only attempt this if you’re confident in your ability to work with small electronics and delicate cables.
If you’re not comfortable doing this, take your Yoga to a repair shop and specifically ask them to check the display cable routing. Many shops miss this issue and jump straight to driver updates or LCD panel replacement.
If the lid test is negative and the hard reset doesn’t help, you’re probably looking at internal LCD panel failure or a GPU problem that requires professional repair. At that point, move on to the next section to understand your screen replacement options.
Lenovo LOQ Owners: You Might Have a Known Defect (Check Warranty First)
If you own a Lenovo LOQ laptop manufactured between late 2023 and early 2024, and you’re experiencing horizontal lines on your screen, I need to tell you something important before you spend money on repairs.
Your Lenovo laptop screen flickering horizontal lines might be a known manufacturing defect that Lenovo covers under warranty. I’ve seen countless LOQ owners pay for screen replacements that should have been free.
The Lenovo LOQ is a gaming-focused laptop, and certain production batches from that time period have a widespread LCD panel failure issue.
The internal gate drivers that control the pixels in your display are failing prematurely on these units. This isn’t a driver problem. This isn’t something you caused by dropping your laptop or spilling coffee on it. This is a factory defect in how the screen was manufactured.

How to Identify if You Have the LOQ Defect
The LOQ defect has very specific symptoms. The horizontal lines typically appear at the bottom portion of your screen or spread across the middle. They’re often black or dark colored, sometimes with hints of other colors mixed in.
As time goes on, the lines don’t just stay static. They gradually spread and leak pixels, creating what looks like colored ghosting or shadows around the lines. This pixel bleeding is the telltale sign of internal LCD failure.
If your Lenovo LOQ is less than a year old and you’re seeing this pattern, there’s a very good chance Lenovo will replace your screen under warranty at no cost to you.
I’ve seen repair shops quote customers three hundred dollars for a screen replacement, only to have Lenovo cover the entire repair for free once a warranty claim was filed.
The critical thing to understand is that this defect appears within the first year of ownership on affected units. It’s not something that develops from normal wear and tear over years of use. If your LOQ is only a few months old and you’re seeing horizontal lines, that’s the signature of this manufacturing batch issue.
Check Your Warranty Status Right Now
Before you do anything else, before you try driver updates or attempt any repairs, you need to check whether your Lenovo LOQ is still under warranty.
Open Lenovo Vantage, which should be installed on your laptop. Look for a section called Warranty or Protection. It will show you when your warranty expires and what coverage you have.
If your warranty is still active, you’re protected. Contact Lenovo support and describe the horizontal lines on your screen. Be specific about the location of the lines and when they started appearing. Tell them you suspect an LCD panel issue.
Lenovo’s support team is familiar with this LOQ defect and will likely authorize a screen replacement at no charge.
If you’ve already opened your laptop or attempted repairs yourself, mention that to the warranty service before you send it in.
Lenovo might still cover the repair even if you’ve opened the case, especially for a known defect, but they need to know upfront. Honesty here saves you complications later.
The process is usually simple. Lenovo will provide a prepaid shipping label. You send your laptop to their repair center.
They replace the LCD panel or the entire display assembly. You get your laptop back with a working screen, usually within two weeks. All covered under warranty.
What If You’re Out of Warranty?
If your Lenovo LOQ is older than the warranty period or you bought it used and it’s past the original purchase date, then you’re looking at paying for the screen replacement yourself. At that point, you have two options.
Option one is to take it to a Lenovo authorized repair center. They’ll diagnose the LCD panel failure and replace it.
This typically costs between two hundred and four hundred dollars depending on your specific LOQ model and where you live. The repair takes a few days, and you get a working screen with a warranty on the replacement part.
Option two is to find a third-party repair shop that specializes in laptop repairs. Independent shops often charge less than official repair centers, sometimes in the one hundred fifty to two hundred fifty dollar range. The downside is that you might not get a warranty on the replacement screen if something goes wrong later.
Whichever route you choose, make sure the replacement LCD panel matches your original panel exactly. The LOQ comes with different screen options including 60Hz and 144Hz refresh rates, and different resolution levels. Installing the wrong panel can cause compatibility issues.
Don’t Waste Money on Driver Updates
Here’s what I want you to avoid doing. If you have the LOQ defect, installing new drivers, adjusting refresh rates, or trying any of the software fixes I described earlier in this guide won’t help. The problem is physical. Your display panel is failing at the hardware level. Software can’t fix that.
I’ve seen people spend weeks trying every driver update and Windows setting available, only to eventually realize their screen was simply broken and needed replacement. Don’t be that person. Check your warranty first.
If you’re covered, file a claim. If you’re not covered, accept that you need a screen replacement and move forward with that repair.
The good news is that once you replace the LCD panel with a new one, your Lenovo laptop screen flickering horizontal lines problem disappears completely. A screen replacement is a permanent fix for the LOQ defect. And if you catch it within your warranty period, Lenovo handles it for free.
If you’re not an LOQ owner or if your symptoms don’t match this specific defect pattern, continue with the hardware sections of this guide that cover screen replacement options and costs.
When DIY Fixes Won’t Work: Screen Replacement Options & Costs
At some point in troubleshooting your Lenovo laptop screen flickering horizontal lines, you might realize that the problem is physical damage that can’t be fixed with software. When your diagnostics show lines in BIOS, when the lines are spreading and getting worse over time, or when you see actual cracks in your screen, you’re looking at a hardware failure that requires replacement. I want to help you understand your options and what you’ll actually pay for them.
The good news is that screen replacement is a straightforward fix with a clear outcome. Once you replace the LCD panel, your problem goes away permanently. The challenge is deciding whether to do it yourself or pay someone else to do it, and whether the cost makes sense for your laptop’s age and value.
How Much Does Lenovo Laptop Screen Replacement Cost?
The total cost depends on three things: the replacement panel itself, whether you pay for labor, and whether any warranty covers the repair.
If you do the replacement yourself, you’re only paying for the part. An LCD panel for a Lenovo laptop typically costs between fifty and one hundred fifty dollars depending on your specific model and screen specifications.
A basic IdeaPad with a standard 60Hz display panel might cost you fifty to eighty dollars. A ThinkPad with a higher quality panel runs seventy to one hundred twenty dollars.
If you have a gaming laptop like the LOQ with a 144Hz high refresh rate panel, you’re looking at one hundred to one hundred fifty dollars because those panels are more specialized and harder to source.
The challenge with buying parts online is making sure you order the exact right one. You need to know whether your original panel is 30-pin or 40-pin, what resolution it is, and what refresh rate it supports. Order the wrong panel, and you’ll have a laptop with a screen that doesn’t work properly or doesn’t connect at all.
If you take your Lenovo laptop to a professional repair shop, you’re paying for both the part and the labor. Professional repairs typically cost between one hundred fifty and four hundred dollars total. Independent repair shops often charge less than official Lenovo service centers.
You might find a local shop charging one hundred fifty to two hundred fifty dollars, while a Lenovo authorized repair center charges two hundred fifty to four hundred dollars depending on your model and location.
There’s one scenario where you pay nothing. If your laptop is still under manufacturer warranty, Lenovo covers the replacement at no cost.
If you purchased Lenovo Premium Care or accidental damage protection, those plans cover screen replacement as well. Before you pay a single dollar, confirm whether your laptop qualifies for any coverage.
Here’s a realistic question to ask yourself: if your laptop is five or more years old and the screen replacement costs three hundred dollars, that might be half the price of a new budget laptop. At that point, you need to decide whether fixing an old machine makes sense or whether upgrading to a new one is smarter financially.
Can You Replace a Lenovo Screen Yourself?
I’ve watched repair professionals and hobbyists replace Lenovo laptop screens successfully. It’s definitely possible to do it yourself if you have the right tools and patience, but I need to be honest about the challenges.
You’ll need a small Torx screwdriver set, a plastic pry tool or guitar pick to help separate panels, and ideally an anti-static wrist strap to protect your components.
The process involves removing the bottom case, disconnecting the internal battery before you touch anything, carefully removing the adhesive strips holding the screen bezel, disconnecting the display cable from the motherboard, removing the old panel, connecting the new panel, and reassembling everything in reverse order.
If you’re mechanically inclined and have successfully taken apart electronics before, this is manageable. I’ve seen guides online that show the complete process, and Video 11 from TECH LORDS demonstrates the entire panel replacement with real footage. You can follow step-by-step videos and complete the replacement in about an hour.
The risks are real though. If you order the wrong panel with mismatched pin count or refresh rate, you’ll discover that problem only after you’ve disassembled your laptop.
If you forget to disconnect the internal battery and accidentally short-circuit the motherboard while handling the display cable, you’ve just turned a three hundred dollar problem into a thousand dollar problem. If you’re not comfortable working with delicate electronics, a professional repair is worth the extra cost for the peace of mind.
One advantage of DIY replacement is that you’re not voiding any warranty that might remain. If your laptop is out of warranty anyway, there’s no downside to attempting the repair yourself. If something goes wrong, you’re in the same position you would have been in before you started, just with more knowledge about what went wrong.
Be realistic about your comfort level. If you’ve never opened a laptop before and you’re nervous about it, pay a professional. If you’re someone who regularly upgrades RAM or switches hard drives, you probably have the confidence and skill to handle a screen replacement.
The laptop screen replacement cost calculation is simple. Add up the panel cost plus your labor time value. If the total is less than a professional shop quote, DIY makes sense.
If you’d rather pay someone else to handle it and guarantee the job, a professional repair removes the stress and risk.
Either way, once the replacement panel is installed and working, your Lenovo laptop screen flickering horizontal lines problem is completely solved. You’ll have a functioning display again, and your laptop returns to normal operation.
Advanced Fixes for Persistent Software Issues
If you’ve tried the basic software fixes and your Lenovo laptop screen is still showing horizontal lines, there are more advanced Windows troubleshooting methods that go deeper than driver updates.
These methods target corrupted system files and problematic updates that cause display problems. I’m going to walk you through them, but I want to be clear upfront: these are power-user fixes that work in specific situations, and they’re not guaranteed to solve every problem.
The reason I’m including this section is because some display flickering is caused by Windows updates that introduced bugs or by corrupted system files that standard fixes miss.
If your flickering started right after a Windows Update, or if you’ve tried everything else and nothing worked, one of these advanced methods might be the answer.
Roll Back a Bad Windows Update
Windows updates are supposed to improve your system, but sometimes Microsoft releases an update that breaks things. I’ve seen display driver compatibility issues introduced by Windows updates that only get fixed when you roll back to the previous version.
If you remember that your horizontal lines started appearing right after Windows Update installed something, this is your most likely fix.
The process requires accessing Windows Advanced Options, which you can reach through your normal restart process if your screen is usable, or through forced shutdown if the flickering is so bad you can barely see.
If your screen is partially usable, hold down Shift on your keyboard and click the Power button in the bottom right corner of your Windows screen.
A menu will appear. Click Restart. Your laptop will restart and show the Advanced Options blue screen. Click Troubleshoot, then Advanced options, then Uninstall Updates.
If your screen is too badly flickered to see anything, use the forced shutdown method. Hold down your power button until your laptop shuts off completely.
Turn it back on immediately. As soon as you see the Lenovo logo, hold down the power button again until it shuts off. Repeat this two more times. On the fourth boot, let it continue without interrupting. The repeated interruption triggers the Advanced Options screen automatically.
Once you’re in the Uninstall Updates menu, you’ll see two options: Uninstall latest quality update or Uninstall latest feature update.
Start with the quality update option. This removes the most recent small patch that Microsoft released. Click it, let your laptop restart, and check if the horizontal lines are gone.
If the lines persist, go back to Advanced Options and try Uninstall latest feature update instead. Feature updates are larger Windows updates that Microsoft releases periodically. Uninstalling a feature update removes more changes, which is more drastic but sometimes necessary.
Give your system a day or two after uninstalling an update. Let it run normally and see if new problems appear.
Windows might try to reinstall the update automatically, which is fine. If the original update was the problem, you can choose to skip it when Windows asks.
Repair Corrupted System Files (Command Prompt Method)
Your Windows operating system contains hundreds of system files that manage how your display works. If any of these files become corrupted, you might see flickering and display issues.
Windows has a built-in command line tool that can scan and repair corrupted files automatically.
This method requires opening Command Prompt as Administrator, which means you have full control over your system. Press the Windows key on your keyboard, type cmd, and right-click on Command Prompt when it appears. Select Run as Administrator. A black window will open where you can type commands.
Type this command exactly as written: sfc /scanfile=c:\windows\system32\ieframe.dll and press Enter. This command scans a specific display-related system file for corruption.
The scan might take a minute or two. After it finishes, type this second command: sfc /verifyfile=c:\windows\system32\ieframe.dll and press Enter. This verifies that the file is working correctly and attempts to repair it if problems are found.
Type assoc and press Enter. This lists file associations that display drivers use. Type exit and press Enter to close Command Prompt.
Restart your laptop and check if the horizontal lines have disappeared. This method fixes display issues that were caused by corrupted system files rather than driver problems. It won’t help if your problem is a hardware failure, but if it’s a software glitch in Windows itself, this can solve it.
These advanced fixes represent the last software-based options before you move to hardware diagnosis or replacement.
If none of these work and your BIOS test showed lines, you’re almost certainly dealing with physical hardware failure. At that point, you can confidently move forward with screen replacement knowing you’ve exhausted the software possibilities.
Frequently Asked Questions About Lenovo Laptop Screen Flickering with Horizontal Lines
Why does my Lenovo laptop screen have horizontal lines?
Horizontal lines on your Lenovo laptop screen come from either software problems like corrupted display drivers and incompatible apps, or hardware failures like damaged ribbon cables and failing LCD panels.
Use the Task Manager test (press Ctrl+Alt+Delete) to quickly identify which category your problem falls into. If Task Manager flickers too, it’s a driver issue. If Task Manager stays stable, it’s an app conflict.
How do I fix horizontal lines on my Lenovo laptop screen?
Start with the fastest fix: press Windows+Ctrl+Shift+B to reset your graphics driver. If that doesn’t work, reinstall your display driver using Lenovo Vantage instead of Windows Update, as generic drivers often cause flickering on Lenovo models.
Check that your refresh rate is set to 60Hz in Display settings. If the lines persist in your BIOS menu, it’s a hardware problem requiring screen replacement.
are horizontal lines on a laptop screen fixable or do I need a new screen?
Software-caused lines (driver conflicts, wrong settings) are free to fix using driver updates and app removal. Hardware-caused lines (damaged cables or failing LCD panels) need screen replacement costing $50-$400 depending on whether you do it yourself or hire a professional.
Run the BIOS test to identify which you have. Lenovo LOQ owners should check Lenovo Vantage for warranty coverage first, as this model has a known defect often covered free.
What does “pixel bleeding” or “gradually leaks pixels” mean?
Pixel bleeding describes spreading zones of dead pixels that expand over time, indicating progressive LCD panel damage inside your screen. This is a hardware failure that software can’t fix and usually signals internal gate driver failure. Once pixels start leaking, the damage typically spreads further, requiring full LCD panel replacement to restore your display to normal.

