
Is It Hardware or Software? A 60 Second Test Before You Do Anything
When I first noticed a black line cutting across my Dell laptop screen, I made the same mistake most people make. I immediately started googling expensive screen replacement costs and panicking about losing all my work.
But here’s what I learned after fixing this issue on three different Dell laptops: you need to figure out whether it’s a hardware problem or a software glitch before you do anything else.
This simple diagnostic step saved me hundreds of dollars, and it takes less than a minute to complete.
The fastest way to know if your Dell laptop display problem is fixable at home or needs professional help is to check whether the issue is coming from the screen itself or from your computer’s graphics system.
A black line on your laptop screen can be caused by a damaged LCD panel, a loose cable inside the laptop, or just a confused graphics driver that needs a quick reset.
I’m going to walk you through two quick tests that will tell you exactly what’s going on with your computer screen black lines.
The External Monitor Test (Takes 2 Minutes)
This is the most reliable way to separate hardware damage from software issues, and I use this test every single time before trying any other fix.
Here’s how the external monitor test works on a Dell laptop:
Grab any TV or external monitor you have around the house. It doesn’t need to be fancy. Connect your Dell laptop to it using an HDMI cable, a VGA cable, or even a USB-C to HDMI adapter if your laptop is newer. Most modern TVs have an HDMI port on the back or side.
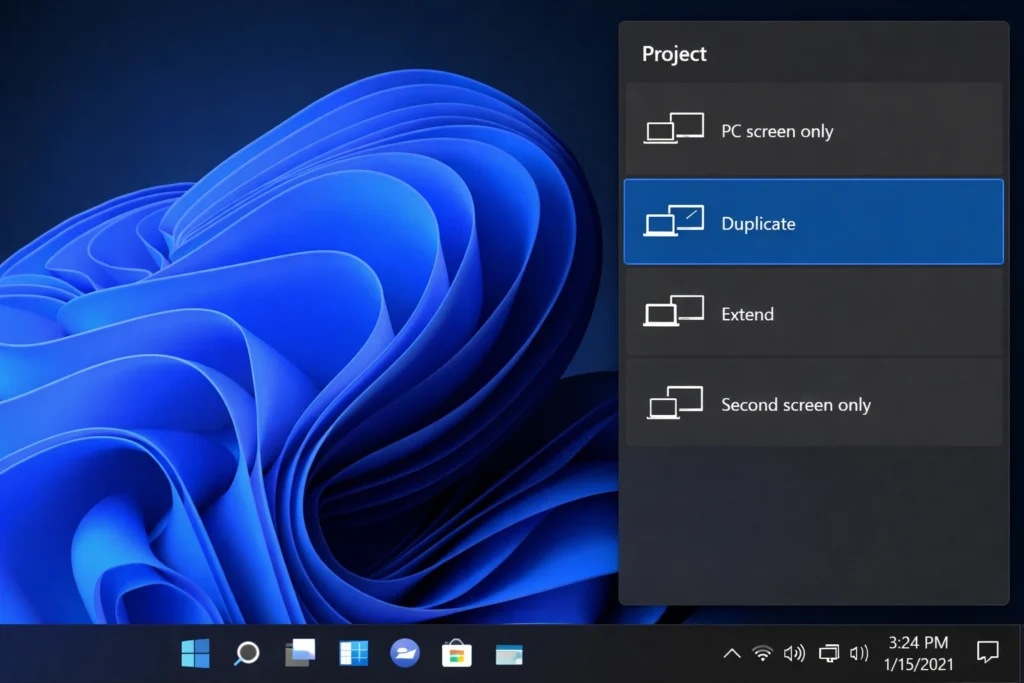
Once you plug in the cable, your Dell should automatically detect the external screen. If it doesn’t show up right away, press Windows+P on your keyboard and select “Duplicate” or “Extend.” This forces your laptop to send the display signal to the external monitor.
Now look carefully at the external screen. Does it show the same black line that’s on your laptop screen? Or does the external display look completely normal with no lines at all?
If the external monitor looks perfect with no lines, the problem is inside your Dell laptop screen itself.
This means you’re dealing with a hardware issue like a damaged LCD panel, a loose display cable, or a broken ribbon connector.
The good news is your laptop’s internal components are fine. The bad news is you’ll probably need a screen repair or replacement.
If the black line appears on the external monitor too, congratulations, you just saved yourself money. This means the issue is coming from your graphics card or display driver, not your screen hardware.
Software problems like this are almost always fixable at home for free, and I’ll show you exactly how in the next sections.
I’ve used this external monitor test dozens of times on different Dell models, and it’s never been wrong. It’s the same diagnostic method Dell’s own support technicians use when you call them, and lines on a monitor screen during this test tell you immediately whether the problem is hardware or software
Try This Keyboard Shortcut First (Windows+Ctrl+Shift+B)
Before you even bother with cables and external monitors, there’s an even faster test you should try first. I learned this trick from a Dell repair video, and it’s honestly saved me more time than any other fix I know.
Your Dell laptop has a hidden graphics driver reset shortcut built right into Windows. Most people have no idea this exists.
Here’s what you do: press and hold four keys at the same time: Windows+Ctrl+Shift+B.
Your screen will go black for about two seconds. You’ll hear a beep sound. Then your display will flash back on. What just happened is your computer forced the GPU (Graphics Processing Unit) to restart without rebooting your entire laptop.
If your black line was caused by a graphics card problem or a stuck display driver, it will disappear the moment your screen comes back.
I’ve seen this graphics card problem laptop issue resolve itself on Dell Inspiron, XPS and Latitude models when the display driver was causing temporary confusion rather than permanent hardware damage
The reason this works is simple. Sometimes your Windows display settings get corrupted or your graphics driver crashes silently in the background.
Your screen keeps showing whatever image was last rendered, including any glitches or lines.
Resetting the GPU clears that cached image and forces Windows to redraw everything from scratch.
I remember one time my Dell XPS showed a thick horizontal black line right across the middle of the screen during a video call. I panicked and thought the LCD was done for. Then I tried Windows+Ctrl+Shift+B, heard the beep, and the line was completely gone. It was just a driver hiccup.
If the line disappears after using this shortcut, you don’t have a hardware problem at all. Your issue is software-based, which means you can fix it by updating drivers, adjusting settings, or running a few simple troubleshooting steps I’ll cover later.
If the line is still there after the shortcut, it doesn’t mean your screen is definitely broken. It just means the problem isn’t a simple driver glitch. You’ll need to move on to the external monitor test or try the other fixes in the next sections.
This keyboard shortcut is one of those things Dell should print on a sticker and stick it on every laptop they sell. It’s that useful for diagnosing Dell laptop display problems in seconds.
So before you do anything else, try that four key combo. Then if it doesn’t work, plug in an external monitor and see what happens. These two tests will tell you everything you need to know about whether your black line is fixable at home with simple fixes or needs professional help.
What’s Actually Causing That Black Line on Your Dell Screen
The black line you’re seeing on your Dell laptop screen is usually caused by one of two things: either liquid crystals leaking inside the LCD panel itself, or a software glitch in your graphics system.
Understanding which one you’re dealing with makes all the difference between a free five-minute fix and a costly screen replacement.
I’ve seen both types of problems across different Dell models, and the causes are more specific than most people realize. Let me break down exactly what’s happening inside your laptop screen and why computer screen black lines show up in the first place.
An LCD (Liquid Crystal Display) is made of millions of tiny liquid crystal cells sandwiched between layers of glass. When those cells get damaged or start leaking, they create visible lines across your screen.
Physical damage to the laptop screen is the most common reason this happens, and I’ve noticed two specific patterns in laptop screen hardware damage that come up again and again.
The first pattern is pressure damage from carrying your Dell laptop in a bag. I learned this the hard way when I started seeing a thin black line appear on my Inspiron after a week of daily commuting.
The line started small, maybe half an inch long, and grew longer over the next few weeks.
What happens with this screen pressure damage is simple: when you stuff your laptop into a backpack with books, chargers, and other items pressing against it, that pressure squeezes the LCD panel.
The liquid crystals inside start to spread beyond their normal cells, and you see that spread as a growing black line. This type of physical damage laptop screen issue is preventable with proper protection
The second pattern I’ve noticed is lines appearing after long periods of storage. I once pulled out a Dell laptop I hadn’t touched in about eight months, and there was a thick horizontal black line right across the middle of the screen.
When a laptop sits unused for months or even a year, the liquid crystals inside the panel can settle, dry out slightly, or shift position.
This kind of LCD screen damage on a Dell laptop often shows up as thicker, more defined lines compared to the thin progressive lines caused by bag pressure
Here’s something important to understand: once hardware panel damage starts, it almost always gets worse over time.
The damaged area acts like a crack in a windshield. It starts small, but temperature changes, normal use, and even just opening and closing the laptop lid can make the line spread further across the screen.
I’ve watched a single one inch line turn into multiple lines covering half the display over the course of a few months.
Hardware Causes (The Most Common Reason)
When your Dell laptop has a black line caused by hardware damage, there are a few specific components that could be failing.
The most common culprit is a liquid crystal leak inside the LCD panel. This is what I just described above. The panel itself is damaged and there’s no way to repair individual liquid crystal cells. Once the panel starts leaking, the only real fix is replacing the entire screen.
Another frequent cause is a damaged ribbon cable. Your Dell laptop has a thin, flexible cable that connects the LCD panel to the motherboard. This ribbon cable carries the video signal from your graphics card to the display.
If that cable gets pinched, bent too sharply when you open and close the lid repeatedly, or comes loose from its connector, you’ll see lines, flickering, or sections of the screen going black. I’ve seen this damaged ribbon cable laptop issue especially often on older Dell Latitude and Inspiron models where the hinge area gets a lot of wear.
Sometimes the issue is just a loose display cable connector. The ribbon cable might be fine, but the little plastic connector where it plugs into the motherboard or the back of the LCD panel can work itself loose over time from vibration and movement.
If you’re comfortable opening up your laptop, reseating that display cable connector can sometimes fix the problem instantly
There’s also a component called the T-CON board inside your screen assembly. This small circuit board controls the timing and signals going to each row and column of pixels on your display.
When the T-CON board starts to fail, you often see perfectly straight horizontal or vertical lines. T-CON board failure is less common than direct LCD panel damage, but it does happen, especially on laptops that have seen heavy use or exposure to heat.
Finally, dead pixels or shorted pixels can cause vertical lines on a Dell laptop screen. A dead pixel is a single dot on your screen that no longer lights up. A shorted pixel is one that’s stuck in the on position or is sending incorrect signals to nearby pixels.
When an entire column of dead pixels or shorted pixels connects together, you see a continuous vertical line running from the top to the bottom of your screen. Once pixels are shorted, there’s no software fix that will bring them back. The only solution is replacing the LCD panel
Once pixels are shorted, there’s no software fix that will bring them back. The only solution is replacing the LCD panel.
Software and Driver Causes (Easier to Fix)
Not every black line on a Dell screen means you need a hardware repair. Sometimes the problem is entirely software based, and those cases are almost always fixable at home without spending a cent.
The most common software cause is a graphics driver issue. Your laptop’s GPU relies on driver software to communicate with Windows and send the correct image to your screen. If that driver gets corrupted, outdated, or crashes silently in the background, your display can show all kinds of glitches including black lines, flickering, or frozen sections
This graphics driver issue laptop problem is one I’ve fixed on multiple Dell laptops just by updating or reinstalling the driver
Another frequent cause is a wrong refresh rate setting. Your screen refreshes the image a certain number of times per second, measured in Hertz (Hz). Most Dell laptop screens run at 60Hz, but some newer models support 120Hz or even higher.
If Windows somehow gets set to a refresh rate your screen doesn’t support properly, you can see horizontal lines appear across the display. I once spent two hours troubleshooting a Dell XPS with thick black horizontal lines, only to discover that changing the refresh rate from 60Hz to 75Hz made the lines disappear instantly.
Display resolution mismatch can also cause screen problems. If your resolution is set too high or too low for your specific Dell laptop model, the graphics card struggles to scale the image properly, and you might see lines, blurriness, or distortion.
This is less common than driver issues, but I’ve seen it happen after Windows updates that reset display settings.
Finally, there’s Windows display corruption. Sometimes Windows itself gets confused about your display configuration, especially if you’ve been connecting and disconnecting external monitors frequently.
The operating system caches display information, and if that cache gets corrupted, your screen can show persistent visual glitches even though the hardware is perfectly fine.
The good news about all these software causes is they’re testable and fixable. If you ran the external monitor test from the previous section and the black line showed up on both screens, you’re almost certainly dealing with one of these software issues.
If the line only appears on your laptop screen and not on the external monitor, the problem is hardware-based and located somewhere in the physical screen assembly itself.
Understanding the difference between laptop screen hardware damage and a graphics card problem saves you time, money, and frustration.
Hardware problems usually require professional repair or part replacement. Software problems can almost always be fixed with the right settings adjustments or driver updates, which I’ll walk you through in the next sections.
How to Fix Horizontal Black Lines on Your Dell Laptop Screen
If you’re seeing horizontal black lines across your Dell laptop screen, start with the fastest and easiest fixes first before assuming you need an expensive repair. I’ve fixed this exact problem on multiple Dell laptops and about half the time the solution takes less than two minutes and costs nothing.
Horizontal lines on a laptop monitor are often caused by refresh rate mismatches or corrupted display settings rather than actual hardware damage.
The key is to work through the software fixes in order, from quickest to most involved, before considering a screen replacement.
I’m going to walk you through four proven methods to fix laptop display issues caused by horizontal black lines.
I’ve arranged these steps from fastest to slowest, so you can get back to using your Dell laptop as quickly as possible.
Step 1: Change Your Display Refresh Rate (Try This First)
This is the single fastest fix I know for horizontal black lines, and I’ve seen it work instantly on Dell XPS, Inspiron, and Latitude models.
Your screen’s refresh rate is how many times per second the display redraws the image. Most Dell laptop screens run at 60Hz, meaning the image refreshes 60 times every second.
If Windows somehow sets your refresh rate to a value your screen doesn’t support properly, you’ll see horizontal lines, flickering, or screen tearing.
Here’s how to check and change your refresh rate in Windows 11:
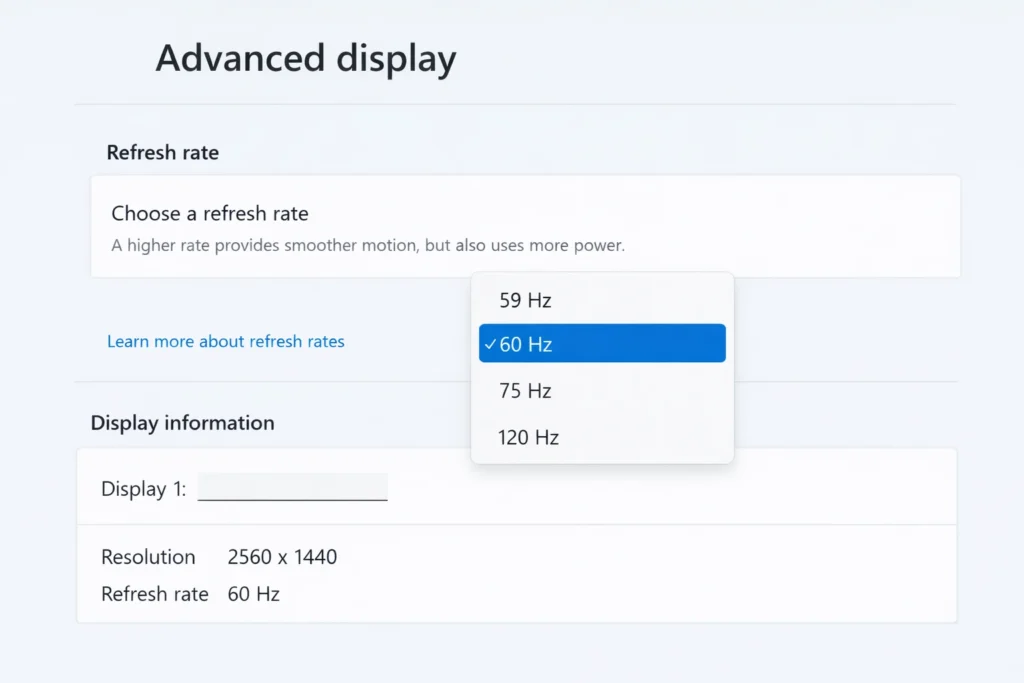
Right-click anywhere on your desktop and select Display settings. Scroll down and click Advanced display.
You’ll see a dropdown menu labeled Choose a refresh rate. Click on that dropdown and try selecting a different refresh rate than what’s currently selected.
If your Dell laptop screen is set to 60Hz, try changing it to 59Hz or 75Hz if those options are available.
If your screen is already set to a higher refresh rate like 120Hz or 144Hz, try switching it back down to 60Hz.
The moment you select a new refresh rate, Windows will apply the change and ask if you want to keep it.
Look at your screen carefully. Did the horizontal black lines disappear? If yes, click Keep changes and you’re done. If the lines are still there or got worse, click Revert and try a different refresh rate option.
I remember fixing a Dell XPS that had thick horizontal black lines running across the middle of the screen. The owner was convinced the LCD panel was broken and was ready to spend money on a replacement.
I opened the Windows display settings, changed the refresh rate from 60Hz to 165Hz, and the lines vanished the instant I clicked apply. The entire fix took maybe 90 seconds.
This works because some Dell laptop screens, especially newer high refresh rate models, can get confused when Windows sets an unsupported or unstable refresh rate.
Switching to a different refresh rate forces the display controller to reset its timing, and if that timing mismatch was causing your horizontal lines, the problem disappears immediately.
Step 2: Run Dell’s LCD Built-In Self-Test
Before you spend time updating drivers or resetting settings, use Dell’s hidden LCD self-test to confirm whether your horizontal black line problem is hardware or software.
Every Dell laptop has a built-in diagnostic tool that tests the LCD panel independently from Windows.
This test bypasses your operating system, graphics drivers, and all software entirely. If the horizontal lines still appear during this test, you know for certain the problem is inside the physical screen itself. If the screen looks perfect during the test, the issue is definitely software-related.
Here’s how to run the Dell LCD built-in self-test:
Shut down your Dell laptop completely. Don’t just close the lid or put the laptop to sleep. Fully power off. Once the laptop is off, press and hold the D key on your keyboard.
While holding D, press the power button to turn the laptop back on. Keep holding the D key until you see solid colors filling your entire screen.
Your Dell laptop screen will cycle through solid red, green, blue, white, and black screens. Watch carefully during each color.
Do you see the horizontal black lines appearing on any of these solid color screens? Pay special attention during the white and light gray screens, since black lines are easiest to spot against those backgrounds.
If the horizontal lines appear during the LCD self-test, your Dell laptop has a hardware problem. The LCD panel, the ribbon cable, or the display connector is damaged. No software fix will help, and you’ll need to either live with the lines or get the screen repaired professionally.
If your screen looks completely clean during the self-test with no lines visible at all, congratulations. Your LCD panel is fine.
The horizontal black lines you’re seeing in Windows are caused by a driver issue, a settings problem, or software corruption. Move on to the next steps to fix those software causes.
I use this Dell LCD self test on every laptop I troubleshoot because it saves so much time. There’s no point spending an hour reinstalling drivers and tweaking settings if the hardware itself is broken.
Step 3: Update or Reinstall the Graphics Driver
Outdated or corrupted graphics drivers are one of the most common causes of horizontal lines on a Dell laptop screen, and this fix solves the problem more often than most people realize.
Your graphics driver is the software that tells your GPU how to communicate with your screen. When that driver gets corrupted, crashes silently, or falls out of sync with a Windows update, all kinds of display problems can appear including lines, flickering, and color distortion.
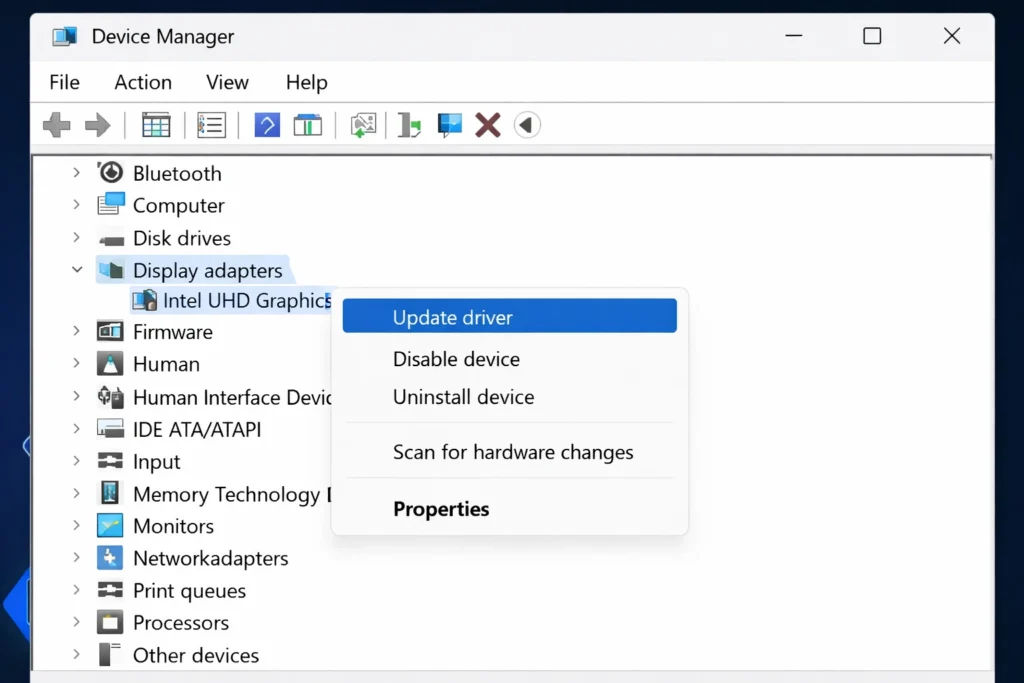
Here’s how to update your display driver using Device Manager in Windows:
Press Windows + X on your keyboard and select Device Manager from the menu that appears. In Device Manager, expand the section labeled Display adapters. You’ll see your graphics card listed there. It will say something like Intel UHD Graphics, NVIDIA GeForce, or AMD Radeon depending on your Dell laptop model.
Right-click on your graphics card name and select Update driver. Windows will ask how you want to search for drivers. Choose Search automatically for drivers. Windows will check online and install any newer driver version if one is available.
After the driver update finishes, restart your Dell laptop and check if the horizontal black lines are gone.
If updating the driver didn’t help, try reinstalling the driver completely. Go back into Device Manager, right-click on your graphics card again and this time select Uninstall device.
Don’t panic when your screen resolution changes or looks weird. Restart your laptop, and Windows will automatically reinstall a fresh copy of the graphics driver when the laptop boots back up.
For Dell laptops, there’s an even easier method using Dell SupportAssist. If your Dell laptop came with SupportAssist pre installed, open that program and click Check for updates.
Dell SupportAssist will automatically find and install the correct graphics driver for your specific Dell model, along with any other important updates like BIOS updates or firmware patches.
I’ve fixed horizontal line problems on Dell Inspiron and Latitude laptops dozens of times just by reinstalling the Intel graphics driver. Sometimes Windows updates break driver compatibility, and a fresh reinstall is all you need to fix laptop display issues.
Step 4: Perform a Dell Hard Reset
If none of the software fixes above worked, try a hard reset before giving up. A hard reset clears all residual electrical charge from your laptop’s components and forces everything to restart fresh.
Here’s how to perform a Dell laptop hard reset:
Save any open work and shut down your Dell laptop completely. Unplug the power cable. If your Dell laptop has a removable battery, take the battery out. If your battery is built-in and non-removable, just leave it in place.
Now press and hold the power button for 30 full seconds. Don’t let go early. Count to 30 slowly. What you’re doing is draining any leftover electrical charge stored in the laptop’s capacitors. This charge can sometimes cause display glitches, especially if your laptop has been running for days or weeks without a full shutdown.
After 30 seconds, release the power button. Plug the power cable back in. If you removed the battery, put the battery back in. Press the power button normally to turn your Dell laptop back on.
Check your screen as Windows loads. Are the horizontal black lines still there?
A hard reset fixes display problems more often than you’d think. I once had a Dell laptop that showed horizontal lines across the screen every time it woke from sleep mode. No driver update or settings change made any difference. A single hard reset fixed the problem permanently, and the lines never came back.
If you’ve tried all four of these steps and the horizontal black lines are still visible on your Dell laptop screen, the problem is almost certainly hardware damage.
At that point, your options are to use the laptop with the lines as they are connect an external monitor, or take the laptop to a repair shop for a professional screen replacement.
Vertical Black Lines on Your Dell Screen Mean Something Different
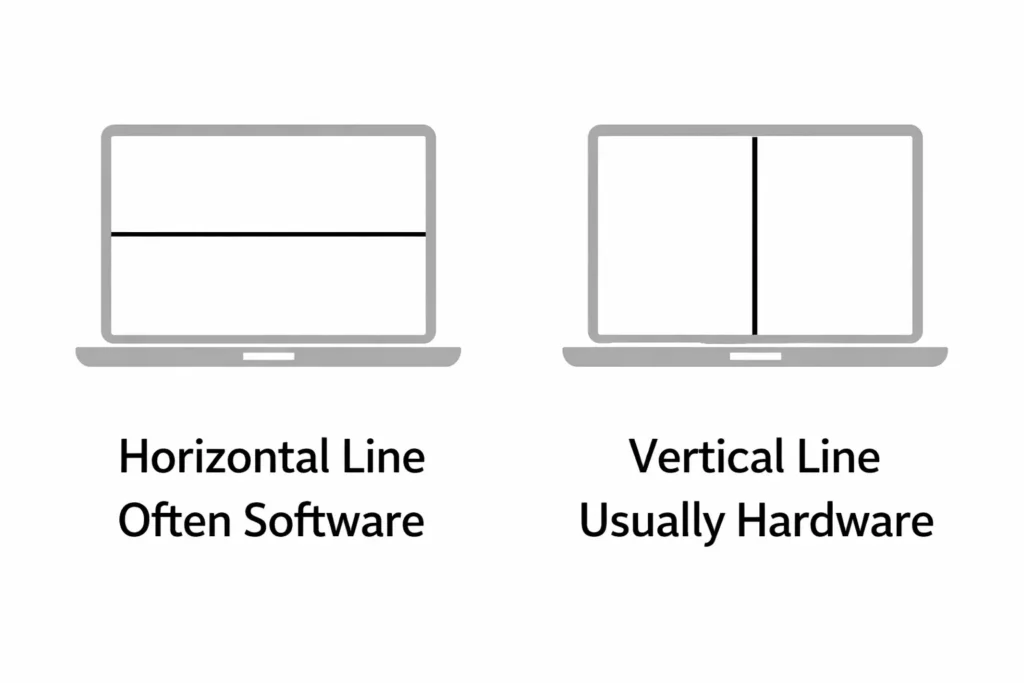
Vertical black lines on a laptop screen are almost always caused by hardware problems, not software issues. Unlike horizontal lines which can often be fixed by changing refresh rates or updating drivers, vertical lines usually point to physical damage inside the display assembly or shorted pixels that can’t be repaired through settings.
I’ve worked on enough Dell laptops to know that when you see a perfectly straight vertical line running from the top to the bottom of your screen, you’re dealing with one of two things: either a loose display cable that’s losing connection, or a column of dead pixels that have shorted out permanently.
The good news is there’s a simple test you can do right now to figure out which problem you have. This test has saved me from unnecessary screen replacements more than once, and it takes about 30 seconds.
The “Press the Bezel” Test for Vertical Lines
Before you assume your Dell laptop screen is completely damaged and needs replacement, try this diagnostic test that I learned from watching a repair technician work on a Dell Inspiron.
The bezel is the plastic frame that surrounds your screen. On most Dell laptops, there’s a specific spot on the top bezel, right above your keyboard and just below where the Dell logo sits, where the video cable connector is located behind the plastic.
Here’s what you do: with your Dell laptop powered on and the vertical black line visible on screen, use your thumb to press firmly on the top center of the bezel. Not hard enough to crack anything, just firm steady pressure. Hold that pressure for about five seconds and watch your screen carefully.
Does the vertical line disappear or flicker when you press? Does the screen static or distortion clear up temporarily? If yes, you’ve just diagnosed a loose display cable, not a dead LCD panel.
What’s happening is simple. Your Dell laptop has a thin ribbon cable called the EDP cable or LCD video cable that connects the motherboard to the screen. This cable carries all the video signal data. If that display cable connector has worked loose over time from opening and closing the laptop lid repeatedly, or if the cable itself has developed a bad connection, you’ll see vertical lines, flickering, or sections of the screen cutting out.
When you press on the bezel in the right spot, you’re temporarily pushing that loose display cable back into better contact with its connector. The video signal improves for a moment, and the vertical lines disappear or lessen.
I saw this exact issue on a Dell Inspiron that kept showing vertical black lines and would occasionally crash to a static filled screen. The owner was ready to buy a new laptop. I pressed on the top bezel and the screen instantly cleared up. The problem wasn’t a broken LCD panel at all. The display cable connector just needed to be properly reseated, which a repair shop did for a fraction of the cost of a screen replacement.
If pressing the bezel temporarily fixes your Dell Inspiron screen lines, don’t try to keep using the laptop by pressing on the bezel every time the lines appear. That’s just a diagnostic test, not a real fix. The actual repair involves opening the laptop, removing the screen assembly, and properly reconnecting or replacing the loose display cable. This is something a professional repair shop can do relatively quickly and cheaply compared to a full panel replacement.
When Vertical Lines Cannot Be Fixed Without Replacement
Now here’s the hard truth about vertical lines on laptop screens. If you tried the bezel press test and absolutely nothing changed, the vertical black line stayed exactly the same with no flickering or improvement, you’re dealing with shorted pixels or permanent laptop screen hardware damage.
Vertical lines that run in a perfectly straight column from top to bottom are caused by an entire row of pixels burning out or shorting together. When pixels short, they either stay permanently black, permanently white, or stuck on a single color. A whole column of shorted pixels appears as a continuous vertical line.
There is no software fix for shorted pixels. You can’t update a driver or change a setting to bring dead pixels back to life. The only way to fix vertical lines caused by shorted pixels is to replace the entire LCD panel.
I know that’s not what anyone wants to hear, but I’d rather be honest with you than waste your time trying fixes that won’t work. If your vertical line is consistent, doesn’t change when you press the bezel, appears in the Dell LCD self-test we covered earlier, and shows up even on an external monitor, your screen panel itself is damaged beyond repair.
At that point you have three realistic options. You can live with the vertical line if it’s not too distracting and the rest of the screen works fine. You can use an external monitor and essentially turn your Dell laptop into a desktop setup. Or you can take the laptop to a repair shop and pay for a professional screen replacement.
Screen replacement costs vary depending on your Dell model and whether you choose an original Dell panel or a third party replacement, but expect to pay anywhere from a couple thousand rupees to significantly more for higher end models like the Dell XPS.
The important thing is knowing the difference between a loose cable issue that’s fixable and shorted pixels that require replacement.
That bezel press test is the fastest way to tell which problem you’re dealing with, and it can save you a lot of money and frustration.
Dell Model Differences Inspiron, XPS and Latitude Screen Lines
Black line problems show up differently across Dell’s various laptop lines, and knowing which Dell model you own can actually help you understand what’s likely causing your screen issue and what to expect from a repair.
I’ve noticed distinct patterns in how different Dell laptop display problems develop based on the model family. Each line has its own construction quirks that make certain issues more common than others.
Dell Inspiron Screen Lines
The Dell Inspiron is Dell’s budget friendly consumer line, and it’s the model I see most frequently develop loose display cable issues.
The Inspiron uses a simpler hinge design and thinner ribbon cable connectors compared to premium models, which means the EDP cable is more prone to working loose over time.
If you own a Dell Inspiron and you’re seeing vertical black lines or screen flickering that comes and goes, the bezel press test I described earlier is your best diagnostic tool. I’ve fixed Dell Inspiron screen lines multiple times just by having a technician reseat the loose video cable connector.
That repair costs significantly less than a full screen replacement and often takes less than an hour.
The Inspiron’s budget construction actually works in your favor here because loose cable issues are often easier and cheaper to fix than actual panel damage.
Press that top bezel and pay attention to whether the lines temporarily clear up. If they do, you can confidently tell a repair shop that it’s a cable issue, not a dead panel.
Dell XPS Screen Lines
The Dell XPS is the premium ultrabook line, and XPS screens are thinner, lighter, and more power efficient than Inspiron screens. That’s great for portability but it also means the LCD panel itself is more fragile and more susceptible to pressure damage.
If you carry a Dell XPS in a backpack or bag, physical pressure on the lid is more likely to cause liquid crystal leaks inside the panel. I’ve seen more pressure related black line damage on XPS models than on any other Dell line.
The thin panel design that makes the XPS so sleek unfortunately makes it vulnerable to the bag pressure problem I mentioned earlier.
With a Dell XPS, prevention through a padded laptop sleeve becomes really important. If you already have black lines on your XPS screen, the refresh rate fix and driver updates are worth trying first. But if those don’t work, you’re more likely dealing with actual panel damage than a cable issue.
Dell Latitude Screen Lines
The Dell Latitude is the business laptop line, and it’s built like a tank compared to consumer models. The hinge is more robust, the cables are thicker, and the overall construction is designed to survive years of heavy corporate use.
If you own a Dell Latitude, especially if it’s a company laptop, there’s a good chance it’s still covered under a business warranty.
Before you pay for any screen repair yourself, check your warranty status. Many Latitude models come with extended warranty coverage that includes accidental damage protection.
Go to Dell’s support website, enter your Latitude’s service tag, and check what coverage you have. Some business warranties will replace the screen at no cost even if the damage is accidental. If your Latitude is covered, you just saved yourself a significant repair expense.
The Dell Latitude’s robust construction also means that if you’re seeing black lines, it’s usually either a genuine hardware failure rather than a construction defect, or the laptop has been through some serious impact or pressure.
The display malfunction on a Latitude is typically worth getting professionally diagnosed because the diagnosis often determines whether warranty covers it.
Each Dell model family has its own personality when it comes to screen issues. Understanding which family your laptop belongs to helps you predict what’s likely causing your problem and what your repair options are.
If you know your exact Dell model, a repair shop can often tell you immediately whether they typically see cable issues or panel damage in that specific model line.
The Risky DIY Fixes You’ve Seen Online What Can Actually Go Wrong
You’ve probably seen YouTube videos showing people pressing or rubbing their laptop screens to fix black lines, and yes, sometimes those methods actually work. But there’s a critical reason those same videos often show people making their screen problems much worse. I want to be honest with you about what can go wrong so you don’t end up spending more money trying to fix a problem that was already fixable.
The physical pressure technique works on a very specific type of damage: minor liquid crystal leaks that are still contained near the edges of the LCD panel. When you apply gentle pressure in exactly the right spot, you can sometimes push that leaking liquid back toward the bezel where it disperses harmlessly instead of forming a visible line. But this technique only works under very specific conditions, and it can cause permanent damage if you get it wrong.
I’m going to show you the safest way to attempt this if you absolutely insist on trying it. But I’m also going to tell you exactly when to stop and walk away before you make things worse.
If You’re Going to Try the Pressure Method, Do It This Way
If all your software fixes failed, your external monitor test showed the problem is in the physical screen, and you’ve decided you have nothing to lose by trying the pressure technique, here’s how to do it as safely as possible.
First, understand what you’re actually trying to do. The black line you see is liquid crystal that has leaked out of its cells and is spreading across the display.
By applying extremely light pressure at the very edge where the line originates, you’re attempting to encourage that liquid to flow back toward the bezel frame where it won’t be visible.
The word extremely is key here. You need to use only your thumb, and the pressure should be so light that you wouldn’t be comfortable putting that much force on a baby’s skin. This is not a massage. You’re not trying to knead the screen.
You’re just barely making contact with gentle, steady pressure.
Find where your black line starts. Usually one end begins closer to the edge of the screen. Place your thumb just at the edge of that line’s starting point. Using very slow circular motions, apply light pressure for about 30 seconds to a minute. The goal is to coax the liquid crystal gently toward the bezel edge.
Now lift your thumb and check your screen. Did the line get shorter? Did it move? If yes, you can try again a couple more times, but stop after three or four attempts. If nothing changed after the first try, stop immediately. Continuing to pressure your screen will only cause damage.
Here’s the truth that most YouTube videos won’t tell you: even when this technique works, it’s temporary.
The liquid may stay pushed to the side for days or weeks, but eventually gravity and normal screen flexing will cause it to spread back into a visible line again. This is not a permanent fix. It’s a temporary reprieve at best.
I’ve seen people get lucky with this method and buy themselves a few extra months before needing a screen replacement.
I’ve also seen people press too hard, crack the LCD glass, and turn a fixable liquid crystal leak into a completely shattered screen. The risk is always there.
Stop Here If You See Any of These Signs
You need to stop immediately and accept that professional repair is your only option if you see any of these warning signs.
If your screen has visible cracks in the glass, do not apply any pressure at all. A cracked panel is structurally compromised, and any pressure you apply could cause the crack to spread or cause the entire panel to fail suddenly.
If you see a spreading rainbow pattern or color distortion around the black line, that’s a sign of internal glass separation. The layers of your LCD panel are starting to come apart. Pressure will make this worse, not better.
If the black lines are multiplying or spreading rapidly, the damage is progressing beyond a simple liquid crystal leak. Pressing on the screen won’t help and will likely accelerate the failure.
If your screen is flickering, cutting out completely, or showing static, that indicates cable or electrical problems inside the screen assembly. Physical pressure on the screen won’t affect those issues and could disconnect something that’s barely holding on.
I once watched someone use a screwdriver tip to press on their laptop screen to fix a black spot. Yes, the pressure did temporarily disperse the liquid and reduce the visibility of the spot. But using a hard tool on an LCD screen is dangerous.
The screwdriver tip created a concentrated pressure point that cracked the glass underneath the liquid crystal layer. The screen still worked, but now there was a permanent cracked area in addition to the original black spot. The damage that person thought they were fixing became much worse.
The reality is that any physical pressure on a laptop screen is a last resort option, not a recommended fix. If you’re going to try it, understand that you’re taking a genuine risk.
The upside is maybe temporarily improving the appearance of a line that was already going to require replacement eventually. The downside is you could permanently damage the screen and make your situation worse.
A safer alternative if you want to try something before professional repair is running color-cycling software like the Dead Pixel Fix tool for two to three hours or overnight.
This software rapidly cycles your screen through different colors and can sometimes help trapped liquid return to its proper cells without any physical pressure at all. It’s completely risk free and occasionally works.
Try that first. Only consider physical pressure if that fails and you’ve already accepted that screen replacement is probably in your future anyway.
Repair Shop or DIY? How to Decide and What It Will Cost
If you’ve tried all the software fixes and the external monitor test confirmed the problem is in your physical screen, professional repair is your only real option. At that point, the decision isn’t whether to repair but how to do it smartly and avoid overpaying for low quality work.
A Dell laptop screen repair or replacement typically costs between 2,500 to 12,000 rupees depending on your model and panel quality. Before you accept any quote, check whether your laptop is still under warranty. You might get the repair done for free.
How to Check if Your Dell is Still Under Warranty
Go to dell.com/support and enter your service tag. You’ll find this number on a sticker on the bottom of your laptop. Once you enter it, Dell’s system will show your exact warranty coverage and what’s included. If your warranty covers accidental damage or hardware failures, Dell may replace your screen at no cost. Many business Latitude models come with extended coverage that includes screen replacement.
Even if your warranty has expired, knowing the coverage details helps you decide if professional repair is worth the cost.
What to Tell the Repair Shop
When you contact a repair shop, always ask for an original OEM panel, never a cheap third party replacement. I’ve seen cheap panels fail within months and cost customers more money in the long run.
Get a written quote before agreeing to any work. Ask specifically whether the price includes the original Dell panel or a generic replacement. The difference in price might seem small, but an original panel lasts years while cheap alternatives often develop the same problems quickly.
Call multiple shops and compare quotes. Don’t just choose the cheapest option. Choose the shop that commits to using genuine parts and offers a reasonable warranty on their work.
Simple Habits That Keep Your Dell Screen Line-Free
Most Dell laptop display problems are preventable if you understand what causes them in the first place. I’ve learned from watching how screens fail that a few simple habits can add years to your laptop’s life and keep those black lines from ever appearing.
The biggest culprit I’ve seen is pressure damage from carrying your Dell in a bag without proper protection. When you stuff your laptop into a regular backpack with books and other items piled on top, that constant pressure squeezes the LCD panel.
Over weeks and months, the liquid crystals inside start to spread, and you get those black lines creeping across your screen.
Get yourself a padded laptop sleeve or a backpack with a dedicated padded laptop compartment. This single change prevents more physical damage laptop screen problems than anything else I recommend.
The padding absorbs impact and pressure that would otherwise damage your Dell laptop display problem waiting to happen.
Another pattern I’ve noticed is that laptops sitting unused for long periods develop thick black lines more often than actively used machines.
When your Dell laptop sits in storage for months or a year, the liquid crystals can settle and shift position inside the panel.
If you’re storing your laptop for more than a few weeks, power it on at least once a week for a few minutes. This keeps the LCD panel active and prevents the liquid crystals from settling into problem areas.
Finally, be gentle when cleaning your screen. Never apply pressure when wiping the display. Use only soft, lint free cloths and never press hard.
Aggressive cleaning pressure can damage the panel from outside just as easily as impact damage from inside your bag.
Quick Answer What to Do Based on Your Situation
By now you know your black line on a laptop screen dell could be software, a loose cable, or permanent hardware damage. Here’s your quick reference guide to know exactly what to do next based on what you’ve discovered.
If the external monitor test showed no lines on the external screen: Your problem is software. Try the refresh rate fix first, then update your graphics driver. Both take less than five minutes and cost nothing. Most people solve their Dell laptop display fix this way.
If pressing the top bezel temporarily cleared the vertical lines: You have a loose display cable. Don’t keep using the bezel press trick as a workaround. Take your laptop to a repair shop and ask them to reseat the video cable connector. This repair usually costs much less than screen replacement.
If the lines appeared on both the external monitor and in the Dell LCD self-test: Your physical screen is damaged. Check your warranty status at dell.com/support using your service tag. If you’re not covered, get quotes from multiple repair shops and insist on original OEM panels only.
If you tried all software fixes and nothing worked: Accept that professional repair is your only option. Don’t waste more time troubleshooting. The money you spend on a professional screen replacement will be far less than buying a new laptop.
You now have everything you need to fix laptop display issues or make an informed repair decision. Whether your black line on your Dell laptop screen turns out to be a quick software fix or requires professional help, you’re equipped to handle it confidently
Frequently Asked Questions About Black Lines on Your Dell Laptop Screen
Will the black line on my Dell laptop screen get worse over time?
Yes, hardware damage gets worse. Liquid crystal leaks and shorted pixels spread gradually until your screen becomes unusable. Software-caused lines stay the same and don’t progress. Identifying the cause early matters because hardware problems only get worse.
Can I fix a black line on my Dell laptop screen without replacing it?
Sometimes. Software issues like driver problems or refresh rate mismatches are fully fixable for free.
Hardware damage usually needs panel replacement, though loose cable issues can be fixed without replacing the entire screen. It depends on what’s actually causing your black line on laptop screen dell.
How much does it cost to fix a black line on a Dell laptop screen?
Software fixes cost nothing. Professional panel replacement ranges from 2,500 to 12,000 rupees depending on your Dell model and whether you choose original OEM panels or cheap replacements. Always ask for OEM quality panels. Cheap alternatives often fail within months.
Why does my Dell laptop screen have lines after I haven’t used it for a while?
Liquid crystals inside the panel can settle and shift during long storage periods. This is a known cause pattern. Try software fixes first. If those don’t work, your panel needs professional replacement.
Is it safe to press on my laptop screen to fix the black line?
Risky. Very light thumb pressure at the line’s edge is sometimes attempted as a last resort, but aggressive rubbing or tool pressure can permanently crack the LCD. Only try this if all software fixes have failed and you’ve accepted screen replacement may be necessary anyway.


