
Before You Start 3 Things That Cause Transfers to Fail
Before you attempt to transfer your phone number to new iPhone, I want you to know that most transfer failures happen because of three specific blockers that are completely preventable. I’ve seen people waste hours trying different methods when the real problem was something they could have checked in 30 seconds. Let me walk you through exactly what to look for.
Understanding What You’re Actually Transferring
First, let me clarify what “transferring your phone number” actually means, because I notice a lot of confusion around this. When you transfer your phone number to a new iPhone, you’re moving your cellular service and phone number from your old device to your new one. What you’re not doing is migrating all your app accounts, banking passwords, or email logins automatically. Those require separate action on your part.
Your contacts, photos, and most app data transfer separately through either Quick Start or iCloud. Your phone number itself transfers through one of several methods—each covered in detail as we explore how to transfer phone number to a new iPhone. The key is understanding that how to transfer phone number to new iPhone involves moving just your cellular service, not your entire digital life
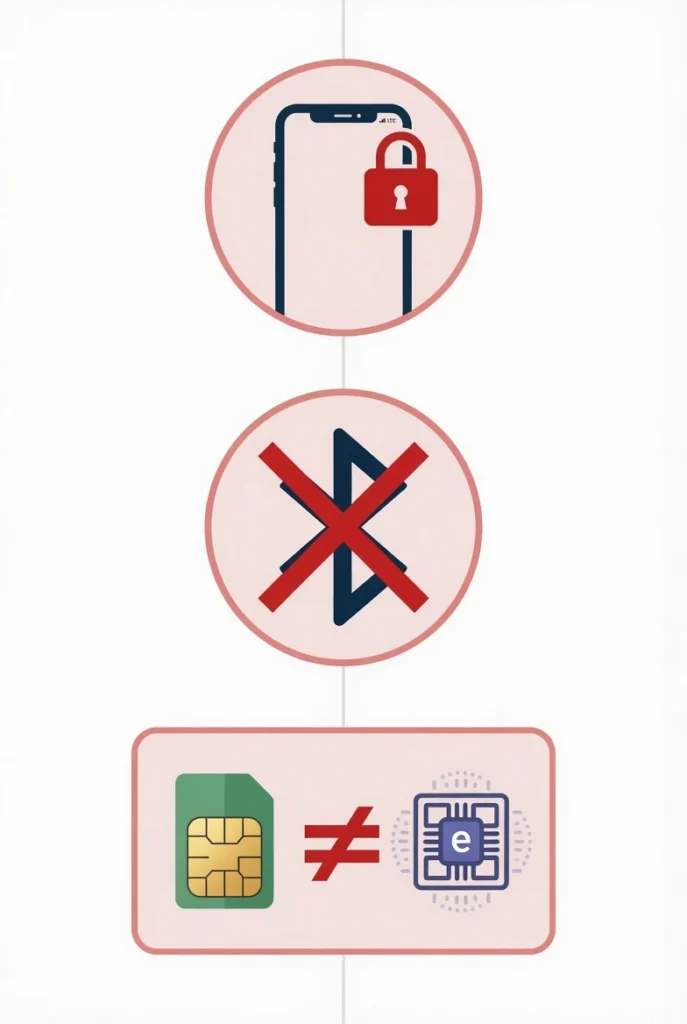
The Three Silent Blockers That Stop Most Transfers
I’ve identified the three most common reasons transfers fail before they even start. The frustrating part? None of them show obvious error messages. Your iPhone just sits there, and nothing happens.
Blocker #1: Your iPhone is locked to a carrier on a different network
This is the most deceptive blocker because your phone works perfectly fine for calls and data. But when you try to transfer your phone number to a new iPhone on a different carrier, the transfer quietly fails.
Here’s what happens: If your old iPhone is locked to Verizon and your new iPhone is locked to AT&T, the cellular service setup won’t recognize your phone number during transfer. The system sees two locked phones on two different networks and rejects the activation. You’ll think the transfer method isn’t working when actually the blocker was the carrier lock itself.
The 60-second check: Go to Settings on your current iPhone. Tap General, then About. Look for “Carrier Lock” in the list. If it says anything other than “No SIM restrictions” or “Unlocked,” you’ve found your problem. You’ll need to contact your carrier to unlock the phone before proceeding.
The good news? If both phones are unlocked, you can transfer between any carriers without issue. If both are locked to the same carrier, the transfer will work fine on that network.
Blocker #2: Bluetooth is turned off on your old iPhone
This one catches people constantly, and I see it happen even with experienced iPhone users. When you choose Quick Start or eSIM wireless transfer, the two phones communicate through Bluetooth to set up the connection. If Bluetooth is off on your old device, the new iPhone never receives the setup prompt.
What actually happens is you see “Hello” on your new iPhone’s screen, but there’s no option to “Set Up from Another iPhone” or “Transfer from iPhone.” The prompt just isn’t there. You restart the phone, try again, nothing changes. Then you waste 20 minutes troubleshooting when the solution was a single toggle.
The 30-second check: On your old iPhone, swipe down from the top right corner to open Control Center. Look for the Bluetooth icon. If it’s grayed out, tap it to turn it on. The icon should turn solid blue.
Once Bluetooth is enabled on both phones and they’re near each other, the setup prompts will appear immediately.
Blocker #3: You’re trying to wirelessly transfer a physical SIM as if it’s an eSIM
This one requires a bit of explanation, so bear with me. Modern iPhones use either physical SIM cards (the tiny chip you can see and hold) or eSIM (an invisible digital SIM stored in the phone’s hardware). If your old iPhone has a physical SIM and you want to transfer wirelessly to a new iPhone, that’s not possible. Physical SIM cards cannot be wirelessly transferred.
What needs to happen first: You convert your physical SIM to eSIM on your old phone, then perform the wireless transfer. If you skip this conversion step and try to wirelessly transfer anyway, nothing happens. The option simply isn’t available.
There’s also an iOS requirement here that I want to mention directly: eSIM wireless transfer requires iOS 16 or later on both phones. If your older iPhone is running iOS 15, the wireless eSIM transfer option won’t appear at all. You can check this in Settings > General > Software Update.
For detailed iOS update instructions, Apple’s support page on updating your iPhone provides step-by-step guidance if you need help.
The decision check: Open Control Center on your old iPhone by swiping down from the top right. Look at the upper left corner where the signal bars are. If you see a carrier name next to the signal bars, you have an active cellular connection. Tap and hold on that section to see your cellular status.
If it says “SIM” with a carrier name, you have a physical SIM. If it says “eSIM” or shows no physical SIM information, you have an eSIM. Knowing this determines which transfer method actually works for you.
Quick Orientation: Which Situation Are You In?
Before you jump into the specific transfer methods in the next section, I want you to identify which of these situations matches yours. This prevents you from following the wrong instructions.
Situation A: Both your old and new iPhones are on the same carrier, and you’re keeping that carrier. You probably want Quick Start or a simple SIM swap to transfer your phone number to a new iPhone.
Situation B: You’re switching to a different carrier. You’ll need to contact your new carrier to activate the number on the new iPhone.
Situation C: You don’t have your old iPhone anymore (it’s lost, traded in, or broken). You’ll restore from an iCloud backup or contact your carrier directly.
Situation D: You’re switching from Android to iPhone. You need to port your number through your carrier and separately handle your contacts.
Each situation has slightly different steps, and I’ll address all of them in detail. The reason I’m mentioning them now is so you don’t accidentally follow instructions meant for a different scenario.
Pre-owned iPhone? Check This Too
If your new iPhone is pre-owned or was previously activated on someone else’s Apple ID, you’ll need to factory reset it before Quick Start will work. The phone will be stuck in the setup screen for the previous owner’s account.
Go to Settings > General > Transfer or Reset iPhone > Erase All Content and Settings. This clears everything and returns the iPhone to its original state. Only then will the Quick Start setup prompts appear properly, allowing you to successfully transfer your phone number to a new iPhone.
The Fastest Way to Transfer Your iPhone Number (eSIM Wireless Transfer)
If you want the quickest way to move your phone number to a new iPhone without physically handling a SIM card, eSIM wireless transfer is your answer. I’ve found this method to be the most reliable for newer iPhones because it happens entirely through an invisible digital SIM that’s built into your phone’s hardware.
eSIM transfer works by wirelessly sending your cellular service information from your old iPhone to your new one when both phones are near each other. The entire process takes just a few minutes, and you don’t need any physical card or a computer involved.
Understanding eSIM and Whether You Can Use It
Before I walk you through the steps, you need to know if eSIM transfer is actually available to you. Not every iPhone or iOS version supports this feature, and I want to save you the frustration of trying a method that won’t work on your devices.
eSIM wireless transfer requires iOS 16 or later on both your old and new iPhones. If either phone is running iOS 15 or earlier, the wireless transfer option simply won’t appear in your settings. You can check your current iOS version by going to Settings > General > About and looking at the software version number.
There’s another requirement that often catches people off guard: your old iPhone must already have an active eSIM, not a physical SIM card. If you’re still using a traditional SIM card, you’ll need to convert it to eSIM first before you can wirelessly transfer to your new phone. I’ll walk you through that conversion in the next section.
One more thing to verify: Make sure Bluetooth is enabled on your old iPhone. The two phones communicate through Bluetooth to authorize and complete the transfer, so if Bluetooth is off, the transfer prompt never appears on your new device.
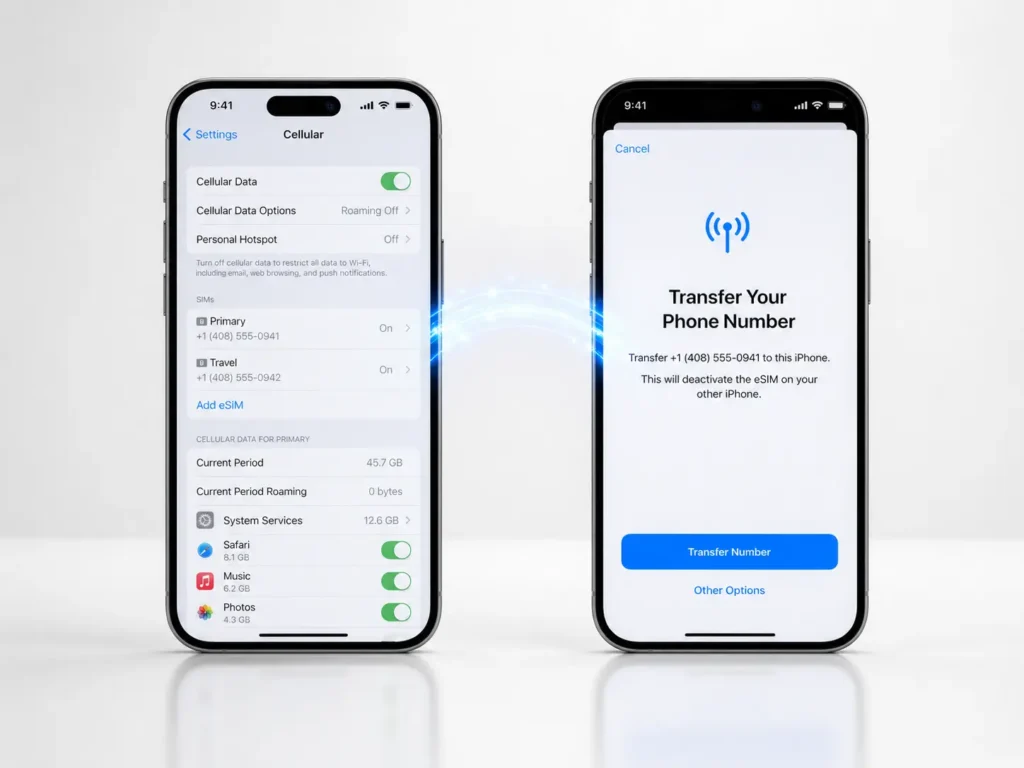
Step-by-Step eSIM Transfer Between Two iPhones
Here’s exactly how to activate eSIM on your new iPhone by transferring it from your old one. Have both phones with you for this process, and keep them close together.
On your old iPhone:
- Open Settings and tap Cellular
- Find the eSIM you want to transfer and tap the information icon (the small “i” next to it)
- Scroll down and tap “Transfer eSIM”
- When prompted, tap “Transfer from Nearby iPhone”
- Wait for the setup code to appear on your screen
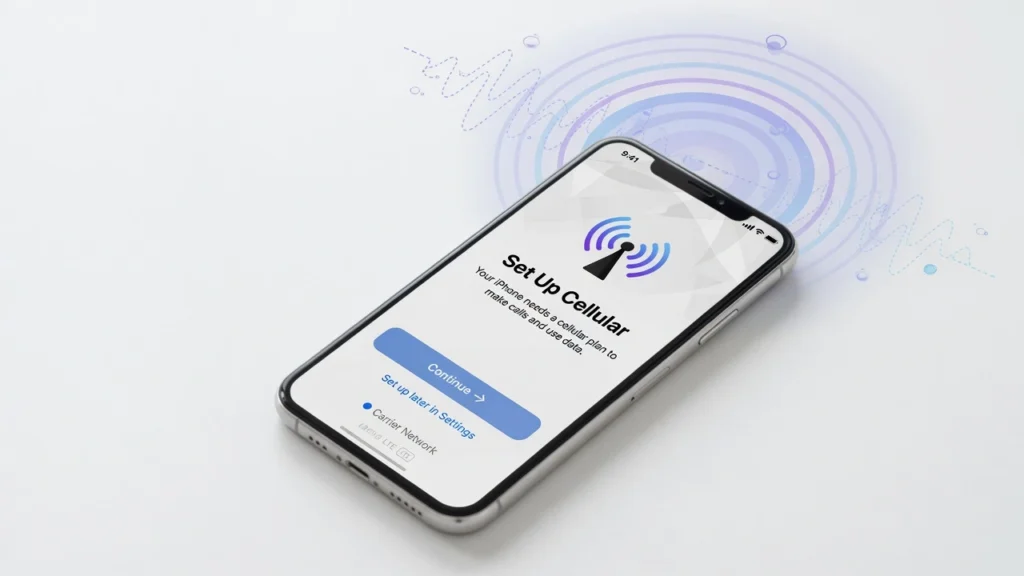
On your new iPhone:
- During the initial setup, you’ll see the “Set Up Cellular” screen
- Tap “Transfer eSIM from Nearby iPhone”
- Hold your new iPhone near your old iPhone
- Follow the prompts on both devices simultaneously
Both phones need to complete their prompts at roughly the same time for the transfer to work. If one phone finishes too quickly and you set it down, the other phone may time out. Just keep them near each other until you see the confirmation message on both screens.
Once you see “Transfer Complete” on your new iPhone’s screen, the eSIM transfer is done. Your new phone now has your cellular service active, and your old phone’s eSIM will be deactivated automatically.
What to Do If Your Old iPhone Has a Physical SIM (Not eSIM)
Many people still use traditional SIM cards, so don’t worry if this applies to you. The process is straightforward, but it requires an extra step before you can do the wireless transfer.
You need to convert your physical SIM to an eSIM first. This conversion happens through your wireless carrier, not through Apple. The good news is that most carriers now allow you to do this directly from their website or app without visiting a store.
Here’s what to do: Search your carrier’s website for “convert physical SIM to eSIM” or “activate eSIM.” You’ll typically find a self-service option that lets you convert your existing SIM within minutes. The process is usually just a few clicks, and your carrier will guide you through it.
Once your carrier completes the conversion, your old iPhone will now have an active eSIM instead of the physical SIM card. At that point, you can follow the wireless transfer steps I outlined above to move your eSIM to your new iPhone.
If you can’t find the conversion option on your carrier’s website, you can also call their customer service line or visit a local store. They can convert your physical SIM to eSIM over the phone or in person within minutes.
eSIM Transfer Not Working? Try the QR Code Method
Sometimes the nearby transfer doesn’t work. Maybe your phones aren’t communicating properly, or one device timed out during the process. When wireless transfer fails, your carrier’s QR code method is your backup solution.
Your wireless carrier can provide you with a QR code that activates your eSIM on your new iPhone. This is essentially the same activation, just done through a code instead of wireless communication between two phones.
To use this method, open the Wallet app on your new iPhone and look for “Add eSIM.” Your carrier’s website or app will have the QR code ready to scan. Simply point your new iPhone’s camera at the code, and the eSIM activation begins immediately.
You can also reach out to your carrier directly through their app, website, or customer service line to get the QR code sent to you. Some carriers email it automatically, while others require you to request it. Either way, the QR code method takes just as long as wireless transfer and gives you a reliable backup when the nearby method doesn’t work.
The QR code approach has saved me several times when the wireless transfer seemed to stall, so don’t hesitate to use it if you run into trouble.
Moving Your Number with a Physical SIM Card (Simplest Method)
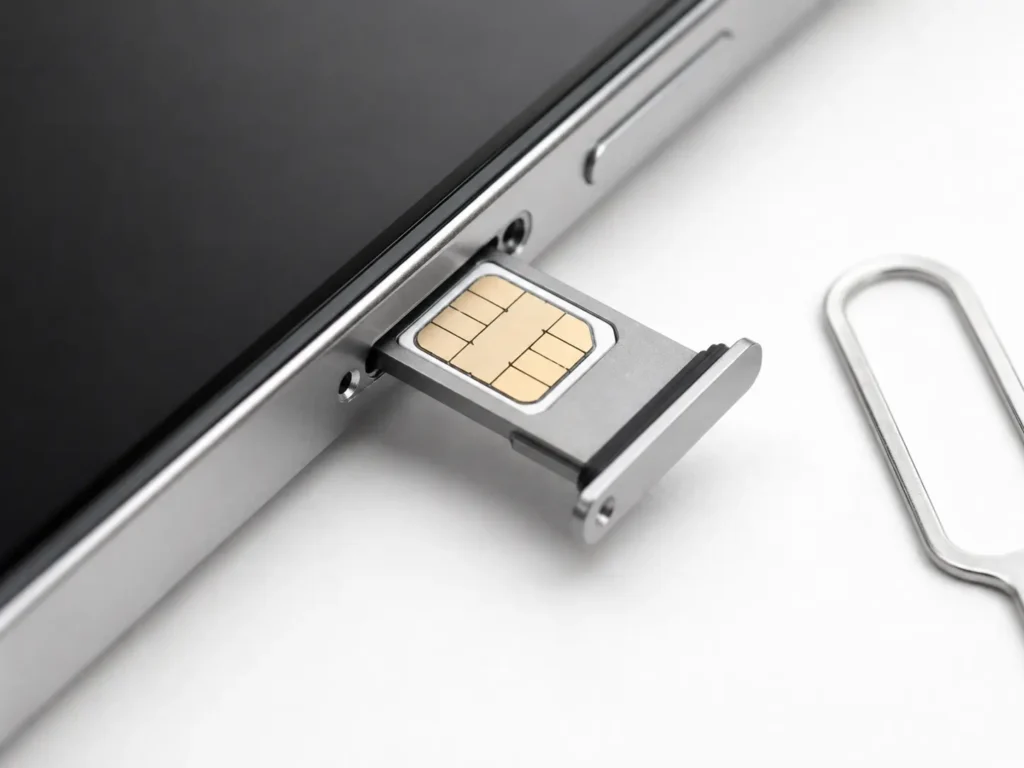
If both your old and new iPhones have physical SIM card slots, swapping the SIM card is the most straightforward way to transfer your phone number. There’s no software to configure, no wireless transfer to wait for, and no special requirements. You physically move the tiny chip from one phone to the other, and your cellular service follows it immediately.
A physical SIM card is that small rectangular chip that holds your carrier information and phone number. Once you insert it into your new iPhone, the phone recognizes your cellular service within seconds, and you’re ready to make calls and send texts.
This method works because your SIM card itself contains your phone number and account information. Moving the card to a new phone is like moving your service along with it. There’s nothing more to it than that.
What You Need Before Removing Your SIM
Before you start, gather the right tool to eject your SIM tray. Most new iPhones come with a small SIM ejector tool in the box. It’s a thin metal pin that you use to pop the tray out. If you’ve lost yours, you have alternatives that work just as well.
A paperclip works perfectly as a substitute. Just straighten one end slightly so you can insert it into the small hole on your iPhone’s side. An earring with a thin post will also work in a pinch. The key is using something thin enough to fit the hole but sturdy enough not to bend when you apply gentle pressure.
Locate the SIM tray on your old iPhone. On most recent models, it’s on the side of the phone, usually below the volume buttons. On some older iPhones, it might be on the bottom or top edge. Look for a tiny circular hole about the size of a pinhead. That’s where you’ll insert your tool.
Before you go any further, confirm that your new iPhone actually has a physical SIM slot. Some newer iPhone models moved to eSIM only, with no physical SIM card slot at all. Check the side of your new phone for the same small hole. If you don’t see one, your new iPhone doesn’t support physical SIM cards, and you’ll need to use eSIM transfer instead.
Removing the SIM and Inserting It Into Your New iPhone
Here’s the step-by-step process for swapping your SIM card between iPhones.
Removing the SIM from your old iPhone:
- Take your SIM ejector tool or paperclip and insert the thin end straight into the hole on your phone’s side
- Push gently until you feel slight resistance. Do not force it. The tray will pop out on its own
- Pull the tray out completely. Your SIM card will be sitting in a small indent on the tray
- Carefully lift the SIM card out of the tray by pinching one corner
The SIM card is small and delicate, so handle it by the edges only. Avoid touching the gold contacts on the back of the card.
Inserting the SIM into your new iPhone:
- Look at your SIM card and notice the notch cut into one corner. This notch is intentional and ensures the card only fits one way
- Hold your new iPhone and locate the SIM tray hole on the side
- Insert the SIM card into your new iPhone’s tray. The notch should align naturally. Do not force it. If the card resists, flip it around and try again. The correct orientation will slide in smoothly
- Push the tray gently back into the phone until it clicks flush against the side of the phone
Once the tray is fully seated, your new iPhone will recognize the SIM card within seconds. You don’t need to restart the phone or adjust any settings.
Verify your cellular service is active:
Swipe down from the top right corner of your new iPhone to open Control Center. In the upper left corner, you should see your carrier’s name next to the signal bars. If you see your carrier name and signal strength, your iPhone SIM card transfer is complete and your cellular service is active.
Your phone number has successfully moved to your new device. You can now make calls, send texts, and use cellular data immediately. Your old iPhone will show no signal once you remove the SIM card, which is exactly what should happen.
Using Quick Start to Transfer Your Number and Everything Else
Quick Start is Apple’s built-in feature that transfers your phone number, all your data, apps, photos, messages, and settings from your old iPhone to your new one in a single process. I consider this the most comprehensive transfer method because it handles everything at once instead of requiring multiple separate steps.
The appeal of Quick Start is that you’re not juggling different methods for your number versus your data. Everything moves together through one seamless workflow. Your new iPhone wakes up with your old iPhone’s identity completely intact.
Quick Start vs. Download from iCloud — Which Is Right for You?
Before you start the Quick Start process, I want to explain the choice you’ll face during setup. You actually have two ways to transfer your data to your new iPhone, and picking the right one saves you significant time.
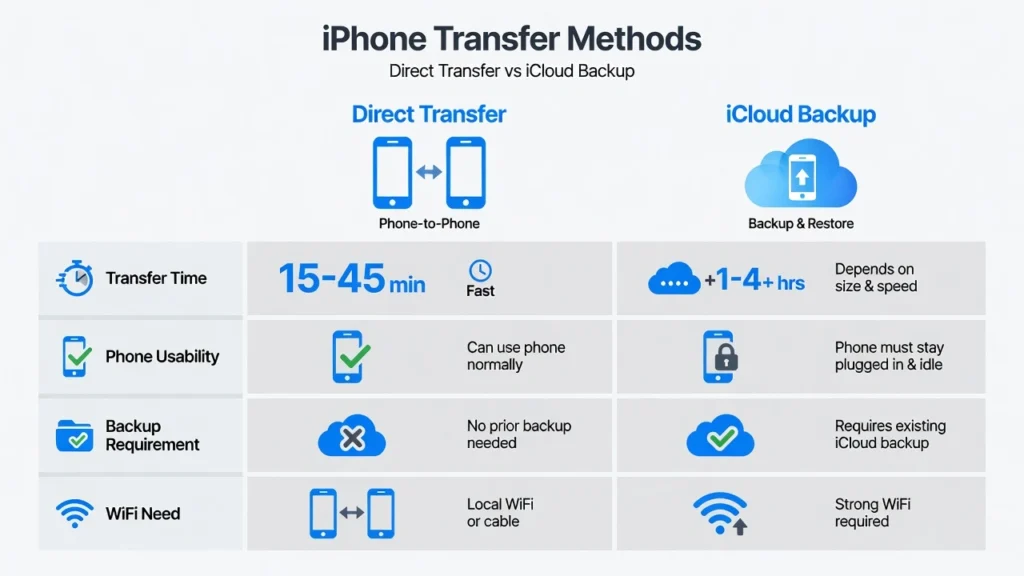
Direct Quick Start transfer connects your old iPhone to your new one wirelessly. The two phones sit near each other, and all your data flows directly between them. This method requires no iCloud backup beforehand. You can’t use either phone during the transfer because both need to stay focused on the communication between them.
The time for direct transfer varies depending on how much data you’re moving. I’ve tested this with real-world scenarios. A phone with about 100GB of data transferred in approximately 12 to 15 minutes. If you have less data, it might finish in 5 to 10 minutes. With more data, plan for several hours.
Download from iCloud is the alternative path. During setup, instead of choosing “Transfer from iPhone,” you select “Download from iCloud Backup.” Your new phone downloads your backup file from iCloud while you can actually use the phone in the background. Apps continue installing, messages appear, and photos sync while you’re already browsing.
iCloud download typically completes the initial setup in about 15 minutes, with remaining data following in the background over the next few hours. The major advantage is that you get immediate access to your new phone while everything else catches up.
I recommend iCloud download if you have a strong Wi-Fi connection and your data size is large. Choose direct transfer if you don’t have an iCloud backup or prefer everything done in one sitting without waiting for background syncing.
Step-by-Step Quick Start Walkthrough
Here’s the exact process from the moment you power on your new iPhone through to the final confirmation.
Prepare both phones:
Ensure Bluetooth is enabled on your old iPhone. Keep both phones close together throughout the process. Plug both phones into power during the transfer to prevent battery drain from interrupting the process.
On your new iPhone:
- Turn on your new iPhone. You’ll see the “Hello” screen with language and region options
- Follow the initial setup screens until you reach “Quick Start”
- You’ll see two options: “Set Up with iPhone” or “Set Up Manually.” Tap “Set Up with iPhone”
- Hold your new iPhone close to your old iPhone
- When the setup code appears on your new iPhone’s screen, hold it steady
- Point your old iPhone’s camera at the code on your new iPhone’s screen to scan it
- On your old iPhone, you’ll be prompted to enter your passcode for your new iPhone. Do this
- Follow the remaining prompts, which include setting up Face ID and choosing your transfer method (direct or iCloud)
Choosing your transfer method:
If you choose direct transfer, you’ll see “Transfer Data from iPhone.” The process begins immediately, and both phones need to stay close and powered on.
If you choose iCloud download, select that option and sign in with your Apple ID. Your new phone will download from your most recent iCloud backup.
Wait for completion:
A transfer progress bar appears on your new iPhone. With direct transfer, this can take 15 minutes to several hours. With iCloud download, the initial setup finishes quickly, but background syncing continues.
When you see “Transfer Complete” on your new iPhone’s screen, the main process is done. Your phone number, apps, contacts, messages, and settings are now on your new device.
Quick Start Not Starting? Here’s Why
If you’re staring at your new iPhone’s setup screen and the “Set Up with iPhone” option never appears, something blocked the connection between your phones.
The most common culprit is Bluetooth being disabled on your old iPhone. Quick Start requires Bluetooth to communicate setup codes between devices. Swipe down from the top right of your old iPhone to open Control Center. If the Bluetooth icon looks grayed out or faded, tap it to turn it on. Make sure the icon turns solid blue.
After enabling Bluetooth, restart both iPhones. Turn them completely off, wait 10 seconds, and turn them back on. Once both phones have restarted, try Quick Start again. The setup prompts should appear this time.
If you’ve already completed setup on your new iPhone and selected “Set Up Manually,” the Quick Start option is gone. You can’t access it after you’ve already finished the initial setup. To see Quick Start again, you must erase your new iPhone and start over. Go to Settings > General > Transfer or Reset iPhone > Erase All Content and Settings. This brings you back to the Hello screen where Quick Start will appear again.
Another possibility is that your new iPhone isn’t on the Hello setup screen. If it’s already showing the home screen with apps and icons, Quick Start won’t work. You’ll need to erase and start fresh.
Make sure both phones have recent iOS versions. Quick Start works most reliably when both phones are running the same or similar iOS versions. If your old phone is several versions behind, consider updating it first through Settings > General > Software Update.
How to Transfer Your Number Through Your Carrier (AT&T, Verizon, T-Mobile, Straight Talk)
If you want direct control over your carrier transfer or you’re switching to a different wireless carrier, going through your carrier’s own activation process gives you that control. Each major carrier handles number transfers slightly differently, so I’m walking you through the specific steps for the carriers you’re most likely using.
A carrier transfer means activating your phone number on your new iPhone directly through your wireless carrier’s system rather than relying on Quick Start or eSIM wireless transfer. This approach is particularly useful when you’re changing carriers or need carrier-specific account verification.
How to Transfer Your Number to a New iPhone with AT&T
AT&T makes their number transfer process straightforward through their MyAT&T app or website. You can complete most of it without visiting a store.
Open the MyAT&T app on any device and sign in with your account credentials. Navigate to the “Devices” or “My Devices” section. You should see an option to add a new device or activate a device. Select your new iPhone from the available device list and follow the prompts to confirm your phone number and account information.
AT&T will guide you through choosing between a physical SIM or eSIM activation. If you’re transferring a physical SIM, make sure you have the correct SIM card size for your new iPhone. Older iPhones used micro SIM cards, while newer models use nano SIM. If your old SIM doesn’t fit, AT&T can mail you a new SIM or issue one at a local store.
For eSIM activation through AT&T, you’ll receive a QR code during the MyAT&T process. Open the Wallet app on your new iPhone, select “Add eSIM,” and scan the code. Your AT&T service activates within minutes.
If you prefer not to use the app, visit att.com on a computer, log into your account, and look for “Device Activation” or “Add Device.” The website process mirrors the app process and takes about 10 minutes. If you run into trouble, AT&T customer service is available by phone or through a local store visit.
How to Transfer Your Number to a New iPhone with Verizon
Verizon’s process happens through their My Verizon app or website, and I’ve found it to be one of the most efficient carrier processes available.
Download the My Verizon app and sign in with your account details. Tap “Devices” and look for an option to manage or add a device. Select “Activate a Device” or “Add New Device.” Search for your new iPhone model and confirm you want to activate it on your existing line.
Verizon will prompt you to choose your activation method. Select “eSIM” if you want wireless activation, or “Physical SIM” if you’re swapping cards. If you choose eSIM, Verizon generates a QR code immediately. Open Wallet on your new iPhone and scan it to activate your service.
For physical SIM activation, confirm that your current SIM card is compatible with your new iPhone. Verizon can mail you a replacement SIM if needed, though this adds a few days to the process. If you need immediate activation, visit a Verizon store with your new iPhone to have them issue and install a compatible SIM.
One thing I appreciate about Verizon is that you can also complete this entire process by calling their activation line or visiting verizon.com on a computer. The website interface is equally straightforward and takes about the same amount of time as the app.
Your Verizon number becomes active on your new iPhone within minutes of completing activation. You’ll receive a confirmation text and email once the transfer is complete.
How to Transfer Your Number to a New iPhone with T-Mobile
T-Mobile offers the quickest path through their dedicated T-Mobile app or website, and their customer service is usually helpful if you get stuck.
Open the T-Mobile app and navigate to “Account” or “My Account.” Look for “Devices” or “Device Management.” Select the option to add or activate a new device. T-Mobile will show you your available lines and ask which one you want to activate on your new iPhone.
Choose your activation method. T-Mobile strongly encourages eSIM activation, which they call “T-Mobile digits.” If you go this route, you’ll receive a QR code during setup. Scan it with your new iPhone’s camera through the Wallet app, and your service activates instantly.
If you prefer a physical SIM, confirm that your current SIM card works with your new iPhone. T-Mobile uses nano SIM cards on all recent iPhone models, so your existing card will likely work. If it doesn’t, T-Mobile can mail you a replacement or provide one at a local T-Mobile store.
T-Mobile’s website process is equally simple. Visit t-mobile.com, log in, and find the device activation section. The steps mirror the app, taking about 10 minutes from start to finish.
What sets T-Mobile apart is their willingness to handle transfers over the phone. Call T-Mobile customer service and they can activate your new iPhone in about 15 minutes while you wait on the line. This option is helpful if you prefer speaking with someone directly.
How to Transfer Your Number to a New iPhone with Straight Talk
Straight Talk’s process is different because they use a “Bring Your Own Phone” model, meaning you activate your existing Straight Talk SIM in your new iPhone rather than getting a new SIM.
Visit the Straight Talk website and log into your account. Navigate to “Device Management” or “Manage Devices.” You’ll see an option to activate a device or transfer service. Enter your new iPhone’s IMEI number, which you can find in Settings > General > About on your new phone.
Straight Talk will confirm your new iPhone’s compatibility. Once confirmed, you can either move your existing physical SIM to your new iPhone or request eSIM activation if your current plan supports it.
For physical SIM transfer, your existing Straight Talk SIM card should work in your new iPhone. Insert it using an ejector tool as I described in the SIM swap section. Your Straight Talk service remains active without any additional steps.
If you want eSIM instead, you may need to purchase an eSIM-compatible plan through Straight Talk’s website. They offer eSIM activation, but it requires a separate transaction. Once you select eSIM, Straight Talk provides a QR code that you scan on your new iPhone to activate service.
Straight Talk customer service can also help over the phone if you need guidance. Call their support line, and they can walk you through activation or resolve any issues with your device transfer. The process typically takes 15 to 20 minutes by phone.
How to Transfer Your iPhone Number Without Your Old Phone
If your old iPhone is lost, broken, traded in, or simply not available, you can still transfer your phone number to your new iPhone. You have two viable paths depending on whether you have an iCloud backup. I want you to know upfront that this scenario is completely solvable, even though it feels more complicated than when you have both phones.
The key is that your phone number lives in two places: in your iCloud backup and in your carrier’s account system. Either one can restore your service on your new device without needing the old phone physically present.
Restoring From an iCloud Backup (If You Have One)
If you’ve been backing up your iPhone to iCloud, you have everything you need to transfer your number without the old device. Your iCloud backup contains your phone number, contacts, messages, apps, and all your data.
Start by powering on your new iPhone. You’ll see the “Hello” setup screen with language and region options. Follow the initial setup until you reach the Quick Start screen. This is where the path differs from the standard process.
On the Quick Start screen, look for an option that says “Set Up Without Another Device” or “Set Up Manually.” Tap that option. You’re telling your iPhone that you don’t have access to another device for transfer.
Next, you’ll see setup screens for Wi-Fi, Face ID, and passcode. Complete these steps normally. When you reach the “Apps & Data” screen, you’ll see several options. Select “Restore from iCloud Backup.” This is the critical step that brings your number and all your data back to your new phone.
You’ll be prompted to sign in with your Apple ID. Use the same Apple ID that was connected to your old iPhone. This is essential because your iCloud backup is linked to that specific Apple ID account.
Once you’re signed in, you’ll see a list of available iCloud backups. Select the most recent backup from your old iPhone. The backup date and device name will display, making it easy to identify the right one.
Your new iPhone will download the backup and begin restoring all your data. This process typically takes 30 minutes to several hours depending on how much data you have and your internet connection speed. Keep your new iPhone plugged into power and connected to Wi-Fi during this entire process.
When the restoration completes, your phone number becomes active on your new iPhone immediately. Your cellular service is live, your contacts are restored, and your data is back where it should be.
What to Do If You Have No iCloud Backup
If you didn’t have iCloud backups enabled on your old iPhone, you’ll need to activate your phone number directly through your wireless carrier’s account system. This path is straightforward but requires calling your carrier or visiting their website.
Contact your wireless carrier using the phone number on your bill or through their official website. Let them know you have a new iPhone and want to activate your existing phone number on the new device. Have your account information ready, including your account number and the phone number you want to activate.
Your carrier will verify your identity by asking security questions or requesting information only you would know. This verification process protects your account from unauthorized changes. They may ask for your last four digits of your Social Security number, your billing address, or answers to security questions you’ve set up previously.
Once your carrier confirms your identity, tell them whether you have a physical SIM card or want eSIM activation. If you have a physical SIM from your old phone, they can activate it on your new iPhone immediately. The SIM card itself contains your number, so moving it to a new phone activates your service within seconds.
If you want eSIM activation, your carrier will initiate the process remotely. They’ll send you an activation code or generate a QR code that you scan on your new iPhone. The activation happens within minutes, and your phone number becomes active on your new device.
Some carriers offer online account management options that let you complete this activation yourself without calling. Visit your carrier’s website, log into your account, and look for device activation or number transfer options. Many carriers now support self-service eSIM activation through their websites.
If your old physical SIM card is damaged or you don’t have it, ask your carrier to issue a replacement SIM. They can mail it to you, though this adds a few days to the process. Some carriers will also provide a replacement SIM at a local retail store if you need immediate activation.
The entire carrier activation process takes about 15 to 20 minutes by phone or 10 minutes through online self-service. Your phone number is active and ready to use once the activation completes.
Switching From Android? How to Transfer Your Number to a New iPhone
Switching from Android to iPhone adds one extra layer to the number transfer process because your phone number lives on Android’s carrier system, not on Apple’s ecosystem. The good news is that transferring your number is just as straightforward as moving between iPhones. What requires separate attention is getting your contacts and data across, which works differently on iPhone than it did on Android.
Number porting is the process of moving your phone number from one carrier or device to another. When you switch from Android to iPhone, you’re essentially telling your current carrier to activate your existing number on your new Apple device.
Moving Your Phone Number (Porting) From Android to iPhone
Your approach here depends on whether you’re staying with your current carrier or switching to a new one.
If you’re keeping your current carrier:
Contact your Android carrier and let them know you’re upgrading to an iPhone. Tell them you want to keep your existing phone number. The carrier will ask you to verify your account information for security purposes.
Ask your carrier whether they’ll provide a physical SIM or eSIM for your new iPhone. Most carriers now default to eSIM, but some still issue physical SIM cards. If your new iPhone doesn’t have a physical SIM slot, request eSIM. If your carrier doesn’t support eSIM yet, they can issue a nano SIM card, which is the physical SIM size used by current iPhones.
Your carrier will activate your number on the new SIM or eSIM immediately. This process takes just minutes. Once activated, insert the SIM into your iPhone or scan the eSIM QR code, and your number is live on your new device.
If you’re switching to a new carrier:
You’ll need to port your number to the new carrier. This process is called number porting, and it’s a legal right that all carriers must honor. Contact your new carrier and ask about their porting process. They’ll walk you through it.
Your new carrier will ask for your account number and PIN from your current Android carrier. You can find your account number on your phone bill or through your current carrier’s app. If you don’t know your PIN, contact your current carrier to retrieve it.
The new carrier submits a port request on your behalf. This process typically takes 24 to 48 hours, though some carriers can complete it faster. During this window, your number remains active on your Android phone. Once the port completes, your number transfers to your new iPhone, and your Android phone loses service.
I recommend waiting until your new iPhone arrives and is ready to use before initiating the port. This ensures your number doesn’t transfer to a device that isn’t yet activated. Once your iPhone is set up and ready, complete the port request so your number moves over seamlessly.
Getting Your Android Contacts Onto Your New iPhone
Your Android contacts live in Google Contacts or on your SIM card. Getting them to your new iPhone requires a different approach than Quick Start because iPhone and Android use different contact systems.
The easiest method: Google account sync
If your Android contacts are synced to your Google account, this is the fastest transfer path. On your new iPhone, go to Settings > Mail > Accounts. Tap “Add Account” and select “Google.” Sign in with the Google account you used on your Android phone.
Once you’re signed in, toggle “Contacts” to the ON position. Your iPhone will automatically sync all your Google contacts. This typically takes a few minutes depending on how many contacts you have.
If you already have contacts on your iPhone and want to merge your Google contacts without losing existing ones, you’ll see a prompt asking what you want to do. Select “Keep on My iPhone” to preserve both your existing iPhone contacts and your imported Google contacts.
The manual method: VCF file export
If your Google account isn’t set up or you have contacts stored locally on your Android phone, export them as a VCF file. This is a standard contact format that iPhone can import.
On your Android phone, open your Contacts app. Look for an export or backup option. Most Android phones allow you to export contacts as a VCF file. Save this file and email it to yourself.
Here’s the critical part: Open the email on your iPhone and tap the VCF attachment. iPhone will prompt you to import the contacts. Select “Import” and all your contacts move to your iPhone.
One important warning I need to give you directly: Do not try to share the VCF file through WhatsApp or other messaging apps. Many iPhone users have discovered that VCF files shared through WhatsApp cannot be imported on iPhone. Email is the only reliable method for VCF file transfer. This has caused confusion for many Android switchers, so I’m being explicit about it here.
Once your contacts are synced or imported, you can delete your Google account from iPhone Settings if you want. Your contacts stay on the phone even after you remove the account. Or leave the account connected for ongoing sync if you prefer automatic updates.
Don’t Erase Your Old iPhone Yet Read This First
This is the most important warning I can give you after completing your number transfer. Do not erase your old iPhone immediately after setting up your new one. I’ve seen people lose years of WhatsApp conversations, banking app access, and irreplaceable photos because they erased too quickly. The transfer process copies your data, but some apps and services need time to fully sync before the old phone is gone.
Wait at least a few days before erasing your old iPhone. This waiting period gives your apps, messages, photos, and account information time to fully settle on your new device. Once you’ve verified everything is working, then you can safely erase the old phone.
What to Check Before You Erase Your Old iPhone
Before you even think about erasing your old iPhone, go through this verification checklist on your new device. Each item takes just a minute to confirm, and this simple process prevents permanent data loss.
Photos and videos: Open the Photos app on your new iPhone and scroll through your library. Look for recent photos from your old phone. If you see them, your photo library synced successfully. Check both recent pictures and older folders to confirm the full library transferred. If some photos are missing, wait another day and check again. iCloud photo sync can take time depending on your library size.
WhatsApp and messaging: Open WhatsApp on your new iPhone and verify that your conversation history is there. Scroll through a few conversations to confirm messages transferred. Check that you can see old group chats and contact names. WhatsApp specifically requires time to sync after a new device setup. This is one of the most commonly lost data types when people erase too soon.
Banking and financial apps: Open your banking app, investment app, or any financial service you use. Attempt to log in. You’ll likely need to re-enter your password and may be asked to verify your identity. This is normal and expected. Financial apps require re-login for security reasons after you use them on a new device. The important thing is that you can access your account. If you get error messages, wait another day and try again.
Contacts: Open the Contacts app and search for someone you know. Verify that all your contacts transferred successfully. Scroll through several contacts to confirm phone numbers and email addresses are present. If you imported contacts from Google or another source, double-check that they all arrived.
iMessage and SMS: Send a text message to someone and confirm they receive it. Ask them to send one back. If the message arrives as iMessage (blue bubble on iPhone), your Apple ID is properly activated. If it arrives as SMS (green bubble), that’s fine too. Either way, messaging is working. This confirms your phone number is active and recognized by Apple’s systems.
Home screen layout and wallpaper: Your new iPhone should look almost identical to your old one. Home screen app layout, folders, and wallpaper should all match. If something looks different, check your old iPhone to see if there’s a discrepancy. Usually everything replicates perfectly, but if something seems missing, reference the old phone to find it on the new one.
Once you’ve checked all six items and everything looks good, you can proceed with confidence that your data successfully transferred.
How to Properly Erase Your Old iPhone When You’re Ready
After you’ve waited a few days and verified everything above, your old iPhone can be safely erased. Whether you’re selling it, giving it away, or keeping it as a backup, erasing removes all your personal data from the device.
Go to Settings on your old iPhone. Tap General, then look for “Transfer or Reset iPhone” at the bottom of the screen. This option might also be labeled as “Reset” on older iOS versions.
Select “Erase All Content and Settings.” You’ll see a warning that this action is irreversible and will remove everything from your iPhone. Confirm by tapping “Erase” again.
Before the erasure completes, your iPhone will ask you to remove your Apple ID. This step is important if you’re selling or giving away the phone. Enter your Apple ID password when prompted. Removing your Apple ID prevents the next owner from being locked out of the device and ensures they can set it up with their own account.
If you’re keeping the old iPhone as a backup for yourself, you can choose to keep the Apple ID. This allows you to reactivate it later without entering credentials again.
The erasure process takes 5 to 10 minutes. Your iPhone will restart several times and show a progress indicator. Keep the phone plugged in during this process. Once complete, your old iPhone returns to its factory state with no personal data remaining.
At this point, your old iPhone is completely clean, and your new iPhone is your primary device with all your data, contacts, and phone number. You’ve successfully completed the entire transfer process.
When Your Number Still Isn’t Working After the Transfer
If you’ve completed all the transfer steps and your phone number still isn’t working on your new iPhone, don’t panic. This happens sometimes, and the fix is usually simple once you know what to look for. I’m going to walk you through the three most common reasons your iPhone activation fails and exactly how to fix each one.
Most transfer failures happen because of one overlooked setting or a timing issue rather than a permanent problem. In my experience, 90 percent of “my number isn’t working” situations resolve within 24 hours or with a single restart.
No Signal or “No Service” Message
If your new iPhone shows “No Service” in the status bar, your cellular service setup didn’t complete properly. The first thing to check is whether both devices are on the same carrier or both unlocked.
Go to Settings > General > About on your new iPhone. Look for “Carrier Lock” in the list. If it says anything other than “Unlocked” or “No SIM restrictions,” your phone is locked to a specific carrier. If your old phone was on a different carrier, the number transfer will fail. You’ll need to contact your new carrier to unlock the phone before the number can activate.
If both phones are on the same carrier or both are unlocked, restart your new iPhone. Hold the power button until “slide to power off” appears, then drag to turn the phone completely off. Wait 30 seconds, then power it back on. This restart often triggers the cellular service setup to complete.
Once the phone restarts, go to Settings > Cellular and verify that “Cellular Data” is turned on and “Cellular” shows your carrier name. If your carrier name appears, your number is active. If it still shows “No Service” after restarting, contact your wireless carrier. They can resend the activation signal to your phone remotely.
eSIM Transfer Didn’t Work
If you attempted eSIM wireless transfer and the setup screen never showed the transfer prompt, iOS version is usually the culprit. eSIM wireless transfer requires iOS 16 or later on both phones. If your old iPhone is running iOS 15, the eSIM transfer option won’t appear.
Check your old iPhone’s iOS version by going to Settings > General > Software Update. If an update is available, connect to Wi-Fi and tap “Download and Install.” Once the update completes, restart both phones and try the eSIM transfer again.
If your iOS is already 16 or later but the transfer still didn’t work, try the QR code backup method instead. Contact your wireless carrier and request an eSIM activation QR code. Scan the QR code on your new iPhone through the Wallet app, and your eSIM activates within minutes. This method bypasses the wireless transfer requirement entirely.
Apps Don’t Recognize Your New Number
Sometimes your number transfers successfully, but apps like banking services or two-factor authentication still show your old number or refuse to recognize the new one. This is frustrating but solvable.
Many apps cache your phone number when you first set them up. After transferring to a new iPhone, these apps don’t automatically update to recognize your new device. Sign out of the app completely on your new iPhone. Delete the app and reinstall it fresh from the App Store. When you log back in, the app will recognize your new iPhone and update your phone number in its system.
For banking apps and services that use your phone number for security verification, you may need to contact the company directly. Call the phone number on the back of your card or the company’s website and let them know you’ve upgraded your iPhone.
They can update their records with your new device information and phone number. If you’re having trouble connecting with a company’s support line after the transfer, verify that the number isn’t accidentally blocked on your new device sometimes security settings carry over during transfer. You can quickly check your list of blocked numbers on iPhone to rule this out
Wait 24 hours before assuming there’s a permanent problem. Many services take time to recognize a new device on their systems. Your number is active if you can make calls and send texts. App recognition typically catches up within 24 hours.
If you’ve tried restarting, verified your carrier settings, and waited a full day but your iPhone activation still isn’t working, contact your wireless carrier’s customer service. They can check their system to confirm your number is provisioned on your new device and resend activation signals if needed.
Frequently Asked Questions
How long does it take to transfer a phone number to a new iPhone?
eSIM wireless transfer takes just a few minutes, while Quick Start direct transfer ranges from 15 minutes to several hours depending on data size (100GB typically transfers in 12–15 minutes). iCloud download completes initial setup in about 15 minutes with background syncing continuing afterward, and physical SIM transfer is instantaneous
Can I transfer my iPhone number without my old phone?
Yes—if you have an iCloud backup, restore it during setup by selecting “Set Up Without Another Device” then “From iCloud Backup.” If you don’t have a backup, contact your carrier directly to activate your number remotely through eSIM or a replacement SIM card, which takes 15–20 minutes.
Will my apps stay logged in after I transfer to a new iPhone?
Most apps stay logged in automatically during transfer, but banking and financial apps require re-login for security this is expected behavior and takes 10,15 minutes to complete across all your financial services.
Can I use my new iPhone while it’s transferring?
Yes, but only if you chose “Download from iCloud”both phones must stay close and unused during direct iPhone-to-iPhone transfer, while iCloud download lets you use your new phone immediately as syncing happens in the background.
What’s the difference between eSIM transfer and physical SIM transfer?
Physical SIM transfer moves a tiny card between phones (works on any iPhone with a slot, needs tool), while eSIM transfer is wireless (requires iOS 16+, Bluetooth ON, and old phone must have active eSIM already).


