
Learning how to connect Canon printer to WiFi doesn’t have to be frustrating or complicated. I’ve helped countless people get their Canon printers connected wirelessly, and I can tell you that 90% of connection problems come down to just a few common mistakes that are easy to avoid once you know what to watch for.
Whether you have a Canon PIXMA, MG series, or TS series printer, the process is essentially the same across all models. In this guide, I’ll walk you through three reliable methods that actually work, plus show you how to fix the most common problems that cause Canon printer WiFi setup to fail. By the end of this article, you’ll have your printer connected and be printing wirelessly from any device in your home
Before You Start — 3 Things to Check First
Before I walk you through connecting your Canon printer to WiFi, let me save you from the frustration I’ve seen countless people face. There are three simple things you need to check first, and skipping even one of them can turn a 5-minute setup into an hour of troubleshooting.
First, find your WiFi network password. If you’ve never changed it from the default, flip your router over and look at the label on the back or bottom. Your wifi network password printer setup requires is printed right there, usually under a section labeled “Wireless Key” or “Password.” Write it down or take a photo with your phone because you’ll need to enter it exactly as shown, including capital letters and numbers.
Second, and this is the biggest hidden problem I see, check your 2.4GHz wifi band connection. Make sure you’re using the 2.4GHz WiFi band, not 5GHz. Most Canon home printers only connect to 2.4GHz networks. If you have a modern dual-band router, it broadcasts two separate networks, one on 2.4GHz and one on 5GHz. During setup, your phone or computer needs to be connected to the 2.4GHz network, or the printer simply won’t show up. This single issue causes more failed setups than anything else, and almost nobody mentions it.
Third, make sure your Canon printer is powered on and ready. This sounds obvious, but if it’s a brand new printer, check that all the orange shipping tapes have been removed. Some are hidden inside the paper tray or under the scanner lid, and they’re easy to miss. The printer won’t work properly until every piece of orange tape is gone.
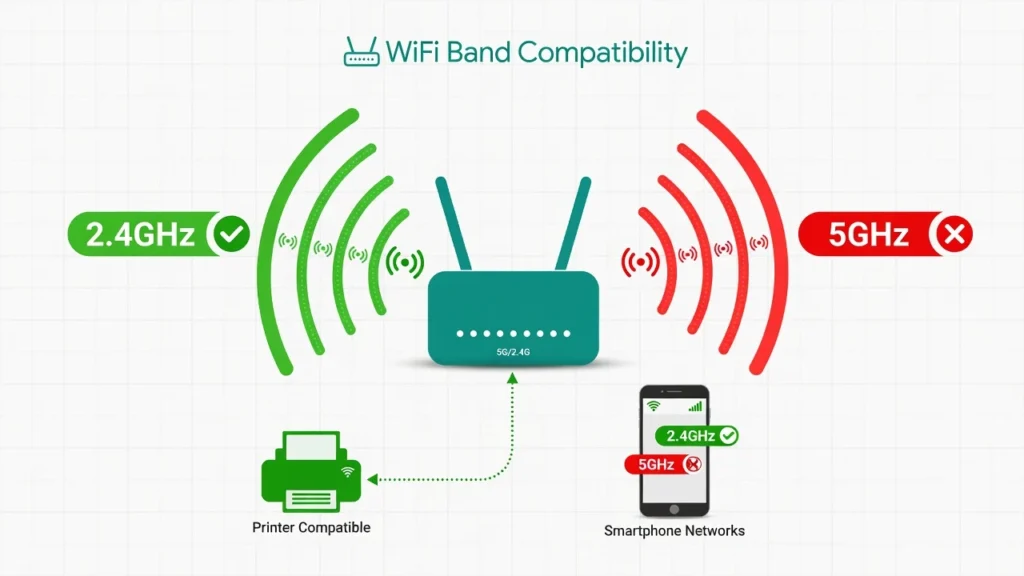
connecting to the 5GHz band is the #1 reason setup
fails.
Once these three things are in place, the actual wireless printer setup takes about 5 minutes. You’re not doing anything complicated. You’re just telling your home wifi network printer to join your network so you can print wirelessly without USB cables.
Method 1 — Connect Canon Printer to WiFi Using the WPS Button (Fastest)
If your router has a WPS button, this is by far the quickest way to connect your Canon printer to WiFi. WPS stands for Wi-Fi Protected Setup, and this WPS button printer setup method is basically a shortcut that lets your printer and router talk to each other without you having to type in any passwords. The whole WPS Wi-Fi Protected Setup process takes less than two minutes once you know where the buttons are
Here’s exactly how I do the WPS button printer setup on Canon printers.
Step 1: Start on the printer. Look for the Setup button on your Canon printer. It usually has a wrench or screwdriver icon. Press it once, then use the arrow buttons to scroll down until you see Wireless LAN setup. Select that option by pressing OK.
Step 2: Choose WPS push button. The printer menu will show you a few different ways to connect. Select WPS (Push button method) and press OK. Your Canon printer will now display a message telling you to press the WPS button on your router within the next two minutes. This timing matters because the wireless LAN setup Canon uses has a built-in timeout for security.
Step 3: Press the WPS button on your router. Now walk over to your WiFi router and find the WPS button. On most routers, the wifi setup button is clearly labeled WPS. Hold it down for about three seconds until you see a light start flashing. That flashing light means your router is ready to connect printer to router.
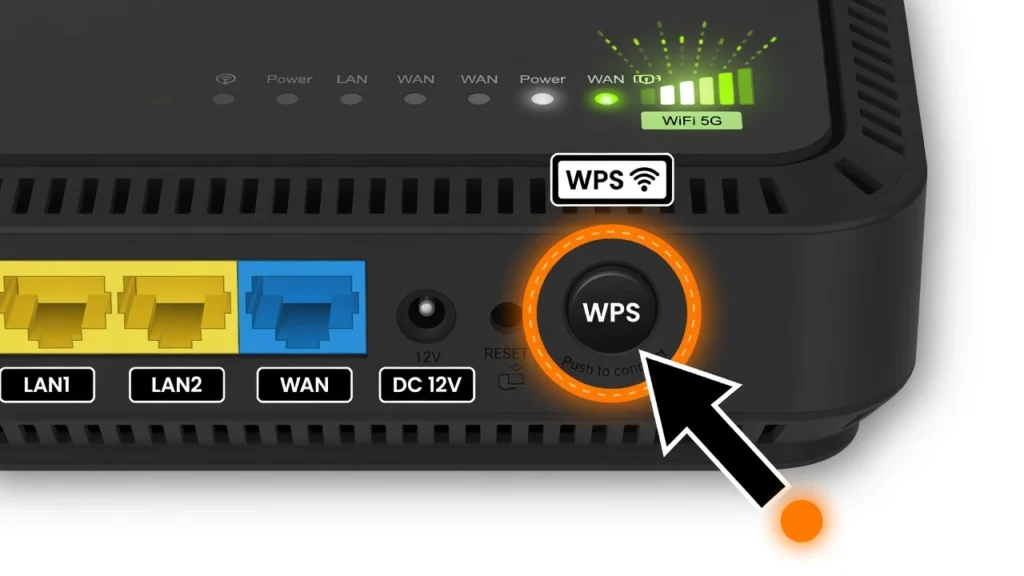
after activating WPS mode on your Canon printer.
Here’s something important I learned the hard way. If you have a mesh router system like Google Wifi or Eero, the WPS button might be labeled Sync or Pair instead. Same function, different name. Hold it until the light flashes, just like you would with a regular WPS button.
Step 4: Wait for confirmation. Go back to your Canon printer and watch the screen. Within 30 seconds, you should see a message that says Connection complete or something similar. If the connection fails, don’t worry. Just try again and make sure you press the router button within that two-minute window.
How to Check If Your Router Has a WPS Button
Not all routers have a physical WPS button, and that’s completely normal. Look on the back, top, or side of your router for a button labeled WPS, WiFi, Sync, or Pair. Some routers have the WPS function built into the router settings instead of a physical button, which means you’ll need to log into your router’s admin page to activate it.
If you don’t see a WPS button anywhere and you’re not comfortable digging into router settings, skip ahead to Method 3 where I’ll show you how to connect manually using the printer’s screen. That method works on every Canon printer and every router, no special buttons required.
On some access point devices or range extenders, the WPS button doubles as a reset button. If that’s the case, you only need to press it briefly, not hold it down for more than three seconds, or you might accidentally reset the device.
How to Verify the Connection Worked
Once your Canon printer says the connection is complete, I always recommend double-checking that the printer network connection actually went through. Press the Setup button on your Canon printer one more time. Look at the screen and you should see a small WiFi icon with signal bars, just like the icon on your phone when you’re connected to WiFi. If you see that icon, your printer is successfully connected.
If you want to be extra sure, try printing a test page from your computer. On Windows, go to Settings, then Devices, then Printers & scanners. Find your Canon printer in the list, click on it, and select Manage. From there, click Print a test page. If the page prints, your network settings printer are working perfectly and you’re all set.
Method 2 — Connect Using the Canon PRINT App on Your Phone
If you prefer using your phone to set things up, the Canon PRINT app is a great wireless connection method that works on both iPhone and Android. This canon print app setup lets you handle the entire Canon PIXMA wifi connection from your phone without touching any buttons on the printer itself. The app is free and once your Canon printer wireless setup is complete, you can also use the same app to print from phone to Canon printer anytime you need to.
Here’s how I walk through the Canon PRINT Inkjet SELPHY app setup from start to finish.
Step 1: Download the Canon PRINT app. Open the App Store on your iPhone or Google Play Store on your Android phone. Search for Canon PRINT Inkjet SELPHY and download the app. It’s the official Canon app with a blue icon. Install it and open the app when it’s ready.
Step 2: Tap Register Printer. When you first open the Canon PRINT app, you’ll see a screen asking you to register your printer. Tap the Register Printer button. The app will start searching for Canon printers nearby. Make sure your Canon printer is turned on and in range of your phone.
WiFi settings this temporary connection is
completely normal during setup.
Step 3: Put your Canon printer in pairing mode. While the app is searching, look at your Canon printer. Find the button with two overlapping ovals, which is the Wireless button. Press and hold that button for about three seconds. You’ll see a light start flashing on the printer, which means the printer is now ready to connect.
Step 4: Select your printer in the app. The Canon PRINT app should now show your printer model on the screen. Tap on your printer name to select it. The app will then ask you to connect to a special temporary WiFi network that the printer creates.
The Step Most People Miss During App Setup (The Canon_ij Network)
This is where most people get stuck during canon print app setup, and I want to walk you through it carefully because the app doesn’t explain it very well.
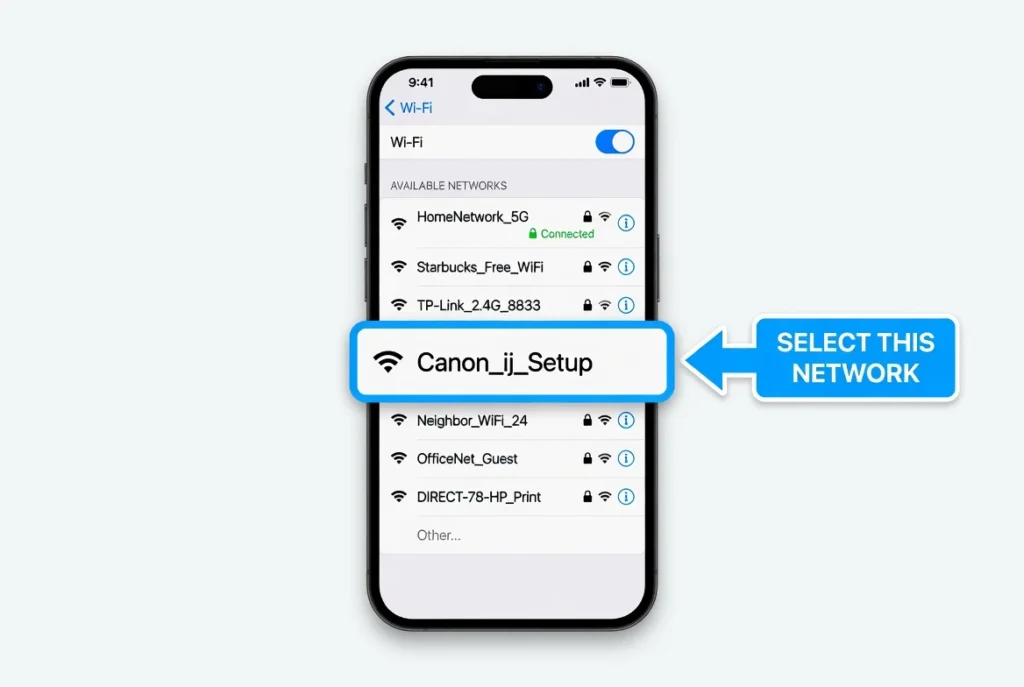
After you select your printer in the Canon PRINT Inkjet SELPHY app, a message will pop up asking you to go to your phone’s WiFi settings. When you open your phone’s WiFi settings, you’ll see a new network in the list that starts with Canon_ij followed by some numbers and letters. This is a temporary printer network connection that your Canon printer created just for setup.
Tap on that Canon_ij network to connect your phone to it. Your phone will disconnect from your home WiFi and connect directly to the printer instead. This feels weird because you’re losing internet for a minute, but that’s completely normal. The Canon printer needs your phone to connect to its own wireless LAN temporarily so it can receive your home WiFi password.
Here’s the part that trips people up. Once your phone connects to the Canon_ij network, your phone might show a notification saying there’s no internet. Ignore that warning and manually go back to the Canon PRINT app. Don’t wait for the app to do something automatically because it won’t. Open the app again and tap the Search or Continue button.
The app will now ask you to select your home WiFi network from a list. Choose your regular WiFi network name and enter your WiFi password exactly as it appears on your router. The password is case sensitive, so make sure capitals and lowercase letters match perfectly.
Once you enter the password and tap OK, your Canon printer will disconnect from the temporary Canon_ij network and connect to your home WiFi instead. Your phone will also automatically reconnect to your home WiFi. The whole process takes about a minute, and when it’s done, the app will show a confirmation message.
What to Do If Your Canon Printer Doesn’t Show Up in the App
Sometimes the Canon PRINT app can’t find your printer automatically, even when the printer is turned on and sitting right next to your phone. If your canon printer not found on network, don’t panic. There are two quick fixes I use every time.
First, try the Wireless button trick. Find the wifi setup button on your Canon printer, the one with two overlapping ovals. Press and hold that button for a full three seconds. A light on the printer should start flashing blue or orange. This forces the printer into pairing mode. Go back to the app and tap Search again.
Second, use the hidden fallback option in the app. If the printer still doesn’t show up, look carefully at the bottom of the screen in the Canon PRINT app. You’ll see small text that says If printer cannot be found. Tap on that text. A menu will appear with a few options. Select Auto Connection and follow the steps the app shows you. This alternative path handles the wireless connection method differently and works even when the automatic search fails.
I’ve found that the Auto Connection option is actually more reliable than the regular search, especially if you have multiple WiFi networks in your house or if your router uses both 2.4GHz and 5GHz bands. The app guides you through the same Canon_ij network step I described earlier, but it’s more patient about waiting for each part to complete.
Method 3 — Connect Canon Printer to WiFi Without WPS (Manual Setup)
If your router doesn’t have a WPS button and you don’t want to use the app, the manual setup method is your best option.
I actually think of this as the failsafe method because it works on every Canon printer and every router, no special buttons or smartphone required. You connect your Canon printer to WiFi without WPS by going directly into the printer’s network settings printer menu and typing in your WiFi password using the printer’s buttons. It takes a few extra minutes, but once it’s done, it stays connected reliably
Here is the full step-by-step process using the wireless LAN setup Canon menu.
Step 1: Open the printer menu. Press the Setup button on your Canon printer. It’s the button with a wrench or tool icon. Use the arrow buttons to scroll through the menu until you find Wireless LAN setup. Press OK to select it.
Step 2: Choose Manual connect. Inside the wireless LAN setup menu, you’ll see a few options. Scroll down to Manual connect and press OK. Your Canon printer will now scan for nearby WiFi networks and display a list on the screen.
Step 3: Select your WiFi network. Look through the list for your router SSID, which is just the name of your home WiFi network. Scroll to your network name and press OK. If your network name doesn’t appear, move your printer closer to the router and try again.
Step 4: Enter your WiFi password. The printer will now show a password entry screen. This is where the network settings printer setup requires a little patience. Use the arrow buttons to navigate through the character options and enter your WiFi password one character at a time. I’ll explain exactly how to do this quickly in the section just below.
Step 5: Confirm and connect. Once you’ve entered the full password, press OK to confirm. Your Canon printer will attempt to connect to your WiFi network. Within about 30 seconds, you should see a confirmation message on the screen.
Typing Your WiFi Password on the Printer — The Trick That Makes It Easy
This is the part of manual wifi password entry on a printer that most guides completely skip over, and I think that’s why so many people give up halfway through.
The Canon printer keypad groups multiple letters onto each button, similar to old mobile phone keypads. To switch between lowercase letters, uppercase letters, and numbers during wifi password entry printer setup, press the Asterisk button on your printer. The Asterisk is usually marked with a star symbol. Each time you press the Asterisk button, the character type cycles to the next option. So if you need a capital letter, press Asterisk until you reach uppercase mode, then select your letter.
Here’s the pro tip that saves a lot of frustration. If two characters you need are on the same button, you don’t have to wait or press repeatedly and risk going past the one you want.
Instead, press the Right Arrow button to move your cursor to the next character space. This lets you select a second character from the same key without any conflict. I’ve seen people spend ten minutes on password entry simply because nobody told them about the Right Arrow trick.
If you make a mistake during wireless LAN password entry, press the Back button to delete the last character you entered.
Take your time with wifi password entry on the printer because the password is case sensitive. A lowercase letter where an uppercase is expected will cause the connection to fail, and you’ll have to start the password entry again.
Method 4 (PC Users) — Let the Canon Driver Installer Handle the WiFi Setup
If you’re setting up your Canon printer on a Windows PC or Mac, there’s actually a fourth connection option that I find very convenient and many people don’t know about. When you do a canon printer driver download from Canon’s official support website, the Full Driver and Software Package includes a built-in WiFi connection wizard. Running the Canon IJ Setup installer lets the software guide you through the wireless connection automatically, without needing to navigate any menus on the printer itself.
Here’s how the canon ij setup driver method works.
Step 1: Visit Canon’s support website. Go to the official Canon support page and search for your specific printer model. Make sure you’re on Canon’s genuine support site and not a third-party page.
Step 2: Download the right package. On the downloads page, look specifically for the option labeled Full Driver and Software Package. Avoid downloading just the basic driver because the basic version does not include the Canon IJ Setup WiFi wizard. Select your operating system, either Windows or Mac, and download the full package.
Step 3: Run the installer and follow the steps. Once the download finishes, open the installer file and run it. The Canon IJ Setup wizard will launch and walk you through each step including the wireless LAN connection. Keep your computer connected to the internet during installation because the installer fetches the latest files directly from Canon’s servers.
Step 4: Select wireless connection when prompted. During the installation process, the Canon IJ Setup wizard will ask how you want to connect your printer. Select Wireless LAN connection. The wizard then handles the network settings printer side of things automatically, finding your network and completing the connection without you needing to type anything on the printer itself.
This method is especially useful if you’re setting up a new Canon printer on a computer for the first time, because the canon printer driver download and WiFi setup happen together in one smooth process.
When downloading drivers, always use Canon’s official support website rather than third-party driver sites. Canon regularly updates these drivers to fix connectivity issues and improve compatibility with newer router firmware. For Windows users, Microsoft’s official printer troubleshooting guide can also help resolve driver-related WiFi problems if you encounter issues during installation.
How to Connect Canon PIXMA Printer to WiFi — Quick Guide by Model
Most Canon PIXMA printers follow the same general setup process I’ve already covered in Methods 1, 2, and 3. But I know from experience that when you’re staring at your specific printer model, small differences in button placement or screen wording can throw you off. So I’ve put together these quick model-specific notes to give you the exact details for the most searched Canon models. Find your model below and you’ll know exactly what to expect.
Canon TS3522 and TS3722 WiFi Setup
The Canon TS3522 and Canon TS3722 are two of the most popular Canon PIXMA home printers, and the good news is that both models support all three connection methods I described above. The canon pixma ts series wifi setup works exactly the same way on both models.
For the WPS method, look for the Wireless button on the top panel of your Canon TS3522. It’s the button with an icon that looks like signal waves or two overlapping shapes. Press and hold the Wireless button for about three seconds to activate pairing mode, then press the WPS button on your router within two minutes.
For the manual method, the LCD menu path on the Canon TS3722 follows exactly the same route I described in Method 3. Press Setup, scroll to Wireless LAN setup, select Manual connect, choose your network name, and enter your password. The Asterisk button trick for switching between uppercase, lowercase, and numbers works the same way on these models.
If you recently bought your Canon TS3522 or Canon TS3722 and a firmware update prompt appears during setup, I’d recommend accepting it. Keeping the firmware current helps the printer maintain a stable WiFi connection over time.
Canon MG3620 WiFi Setup
The Canon MG3620 is a slightly older model but still very popular, and the canon mg series wifi setup works well on this printer once you know one small detail.
All three connection methods work on the Canon MG3620. The WPS method is the fastest here too. Press and hold the Wireless button on the top of the printer for about three seconds until the WiFi lamp starts flashing, then press WPS on your router.
One thing worth knowing about the MG3620 is that some versions of this model use LED indicator lights instead of a full LCD text screen. So instead of seeing a written confirmation message, you’ll see the WiFi lamp light up solid when the connection is successful. If the light stays solid blue or green rather than flashing, your canon mg series wifi setup is complete.
The manual method still works on the Canon MG3620 even with the LED-only interface, but you’ll need to use the Canon PRINT app on your phone to select your network and enter your password since there’s no text screen for typing. The app method from Method 2 is actually the most convenient choice for MG3620 users for this reason.
Canon TR4700 and TR4720 WiFi Setup
The Canon TR4700 and Canon TR4720 are excellent home office printers, and connecting either one to WiFi follows the same steps as Methods 1 and 3. However, there’s one thing that catches first-time users completely off guard on these models.
If you’re setting up your Canon TR4700 or TR4720 for the very first time, the printer will run through an initial configuration sequence before it lets you access the WiFi settings. The printer will ask you to select your language, set the date and time, and then run an automatic ink alignment process that prints a small test pattern. This alignment takes about a minute and you cannot skip it on first use.
I want you to know this is completely normal and not a sign that anything is wrong. Once the alignment finishes, the printer will bring you to the main setup screen where you can then follow Method 1, 2, or 3 to connect your Canon TR4700 to WiFi. Don’t try to rush past the alignment step because the printer won’t let you, and attempting to skip it can cause issues with print quality later on.
Canon ImageCLASS Office Printers — Different Setup Path
If you’re trying to connect a Canon ImageCLASS printer to WiFi rather than a home PIXMA model, I want you to know upfront that the setup path is quite different. Canon ImageCLASS printers are designed for office environments and use a touchscreen interface with an administrator login system rather than simple push-button controls.
Here’s how the Canon ImageCLASS WiFi setup works.
Step 1: Access the menu. On the Canon ImageCLASS touchscreen, tap the menu icon and navigate to Preferences. From there, go to Network, then select Wireless LAN Settings.
Step 2: Log in as System Manager. The printer will ask for a System Manager ID and PIN before allowing changes to network settings printer configuration. If nobody has changed the factory settings on your Canon ImageCLASS printer, the default System Manager ID is 7654321 and the default PIN is also 7654321. Enter those credentials to proceed.
Step 3: Select your network. Inside Wireless LAN Settings, go to SSID Settings and then tap Select Access Point. Your Canon ImageCLASS printer will scan for nearby WiFi networks and display a list. Select your network name from the list, enter your WiFi password, and confirm.
Once the connection completes, your Canon ImageCLASS printer will show a confirmation on the touchscreen. The network settings printer page will also update to show your connected network name, which is a good way to verify the setup worked correctly.
Canon Printer Still Won’t Connect to WiFi? Fix It Here
I’ve walked dozens of people through Canon printer WiFi setup, and I can tell you the frustration is real when nothing seems to work. You’ve followed every step, pressed all the right buttons, but your Canon printer still won’t connect to WiFi. Before you consider returning the printer or calling support, let me share the five actual reasons I see these setups fail and exactly how to fix each one.
Most of these problems have simple solutions once you know what to look for. I’ve made every single one of these mistakes myself, so I’m writing this from experience, not theory.
The 5GHz Problem — The Most Common Reason Setup Fails
This is hands down the number one issue I see, and it catches almost everyone off guard.
Most Canon home printers only support 2.4GHz WiFi networks. They cannot connect to 5GHz networks at all. Here’s the problem: modern routers broadcast both a 2.4GHz network and a 5GHz network at the same time, often under the same network name. Your phone or laptop automatically connects to whichever signal is stronger, and these days that’s usually the faster 5GHz band.
When you try to set up your Canon printer using the app or manual method, your phone is on the 5GHz network while your printer is searching for a 2.4GHz network. They’re on completely different frequencies, so they never find each other. The printer sits there saying “searching” while your phone says “printer not found,” and both are technically working correctly but they’re just not speaking the same language.
I learned this the hard way after spending 20 minutes convinced my printer was defective. It wasn’t. I was just on the wrong WiFi band.
Here’s how to fix it:
Check your phone or computer’s WiFi settings. If your router lists two separate networks, one might say something like “YourNetwork” and the other “YourNetwork-5G” or “YourNetwork-5GHz.” During printer setup, connect your device to the one without the 5G label. That’s your 2.4GHz network.
If your router uses a single network name for both bands, you’ll need to temporarily disable the 5GHz band in your router settings or move closer to the router so your phone prioritizes the 2.4GHz signal. Some routers let you split the bands into separate names, which makes life much easier for printer setup.
Once your Canon printer connects to WiFi successfully, you can switch your phone or computer back to the 5GHz network. The printer will stay connected to the 2.4GHz band, and everything will work fine. They don’t need to be on the same band, just the same overall network.
This one fix solves about 60% of the “my printer won’t connect” problems I encounter.
Wrong Password — and How Canon’s Keyboard Makes It Worse
WiFi passwords are case sensitive. That means “Password123” and “password123” are two completely different passwords. Canon printers will reject the wrong case version even if every letter and number is technically correct.
Now add Canon’s on-screen keyboard into the mix. When you’re typing your WiFi password using the printer’s number pad and arrow buttons, the default character type is usually lowercase letters. If your password has uppercase letters, numbers, or special characters, you need to use the Asterisk button to cycle through character types.
I’ve watched people enter their password three times thinking they got it right, but they never switched to uppercase when they needed a capital letter. The printer rejects it every time, and they assume the printer is broken. It’s not. The keyboard is just confusing if you don’t know the trick.
Here’s how to type your password correctly:
When you reach a character that needs to be uppercase, press the Asterisk (*) button on the printer’s keypad. This switches the input mode from lowercase to uppercase. Press it again to switch to numbers. Press it one more time to get back to lowercase. You’ll see the mode change on the screen.
If your password is something like “Home2024!” you’ll need to switch modes multiple times: uppercase for H, lowercase for ome, number mode for 2024, then symbol mode for the exclamation mark.
Use the Right Arrow button to move to the next character space if two letters you need are on the same number key. Without this, you’ll overwrite characters accidentally.
If you make a mistake, the Back button deletes the last character you entered. Don’t try to backspace by pressing left, that doesn’t work. Just hit Back and re enter.
Where to find your correct WiFi password:
If you’re not sure what your password is, check the label on the back or bottom of your WiFi router. Most routers have the default network name and password printed there. If you changed your password and forgot it, you’ll need to log into your router’s admin page (usually by typing 192.168.1.1 or 192.168.0.1 into a web browser) or contact your internet provider.
One more thing: some Canon printers time out if you take too long entering the password. If the screen goes back to the main menu, just start the wireless setup process again and type faster this time.
Printer Not Showing Up on Your Network or in the App
You’ve got your phone connected to the right network, your password is correct, but the Canon PRINT app still says “No printer found” or your computer can’t see the printer on the network. This usually means the printer isn’t in pairing mode or the wireless radio isn’t active.
Canon printers need to be actively broadcasting their availability for devices to find them. Sometimes that mode times out. Sometimes it never activates in the first place. Sometimes the printer thinks it’s connected when it’s not.
Here’s the three step fix I use every time:
Step one: Look at your printer’s display or indicator lights. You should see a WiFi icon with signal bars if the printer thinks it’s connected. If you see a WiFi icon with an X through it or no WiFi icon at all, the wireless function isn’t active.
Step two: Find the Wireless button on your printer. It usually has a WiFi symbol or wave icon. Press and hold that button for three seconds. The light should start flashing blue or the screen should show “Wireless LAN active” or something similar. This forces the printer into pairing mode.
On some models like the TS3522 and MG3620, the Wireless button also acts as a reset if you hold it even longer (about 10 seconds), but you don’t need to go that far for most connection issues. Three seconds is enough to wake up the wireless radio.
Step three: If you’re using the Canon PRINT app and the printer still doesn’t appear after step two, open the app and look for a link that says “If printer cannot be found” or “Printer not listed.” Tap that, then select “Auto Connection.” This runs a deeper search and often finds printers that the quick scan misses.
I’ve had situations where the printer was connected to WiFi the whole time but just wasn’t responding to the app’s search. The Auto Connection method forces a different discovery process and almost always works.
If none of this works, restart both your printer and your WiFi router. I know that sounds like generic tech support advice, but network handshake issues are real, and a fresh start clears them about 80% of the time.
Turn off the printer, unplug your router for 10 seconds, plug the router back in and wait for it to fully boot up, then turn the printer back on and try setup again.
One last note: make sure your printer is within reasonable range of your router. Canon printers don’t have the strongest WiFi antennas, and thick walls or long distances can cause weak signal problems even if your phone has full bars in the same spot.
If you’re setting up a printer in a basement and your router is upstairs two floors away, that’s going to be a problem. Move the printer closer during setup to rule out range issues.
These three fixes, the 5GHz band check, the password entry method, and the pairing mode reset, solve the vast majority of Canon printer WiFi connection problems I run into.
If you’re still stuck after trying all of this, there might be a router firewall setting blocking the printer or a deeper network configuration issue, but that’s rare. In most cases, one of these five common problems is the culprit, and now you know exactly how to fix each one.
How to Print and Scan from Your Phone Once Connected
Now that your Canon printer is connected to WiFi, let me show you how to actually print from phone to Canon printer and scan documents back to your phone. The Canon PRINT Inkjet SELPHY app makes both tasks surprisingly simple once you know where to tap.
I use this app almost daily now, and it’s honestly faster than walking to my computer most of the time. You can print wirelessly without USB cables or transferring files anywhere, and scanning documents straight to your phone as a PDF is incredibly handy when you need to email something quickly.
Printing a Photo or Document from Your Phone
Open the Canon PRINT app and make sure your phone is on the same WiFi network as your Canon printer. The app should automatically detect your printer at the top of the screen. If you see your printer’s name listed, you’re ready to print.
Tap either “Document Print” or “Photo Print” depending on what you want to print. Document Print works for PDFs, Word files, and web pages. Photo Print is specifically for images from your camera roll or photo library.
Select the file you want to print. The app will show you a preview. Tap the settings icon if you want to adjust anything like paper size, print quality, or number of copies. For photos, I usually select “High” quality and “Borderless” if I’m printing on photo paper. For documents, “Standard” quality is fine and saves ink.
Hit the blue “Print” button at the bottom. Your Canon printer will start printing within a few seconds. You’ll see a progress bar in the app, and you can tap “Print Queue” to check the status or cancel if you made a mistake.
The whole process takes less than 30 seconds once you get used to it. I’ve printed boarding passes, recipes, coloring pages for my kids, and family photos all from my phone without ever touching my laptop.
Scanning Documents to Your Phone as a PDF
This feature is one of my favorites because it turns your Canon printer into a portable scanner. You can scan receipts, documents, forms, anything paper, and save them as PDFs directly on your phone.
Open the Canon PRINT app and tap “Scan” from the main menu. Place your document face down on the scanner glass just like you would for a regular copy. Make sure the paper is aligned with the corner guides so the scan doesn’t come out crooked.
Choose your scan format. If you’re scanning a document, letter, or form, select PDF. The app saves the scan as a PDF file that you can email or upload anywhere. If you’re scanning a photo, choose JPEG instead. JPEG files are better for images and take up less space.
Tap “Scan” and the Canon printer will scan the document. The image appears on your phone screen right away. You can adjust the edges by dragging the corner handles if the scan captured extra space around the document.
Here’s the trick I wish I’d known earlier: if you have multiple pages to scan, don’t close the scan screen. Swap the first page for the second page on the scanner glass, then tap “Scan” again. The Canon PRINT app adds the second scan to the same PDF file automatically. You can keep adding pages this way until you’re done, and when you tap “Save,” you’ll have one single PDF with all your pages in order.
I’ve scanned 10 page documents this way and saved them as one organized PDF file. It’s way easier than scanning each page separately and then trying to combine them later.
Once you save the scan, the Canon PRINT app stores the PDF in your phone’s files or downloads folder. From there, you can share it via email, text, or upload it to cloud storage like Google Drive or Dropbox.
Speaking of connecting devices to unfamiliar networks, if you’re a gamer who travels frequently, you might face similar connectivity challenges with other devices
Hotel WiFi networks often have restrictions that prevent gaming consoles from connecting properly. If you need to connect your PS4 to hotel WiFi the troubleshooting principles are remarkably similar to printer setup issues. Both devices struggle with captive portals, network authentication, and restrictive firewall settings that hotels use to manage their guest networks
if you ever need to print or scan when you’re away from your home network. I’ve used this feature in hotel rooms and at family gatherings when I needed to print something quickly and didn’t want to mess with their WiFi password.
The Canon PRINT app honestly makes the whole setup process worth it. Being able to print and scan from anywhere in the house without plugging in cables or sitting at a desk has changed how I handle everyday tasks.
Once your Canon printer is connected to WiFi, this app becomes one of the most useful tools on your phone. Plus, with wifi direct canon printer functionality, you can even print wirelessly without USB cables in locations where traditional WiFi isn’t available
Quick Recap — Which WiFi Method Is Right for You?
If you’re not sure which wireless connection method to use when you connect your Canon printer to WiFi, here’s the honest breakdown based on what you have available and what feels easiest to you.
Use Method 1 (WPS Button) if: Your router has a WPS or Sync button and you want the fastest Canon printer wireless setup possible. This method takes about two minutes total and requires almost no typing. I recommend this as the first choice if your router supports it.
Use Method 2 (Canon PRINT App) if: You prefer doing setup from your phone or your router doesn’t have a visible WPS button. The app method works on both iPhone and Android and walks you through every step visually. This is the most beginner friendly option in my experience.
Use Method 3 (Manual LCD Setup) if: You don’t have WPS and you’d rather not download an app. This method works on every Canon printer with an LCD screen and every router. You’ll need to type your WiFi password using the printer’s keypad, but once you know the Asterisk button trick, it’s straightforward.
Use Method 4 (Driver Installer) if: You’re setting up the Canon printer on a new Windows or Mac computer for the first time. Download the full driver package from Canon’s support site and the installer includes a WiFi connection wizard that handles everything automatically.
All four methods end up in the same place. Your Canon printer connects to your home WiFi network and you can print wirelessly from any device on that network. Pick whichever wireless connection method feels most comfortable to you. There’s no wrong choice as long as you follow the steps for that specific method.
Frequently Asked Questions
Why won’t my Canon printer connect to my WiFi even when I enter the right password?
The most common reason is your device is connected to the 5GHz network while Canon printers need 2.4GHz during setup. Also double-check your password case sensitivity using the Asterisk button to switch between uppercase, lowercase, and numbers on the printer’s keypad.
Does my Canon printer need to be on the same WiFi network as my computer to print?
Yes, both your Canon printer and computer must be connected to the same WiFi network to print wirelessly. They share the same network name but don’t need to be the same type of device
Can I connect my Canon printer to WiFi without a WPS button?
Absolutely, you can connect your Canon printer to WiFi using the manual LCD menu method or the Canon PRINT app on your phone. Both methods work on any router regardless of WPS button availability.
How do I reconnect my Canon printer after changing my WiFi password or getting a new router?
Simply repeat any of the connection methods I covered earlier, and the new network settings will overwrite the old ones automatically. You don’t need to factory reset the printer when you connect your Canon printer to WiFi again.
What is the Canon PRINT app and do I need it?
The Canon PRINT Inkjet SELPHY app is Canon’s free official app for iOS and Android that makes wireless setup easier. You don’t need the app if you use WPS or manual setup, but it’s required for printing and scanning from your smartphone afterward.

