
What This Error Actually Means (And Why It’s Not the End of the World)
I know how frustrating it is when you’re ready to upgrade to Windows 11, and suddenly you’re staring at a message that says “this pc doesn’t currently meet windows 11 system requirements.” I’ve been there, and I can tell you right now: your PC isn’t broken.
This message is just a compatibility gate that Windows puts up to check if your computer has certain features turned on. In most cases, it’s not about missing hardware at all. Your PC probably already has everything it needs, but some settings are just disabled in the background.
I learned this after running into the same windows 11 installation error on a perfectly good computer. I checked everything, and the hardware was fine. Turns out, the features Windows was looking for were just switched off in the BIOS. Once I enabled them, the error disappeared.
Here’s what really helped me understand this: I watched someone run the PC Health Check tool, see the unsupported message, and then complete a full upgrade to Windows 11 without losing a single file or app. It worked perfectly.
That showed me the error isn’t a dead end. It’s just a checkpoint you can either fix or work around.
You basically have two paths forward. You can enable the settings Windows is asking for, like TPM 2.0 and Secure Boot, which takes about 10 minutes in your BIOS. Or, if your PC is older and genuinely can’t meet the requirements, you can use a bypass method that lets you install Windows 11 anyway.
The good news? Most people are dealing with disabled settings, not outdated hardware. A Reddit user with over 124 upvotes put it perfectly: “You likely just have necessary features disabled.” That’s the most common scenario, and it’s the easiest one to fix.
Even if you’re running Windows 10 right now and your system says it’s not ready, you’re not stuck. I’ll walk you through exactly how to figure out what’s blocking your upgrade and how to fix it, step by step.
The windows 11 upgrade blocked message might look scary, but it’s usually just a settings issue. And that’s something you can handle yourself, even if you’re not super tech savvy. I’ve done it, and I’ll show you how.
What Windows 11 Actually Requires The Full List
Windows 11 system requirements are more specific than Windows 10 ever was. Microsoft set a clear baseline, and your PC needs to meet every single item on the list before the upgrade goes through.
I’ve gone through these minimum requirements that Windows 11 demands, and I want to break them down for you in plain English. Here’s exactly what Microsoft is looking for
Processor: You need a compatible processor for windows 11, which means Intel 8th Gen or newer, or AMD Ryzen 2000 series or newer. This is one of the two big reasons most people see the error message.
RAM: At least 4GB. The 4GB RAM requirement windows 11 sets is pretty standard, and most computers from the last decade already have this covered.
Storage: A minimum of 64GB of available space. The 64GB storage requirement windows 11 asks for is there to make sure you have room for the operating system and future updates.
System Firmware: Your PC must use UEFI firmware settings, not the older BIOS style. UEFI is the modern boot system that works with newer security features.
TPM: This stands for Trusted Platform Module, version 2.0. TPM 2.0 is a security chip built into your motherboard that handles encryption. This is the other big blocker for most people, and I’ll explain why in a minute.
Graphics Card: Your GPU needs to support DirectX 12 and WDDM 2.0. Most graphics cards made after 2015 already meet this requirement without any issues.
Display: A screen that’s at least 720p resolution and 9 inches diagonally. If you can see Windows 10 clearly, you’re already good here.
Secure Boot: This is a UEFI firmware security feature that prevents unauthorized software from loading during startup. It works together with TPM 2.0 to protect your system.
Now here’s what I noticed when I was troubleshooting my own upgrade. Out of this entire list, two things trip up almost everyone: the CPU requirement and TPM 2.0.
The processor check is strict. If you have an Intel 7th Gen chip or an older AMD processor, Windows 11 officially says no. Your PC might run perfectly fine, but Microsoft drew a hard line at Intel 8th Gen and AMD Zen 2 architecture.
The TPM 2.0 requirement is even more frustrating because most modern PCs actually have the chip. The problem is that TPM 2.0 is often disabled by default in the motherboard settings. I’ve seen dozens of cases where someone’s pc doesn’t meet windows 11 minimum requirements purely because a single setting was turned off.
Here’s the thing that helped me understand this better. Windows 11 isn’t necessarily looking for brand new hardware. Most of these requirements are about security features that already exist on your computer but just aren’t active yet.
If your PC was built or bought after 2018, there’s a very good chance it has everything Windows 11 needs. You might just need to turn a couple of settings on in your UEFI firmware settings, and suddenly the error disappears.
I’ll show you exactly how to check which requirement is blocking you in the next section, and then we’ll fix it together.
First, Find Out Exactly What’s Blocking Your PC
Before you start changing settings or trying workarounds, you need to know exactly which requirement your PC is failing. A proper Windows 11 system requirements check will save you a lot of time and guesswork
I learned this the hard way. I spent an hour enabling settings that didn’t even matter because I didn’t check first. Once I ran a proper system compatibility check, I found out TPM was the only thing blocking me. That clarity made the fix simple.
You have two ways to figure out what’s stopping your upgrade. The first is Microsoft’s official tool, and the second is a community favorite that gives you way more detail.
Before you start changing any BIOS settings, I recommend downloading the official PC Health Check tool directly from Microsoft. You can get it from the official Microsoft Windows 11 page it’s free, takes under a minute to run, and tells you immediately whether your PC can upgrade before you touch anything else.
Use the PC Health Check App (Official Method)
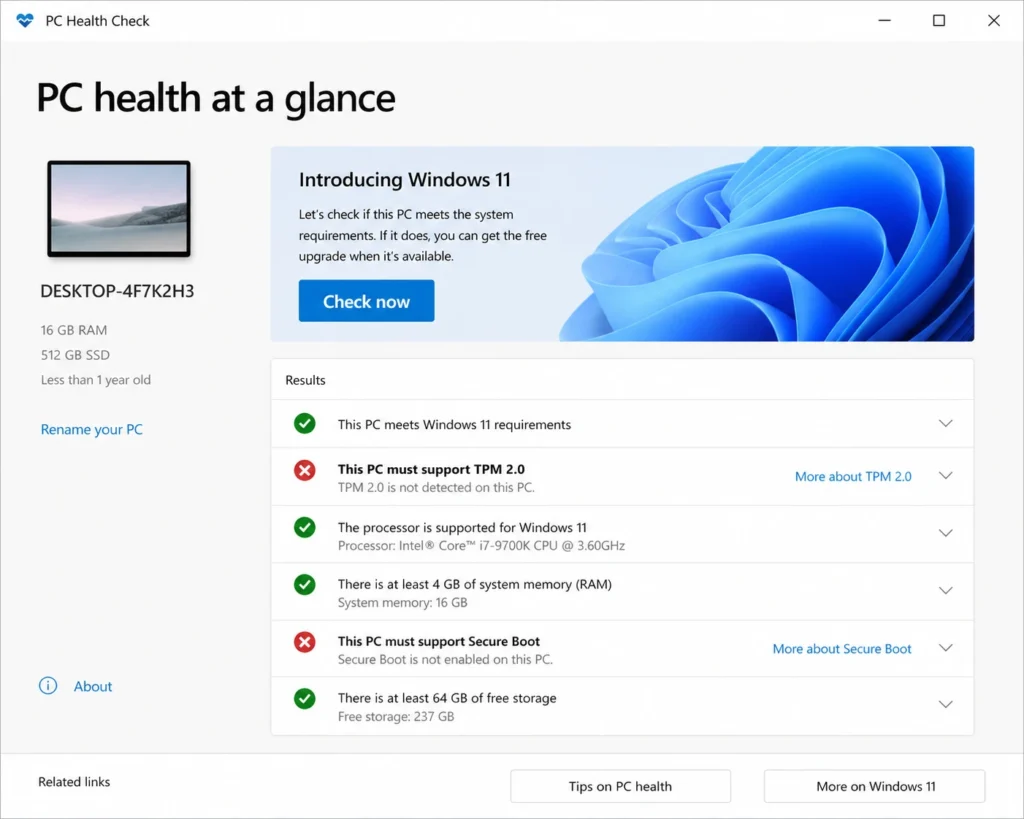
The PC Health Check tool is Microsoft’s official way to answer the question, does my PC support windows 11? It’s free, simple, and takes about two minutes to run.
Here’s how I used the PC health check app on my own computer:
I went to Microsoft’s official Windows 11 page and downloaded the PC Health Check tool. The file is small, and the download finished in seconds.
After installing the app, I opened it and clicked the button that says “Check now.” The tool scanned my system immediately.
Within a few seconds, the PC Health Check app showed me a result. In my case, it said my PC could not run Windows 11, but it didn’t explain why. That’s the tool’s biggest weakness.
If your PC passes, you’ll see a green checkmark and a message saying you’re ready to upgrade. If your PC fails, you’ll see a red X, but the explanation is usually vague. It might say something like “This PC must support TPM 2.0,” but it won’t tell you if TPM is missing or just disabled.
I found the PC Health Check tool helpful for a quick yes or no answer, but when the answer was no, I needed more information. That’s where the second tool came in.
Use WhyNotWin11 for More Specific Results
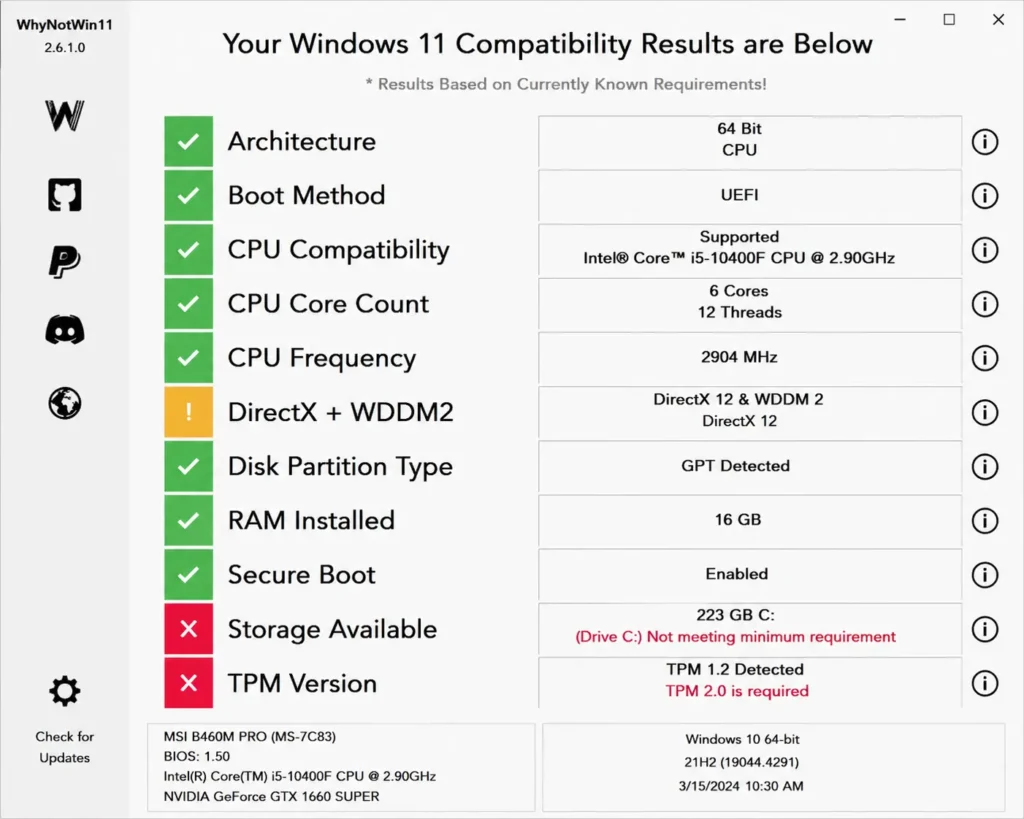
This is the tool I wish I’d known about from the start. WhyNotWin11 is a free open source program that runs a much more detailed system compatibility check than Microsoft’s official app.
I found out about WhyNotWin11 from a tech forum where someone said, “This third-party tool does a much better job than Microsoft’s official ones to tell you exactly why you’re not compatible.” That comment had over 100 upvotes, so I figured it was worth trying
Here’s what makes WhyNotWin11 so much better. Instead of just saying “your PC doesn’t meet the requirements,” it shows you a list of every single requirement with a green checkmark or a red X next to each one.
When I ran WhyNotWin11 on my system, I could see that my CPU was green, my RAM was green, my storage was green, but TPM 2.0 had a red X. That told me exactly what I needed to fix.
You can download WhyNotWin11 from GitHub. Just search for “WhyNotWin11 GitHub” and download the latest release. The file is portable, so you don’t even need to install it. Just run the program, and it scans your PC immediately.
The results screen is color-coded. Green means you pass that requirement. Red means you fail. Yellow means the result is unclear or needs attention. I could see at a glance which part of the system compatibility check was blocking my upgrade.
WhyNotWin11 also explains what each requirement means in simple terms. When I hovered over TPM 2.0, it told me what TPM does and why Windows 11 needs it. That extra context helped me understand what I was fixing, not just follow steps blindly.
I recommend running both tools, but if you only have time for one, use WhyNotWin11. The PC Health Check tool gives you a quick answer, but WhyNotWin11 gives you the details you actually need to solve the problem.
Once you know which requirement is failing, you can move on to the fix. In the next section, I’ll show you how to enable TPM 2.0, which is the most common blocker for most people.
Fix 1 Enable TPM 2.0 in Your BIOS (Most Common Fix)
Enabling TPM 2.0 is the single fix that solves the Windows 11 compatibility error for most people. TPM 2.0 stands for Trusted Platform Module version 2.0, and it’s a security chip built into your motherboard that handles encryption and system protection.
Here’s what I found when I had to enable TPM 2.0 and secure boot for windows 11 on my own PC. The TPM chip was already there. It just wasn’t turned on. Most computers made after 2016 have TPM 2.0 hardware, but manufacturers ship them with the setting disabled by default.
To turn on TPM 2.0, you need to go into your BIOS settings windows 11 requires. BIOS is the low level software that controls your hardware before Windows even loads. On newer systems, this is called UEFI firmware settings, but the process is similar.
Here’s how I accessed my BIOS and enabled TPM 2.0:
I restarted my computer and immediately started pressing the BIOS key. On most PCs, this is Delete, F2, F10, or F12. The exact key appears on your screen for a split second when your computer first starts up. If you miss it, just restart and try again.
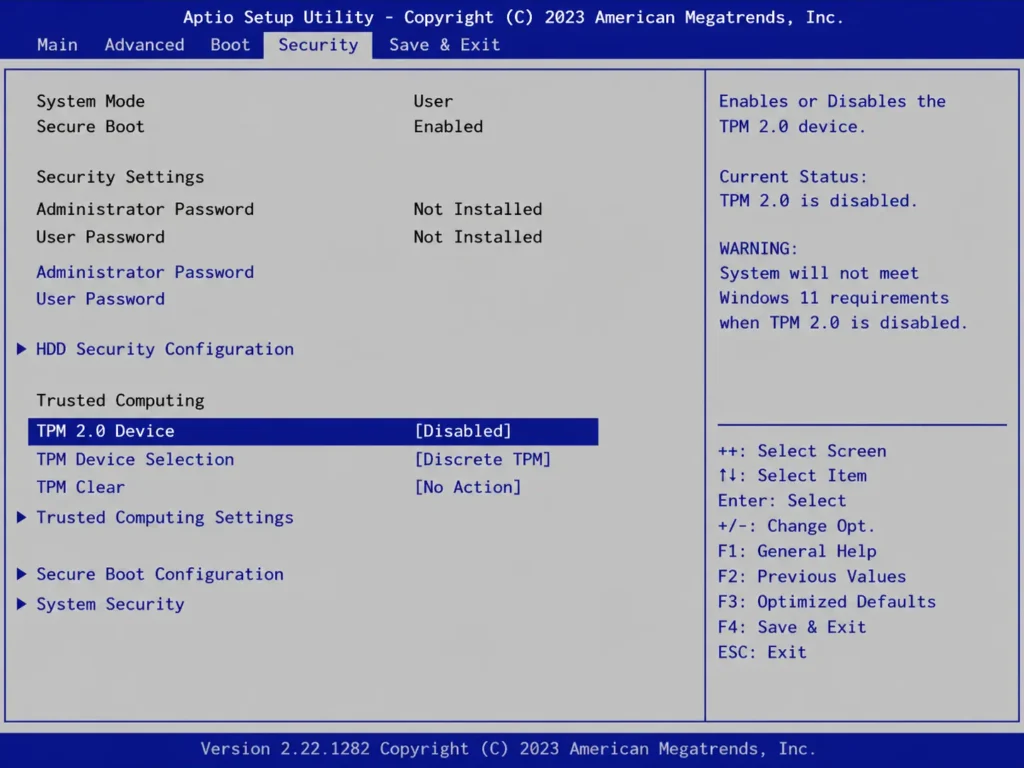
Once I was in the BIOS menu, I looked for the Security tab or the Advanced tab. BIOS layouts vary by manufacturer, so your screen might look different from mine. Some brands put TPM settings under Security, others under Advanced, and some under a section called Trusted Computing.
This is where things got confusing for me at first, and I want to save you the same frustration. I searched for “TPM” in my BIOS menu and couldn’t find it anywhere. That’s because the setting isn’t always called TPM.
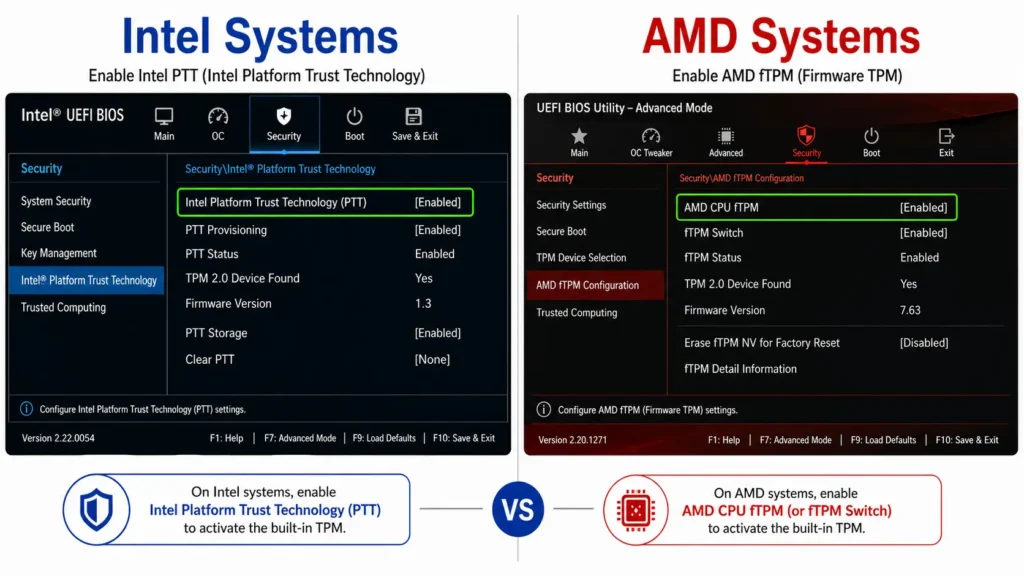
Finding TPM in Your BIOS Intel vs AMD Are Named Differently
I learned this the hard way, and it’s something almost no guide mentions. The TPM setting has different names depending on whether you have an Intel or AMD processor.
For Intel users, TPM 2.0 is called Intel Platform Trust Technology, or Intel PTT for short. I have an Intel 8th Gen processor, and when I finally found the setting, it was labeled PTT under the Security menu. I wasted 20 minutes looking for the word “TPM” before I figured this out.
For AMD users, TPM 2.0 is called AMD CPU fTPM or just fTPM. If you have an AMD Zen 2 processor or newer, look for fTPM in your UEFI firmware settings. Some AMD motherboards also call it “AMD fTPM Switch.”
This naming difference is the reason so many people think their PC doesn’t have a TPM chip when it actually does. The chip is there, but the label doesn’t match what Windows is asking for.
Once I found the right setting, I changed it from Disabled to Enabled. On some motherboards, the option says “Firmware TPM” or “PTT” with a checkbox. Just make sure the setting is turned on.
After enabling TPM, I saved my changes and exited the BIOS. Most systems use F10 to save and exit, but your BIOS will tell you which key to press at the bottom of the screen.
When my computer restarted, Windows automatically recognized that TPM 2.0 was now active. I ran the PC Health Check tool again, and this time the TPM requirement showed a green checkmark.
If you enable TPM 2.0 in your BIOS and the error still appears, there’s one more thing to check before you assume your PC is too old.
What If Enabling TPM Doesn’t Work? Update Your BIOS First
I saw this situation happen to someone who replaced their motherboard and couldn’t get TPM to show up in Windows even after enabling it in the BIOS. The fix turned out to be a BIOS update.
Older BIOS versions sometimes don’t support TPM 2.0 properly, even if the hardware chip is present. I learned from someone’s experience on a tech forum where they said, “If all else fails, try updating your BIOS before installing Windows. I updated BIOS, set everything again, and it worked.”
Here’s how to check if your BIOS needs an update:
Restart your computer and enter the BIOS again using the same key you used before. Look for a section called System Information or Main. Your BIOS version number should be displayed there. Write down the version number.
Go to your motherboard manufacturer’s website. If you have a prebuilt PC from Dell, HP, Lenovo, or another brand, go to that brand’s support page instead. Search for your exact motherboard model or PC model number.
Look for the Downloads or Support section and find the BIOS updates. Compare the latest available version to the version you wrote down. If a newer version exists, download it.
Most manufacturers provide a Windows based BIOS update tool that you run from inside Windows. Follow the instructions carefully, and do not turn off your PC during the update process.
After the BIOS update finishes, restart your computer, go back into the BIOS settings windows 11 requires, and enable TPM 2.0 again. Sometimes the update resets your settings to default.
I want to be clear about something. Updating your BIOS is safe if you follow the manufacturer’s instructions, but don’t do it unless you actually need to. If TPM is working after you enable it, there’s no reason to update your BIOS just for the sake of it.
Once TPM 2.0 is enabled and recognized by Windows, you’ve cleared the biggest hurdle. The next step is to enable Secure Boot, which works together with TPM to meet the full security requirements Windows 11 expects.
Fix 2: Turn On Secure Boot the Right Way
Secure Boot is the second major requirement Windows 11 checks, and enabling it is straightforward. But there’s a hidden gotcha that trips up a lot of people, and I want to make sure you don’t waste time like I almost did.
Secure Boot is a UEFI firmware security feature that prevents unauthorized software from loading when your computer starts up. It works hand in hand with TPM 2.0 to protect your system from malware and other threats. Without Secure Boot enabled, Windows 11 won’t let you upgrade even if everything else passes.
Here’s how I enabled Secure Boot on my system:
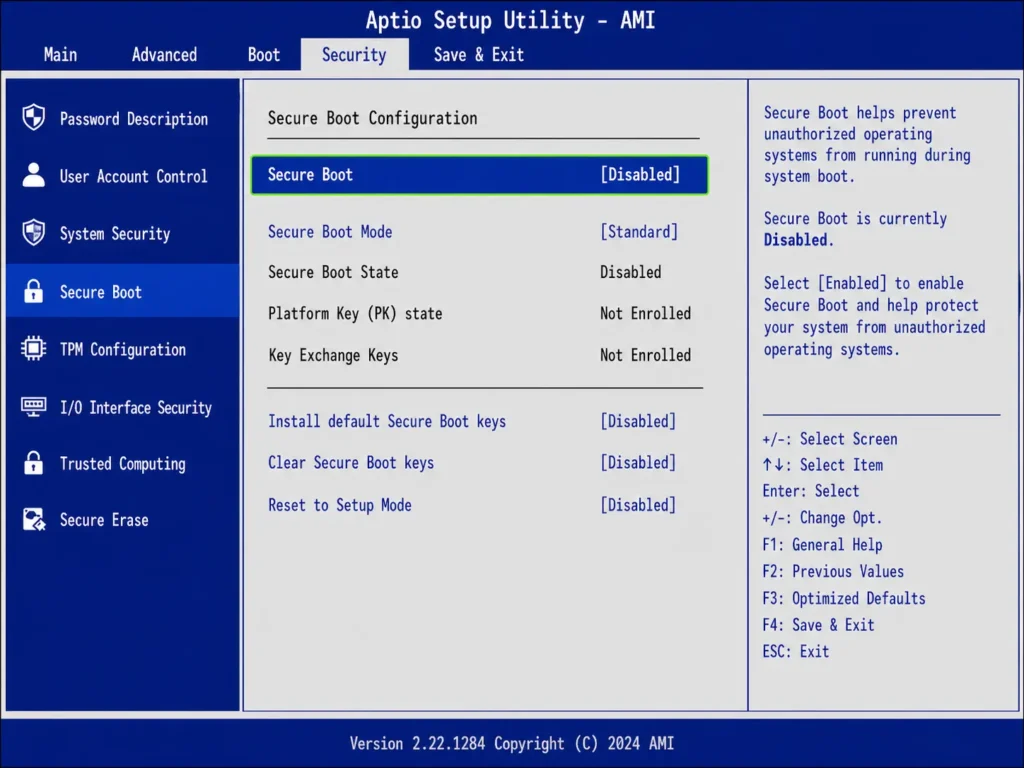
I restarted my computer and entered the BIOS using the same key I used to enable TPM 2.0. Once in the BIOS menu, I looked for a Security tab or a section labeled Boot.
Under the Security settings, I found the Secure Boot option. On most systems, it’s either set to Disabled or Off. I changed it to Enabled.
I saved my changes and exited the BIOS. My computer restarted, and Windows recognized that Secure Boot was now active.
When I ran the system check again, Secure Boot showed a green checkmark. I thought I was done, but I still couldn’t upgrade to Windows 11.
That’s when I discovered the problem. Enabling Secure Boot isn’t quite as simple as flipping a switch.
Secure Boot Is Enabled But Still Failing? Check This Setting
Here’s what I learned after some troubleshooting. Secure Boot has a sub-setting that determines how it actually works, and if it’s set wrong, the whole thing fails silently.
Secure Boot must be set to UEFI standard mode, not Legacy mode. If your boot mode is set to Legacy or CSM, Secure Boot won’t actually function even if it shows as enabled. I found someone online who had the exact same problem. They said, “My secure boot was set to legacy rather than UEFI, and the error persisted until I changed it from Legacy to UEFI mode.”
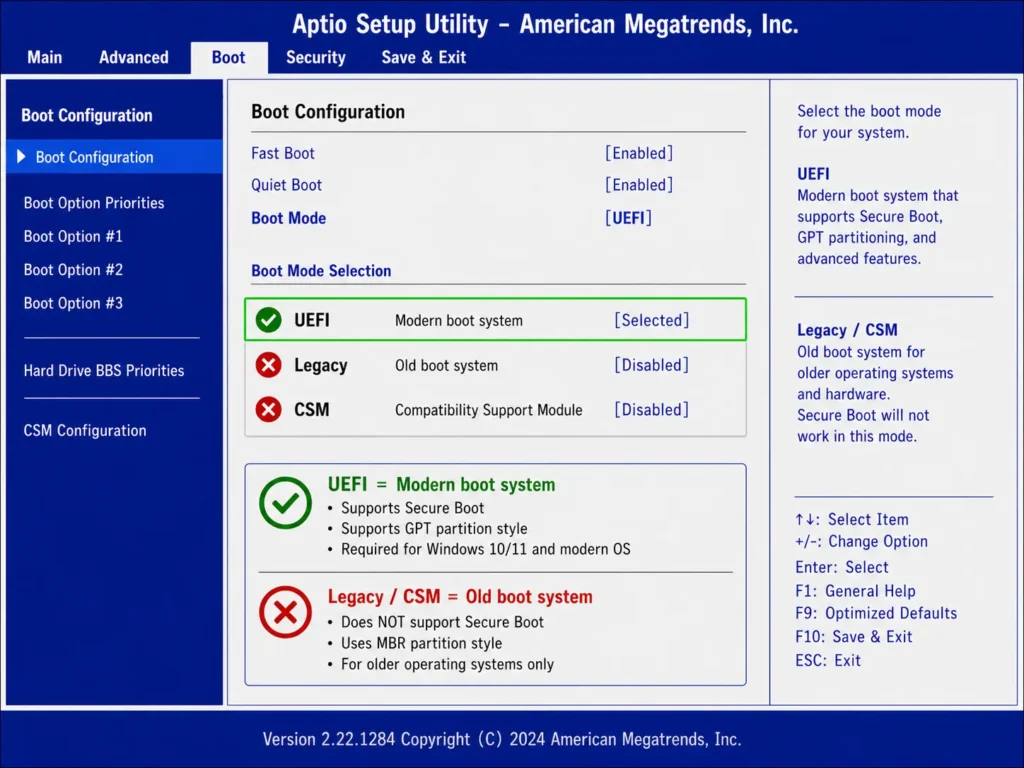
Here’s where to find this setting in your BIOS:
Go back into your BIOS settings windows 11 requires. Look for a section called Boot Mode, Boot Order, or Boot Settings. You might also find it under Advanced settings.
Look for an option that says Boot Mode, UEFI Framework, or Boot Type. Some manufacturers call it CSM Mode or Legacy Support.
Make sure the setting is switched to UEFI only. If you see Legacy Mode, BIOS Mode, or CSM enabled, that’s your problem. Disable Legacy mode completely.
Save and exit. Your computer will restart, and this time Secure Boot should actually be working properly.
After I made this change, Secure Boot finally worked the way it should. The difference between UEFI firmware settings and Legacy mode is that UEFI is the modern boot system that works with Secure Boot and TPM 2.0. Legacy is the old system that Windows 11 doesn’t support.
If you change your boot mode to UEFI only and you’ve already installed Windows, your system will likely have trouble starting up. That’s because your Windows installation is on a disk formatted for Legacy mode, not UEFI mode. Before you make this change, check your disk partition style first.
Is Your Drive GPT or MBR? (It Matters for Secure Boot)
This is the part that confused me the most, and I wish someone had explained it upfront. Your hard drive is formatted using one of two partition styles: GPT or MBR.
UEFI Secure Boot requires your drive to be formatted as GPT. If your drive is MBR, Secure Boot won’t work no matter what you do in the BIOS. I found someone who had converted their drive to GPT and still couldn’t upgrade. They said, “Despite my GPT drive being converted from MBR using MBR2GPT, mine still wouldn’t meet requirements.”
Here’s how to check which partition style your drive is using:
On Windows, right click on the Start menu and select Disk Management. Your list of drives appears.
Find your main hard drive in the list. Right click on it and select Properties.
Go to the Volumes tab. Look for a field that says Partition Style. It will say either Master Boot Record (MBR) or GUID Partition Table (GPT).
If it says MBR, you need to convert it to GPT before Secure Boot will work properly with Windows 11.
I had an MBR drive, and I used a tool called MBR2GPT to convert it without losing my data. This is a built in Windows tool that you run from the Command Prompt.
To use MBR2GPT, open Command Prompt as Administrator. Type the command mbr2gpt /convert /disk:0 and press Enter. The tool converts your drive from MBR to GPT without deleting your files.
After the conversion, restart your computer, go back into the BIOS, make sure your boot mode is set to UEFI only, and enable Secure Boot properly.
Now that you have both TPM 2.0 and Secure Boot working correctly, your PC should meet the official Windows 11 requirements. You’re ready to upgrade through Windows Update or using official installation media.
If you still see the error after enabling both TPM 2.0 and Secure Boot correctly, there’s one more thing to try before you consider a bypass method.
How to Bypass Windows 11 Requirements If Your PC Is Officially Unsupported
If you’ve tried enabling TPM 2.0 and Secure Boot but your PC still won’t upgrade, you might have unsupported hardware. This section is for people with older CPUs, like pre-Intel 8th Gen processors or pre-AMD Ryzen 2000 chips, that genuinely don’t meet the official requirements
Here’s the honest truth. Microsoft says you shouldn’t install Windows 11 on unsupported hardware, and they won’t give you official support if something goes wrong. But millions of people do it anyway, and most of them run Windows 11 without major problems.
I want to be clear about the risks before you proceed. Microsoft can’t guarantee that future Windows 11 updates will work on your unsupported device. Some specific software or games might not run properly. You’re taking responsibility for your own system if you choose to bypass the requirements.
That said, I understand why people want to upgrade. Windows 10 is reaching end of life, and security updates will stop coming. For many people, the bypass TPM requirement windows 11 issue is worth the risk.
I’ve researched three different methods to bypass Windows 11 system requirements. Each one works, but they’re designed for different situations. Let me walk you through all three so you can pick the one that makes the most sense for you.
Method 1: Use Rufus to Create a Bypass Bootable USB (Easiest for New Install)
Rufus is the easiest and cleanest way to install Windows 11 on unsupported hardware. I learned this after comparing all the available methods, and Rufus wins for simplicity and reliability.
This free tool creates a bootable USB drive, and when you use it to create your installation media, you can remove the requirement checks entirely. This means your unsupported PC can install Windows 11 without hitting the compatibility error.
Here’s what you need before you start:
A USB drive with at least 8GB of space. Any modern USB flash drive will work.
Access to a second computer that already has Windows. This is important because you’ll use that computer to create the bootable USB drive.
The Windows 11 ISO file from Microsoft’s official website. This is the complete Windows 11 installation file
Once you have those things ready, here’s how to use Rufus:
On your second working computer, download Rufus from the official Rufus website. The program is portable, so you don’t need to install anything. Just run the exe file.
Open Rufus and plug in your USB drive. Rufus will automatically detect it.
Click the Select button next to “Boot selection” and choose the Windows 11 ISO file you downloaded.
Under Partition scheme, select GPT if your PC uses UEFI firmware, or MBR if your PC uses Legacy BIOS. If you’re not sure which one you have, GPT is more common on modern systems. Video tutorials show that this choice matters for whether your PC can actually boot from the USB drive.
Click the Start button. Rufus shows a warning about the bootable USB creation. Click OK to continue.
Here’s the critical part that makes Rufus work for unsupported hardware. Before clicking Start, scroll down in the Rufus window and look for additional options. Check the boxes that say “Remove requirement for online Microsoft account” and “Disable BitLocker encryption.”
These extra options make the Windows 11 installation smoother on unsupported systems. They remove restrictions that would otherwise block your upgrade.
Rufus creates the bootable USB, which takes a few minutes. Once it’s done, you take that USB drive to your unsupported PC.
On your unsupported computer, restart and boot from the USB drive. You might need to press F12, F2, Delete, or another key during startup to access the boot menu. The exact key appears on your screen briefly when your computer first starts.
Windows 11 setup begins. When you reach the compatibility check, it passes because Rufus already removed those restrictions. You can proceed through the normal installation process.
The main drawback to Rufus is that you lose all your files and programs. This is a clean installation, not an upgrade. Your computer starts fresh with Windows 11. If you want to keep your existing files and apps, use Method 2 instead.
Method 2: The appraiserres.dll Trick (In-Place Upgrade, No Data Loss)
This method lets you upgrade to Windows 11 while keeping all your files and applications intact. I watched a live demonstration of this working on an unsupported PC, and all the files and apps remained after the upgrade finished.
The appraiserres.dll file is part of Windows that checks whether your PC meets the requirements. By removing this file before running setup, you bypass the compatibility check without losing anything.
Here’s what you need:
The Windows 11 ISO file downloaded from Microsoft. Make sure the language of the ISO matches your current Windows language. This is important and easy to overlook. You can check your Windows language by opening Command Prompt and typing dism /online /get-intl. The output tells you which language Windows is currently using. Download the matching language ISO from Microsoft.
Enough free disk space for the Windows 11 files. At least 20GB of free space is safe.
Here’s how to do the appraiserres.dll upgrade:
On your current Windows 10 computer, download the Windows 11 ISO file. Make sure you get the right language.
Right click on the ISO file and select “Mount.” Windows treats the ISO like a USB drive and assigns it a drive letter. You’ll see it appear in File Explorer.
Open the mounted ISO and look for a folder called sources. Copy this entire sources folder to a location on your hard drive where you have plenty of free space. I put mine on the desktop for easy access.
Open the sources folder you just copied. Look for a file called appraiserres.dll. This file is what checks your hardware compatibility.
Right click on appraiserres.dll and delete it. You can also rename it to appraiserres.dll_bak if you want to be extra cautious. Either way, the important thing is that the file is not there when setup runs.
Some people create an empty folder with the name appraiserres.dll instead of deleting the file. This is another variation that works.
Go back to your mounted ISO and find setup.exe. Run this file from the mounted drive. This launches the Windows 11 installation process.
When setup asks about updates, click “Not right now.” This prevents Windows from downloading updates that might re add the appraiserres.dll file.
Follow the normal setup process. When you reach the part where Windows usually checks your hardware, it gets past it because appraiserres.dll is missing. You proceed to the installation.
Once Windows 11 finishes installing, your files, programs, and settings are all still there. You’ve upgraded in place without losing anything.
I want to highlight something important here. After the upgrade, you should run Windows Update to get the latest patches and security updates. The demonstration showed that Windows Update works normally on unsupported hardware after installation, which addresses a common fear about installing on older systems.
The main advantage of this method is data preservation. The main disadvantage is that it’s more technical and requires following specific steps carefully.
Method 3 The Registry Trick During Installation (Shift + F10 Method)
This method works if you’re installing from a USB drive and the setup program hits the compatibility error mid installation. You can bypass it right there in the setup process without needing a separate tool.
Here’s how it works:
You’ve created a bootable Windows 11 USB drive using standard tools or Rufus. You boot from the USB on your unsupported PC and start the Windows 11 setup.
When setup reaches the compatibility check and fails, you’re stuck at an error screen. Instead of giving up, press Shift and F10 at the same time. A Command Prompt window opens.
In Command Prompt, type regedit and press Enter. The Registry Editor opens.
Navigate to HKEY_LOCAL_MACHINE, then SYSTEM, then Setup. You do this by clicking the folders in the left side of Registry Editor.
Right click in the empty space on the right side of the Setup folder. Select New, then Key. A new key appears.
Name this new key LabConfig. This is important: the name is case sensitive. You must type LabConfig with a capital L and a capital C. If you type it in lowercase or with wrong capitalization, the bypass won’t work.
Right click in the empty space again and select New, then DWORD (32 bit) Value. A new value appears.
Name this value BypassTPMCheck. Set the value to 1.
Create two more DWORD values the same way. Name one BypassSecureBootCheck and set it to 1. Name the third one BypassRAMCheck and set it to 1.
Close Registry Editor. Back in Command Prompt, type exit and press Enter to close the window.
Click Back in the setup window. The setup process should now get past the compatibility check and continue with the installation.
I want to emphasize the capitalization issue because it trips up a lot of people. The key name must be LabConfig with capital L and capital C. If you type “labconfig” in lowercase, the registry entry exists but the bypass doesn’t work. You won’t get an error message. The setup will just fail silently at the compatibility check again. Make sure you get the capitalization right.
The advantage of this method is that you don’t need a second computer or special tools. The disadvantage is that it requires precision typing in Registry Editor, and if you make a mistake, you have to start over.
All three of these methods work for unsupported hardware. Choose Rufus if you’re okay with a clean install and want the easiest process. Choose the appraiserres.dll method if you want to keep all your files and apps. Choose the registry method if you already have a bootable USB and prefer to solve the problem during setup.
Once you’ve installed Windows 11 using one of these methods, your PC becomes an unsupported device from Microsoft’s perspective. Updates might work, might not. Some features might behave unexpectedly. But for many people, a working Windows 11 system is worth the trade off.
Risks of Installing Windows 11 on Unsupported Hardware What Nobody Tells You Clearly
Before you decide to bypass the Windows 11 requirements, you should know exactly what you’re getting into. Installing Windows 11 on unsupported hardware windows 11 comes with real risks, but I want to be honest about what those risks actually are versus what people just assume.
Microsoft officially says that devices running Windows 11 on unsupported hardware may not receive updates. That’s the legal disclaimer they put out. But here’s what actually happens in practice.
I found someone who installed Windows 11 on an officially unsupported PC and then verified Windows Updates still work correctly on the unsupported hardware after installation. They checked and confirmed that security patches and system updates came through normally. This contradicts the fear many people have about being cut off from updates entirely.
That doesn’t mean there are zero risks. There are real concerns you should understand before you make your choice.
Updates might work, but they’re not guaranteed. Microsoft doesn’t test Windows 11 updates on unsupported hardware. If a future update breaks something on your specific system, Microsoft won’t help you fix it. You’re on your own. This is the actual risk. Most updates work fine, but you’re taking a chance that one of them won’t.
Some games and software might not run properly. Games with anti cheat systems, like Valorant, check whether Secure Boot is enabled. If you install Windows 11 without Secure Boot enabled to bypass the requirements, some of these games won’t launch. Productivity software is usually fine, but gaming and specialized software can have issues.
Performance might not be optimized for your hardware. Windows 11 was designed for modern CPUs. If you’re running it on older hardware, you might experience slower performance or occasional freezes. This isn’t a major issue for most people, but it’s worth knowing about.
Driver support might be limited. Manufacturers design drivers for supported hardware. If you have an older GPU or network card, you might not get updated drivers from the manufacturer because they’ve dropped support for older hardware.
Here’s the flip side of the coin, and this is important to hear.
I read a report from someone in IT who said, “Over 80% of my company’s business workstations have been upgraded to Windows 11, even on older hardware. We’ve had no software compatibility issues, better security, and better performance overall.” This represents real world experience with Windows 11 on older systems in a business environment.
Thousands of people run Windows 11 on unsupported hardware without major problems. They get security updates. Their programs work. Their systems are stable. The sky doesn’t fall.
The real situation is this. Installing Windows 11 on unsupported hardware is a calculated risk, not a guaranteed disaster. The risk level depends on your specific situation.
If you’re running an older PC for basic tasks like email, web browsing, document editing, and video watching, Windows 11 on unsupported hardware windows 11 is likely safe. These are exactly the tasks it handles well.
If you’re a gamer relying on specific anti cheat games, you need to check whether your games will run first. Some will, some won’t.
If you’re running specialized software that requires driver support, contact the manufacturer before you upgrade. Ask them if they support Windows 11 on your specific hardware.
Windows 10 end of support happened on October 14, 2025. After that date, Windows 10 no longer receives security updates. Staying on Windows 10 after that deadline actually carries more risk than upgrading to Windows 11, even on unsupported hardware. An unpatched operating system is vulnerable to new security threats.
This is why many people make the decision to upgrade despite the unsupported hardware warnings. They’re weighing the known risk of no security updates against the potential risk of Windows 11 instability. For most people, the upgrade is the safer choice.
I’m not telling you what to do. I’m giving you the honest information so you can make an informed decision. If your PC is officially unsupported, know that upgrading comes with some risk, but that risk is often smaller than the security risk of staying on an outdated operating system.
The choice is yours to make based on your specific situation.
Still Seeing the Error After Enabling TPM and Secure Boot? Try This
You’ve done everything right. TPM 2.0 is enabled. Secure Boot is turned on. Your drive is GPT formatted. You run the PC Health Check tool and everything shows green. Yet somehow, when you try to upgrade to Windows 11, you still get the same error message saying this pc doesn’t currently meet windows 11 system requirements.
This frustration is real, and I’ve seen it happen to multiple people who swear they’ve fixed every issue. The problem isn’t that you missed something. The problem is that Windows Update is caching old information about your PC’s compatibility.
Here’s what’s happening behind the scenes. Windows keeps a record of the last time it checked whether your PC supports Windows 11. This eligibility assessment gets stored in Windows Update’s memory. After you make changes to your BIOS, Windows doesn’t automatically re-check your system. It just keeps using the old cached result that says you’re not compatible.
I found confirmation of this from someone who had exactly this scenario. They said, “Despite having everything right including my GPT drive, I still couldn’t upgrade until I manually refreshed my eligibility assessment.” Another person reported, “I was able to successfully upgrade after doing this,” referring to the same refresh process.
This is the fix that most articles completely miss, but it’s the one that solves this exact problem.
Force Windows to Re Check Your PC Eligibility
The solution is to manually tell Windows Update to check your system again. Microsoft has an official support page specifically for this situation, and the process only takes a few minutes.
Here’s exactly how to do it:
Go to Microsoft’s official PC eligibility check page on their support site. Search for “Windows 11 eligibility assessment refresh” or find it through Microsoft’s Windows 11 support documentation.
On that page, you’ll see a section that lets you clear your PC’s compatibility assessment cache. This tells Windows to forget the old result and check your system from scratch the next time you try to upgrade.
Click the button or follow the steps to clear your eligibility cache. On most systems, this is as simple as clicking one button and confirming.
Restart your computer. This is important because Windows needs to complete the restart process to fully clear the cache.
After your PC restarts, run Windows Update again. Go to Settings > Update & Security > Windows Update and click Check for Updates.
Windows now performs a fresh eligibility assessment. Since you’ve enabled TPM 2.0 and Secure Boot, this fresh check sees that your PC actually meets the requirements. The upgrade becomes available.
I want to emphasize something important here. This isn’t a workaround or a hack. This is Microsoft’s official recommended process for this exact scenario. The company acknowledges that the eligibility cache can prevent upgrades even when the underlying hardware issue has been fixed.
The reason this step gets skipped in most guides is that it only matters if you’ve already enabled the required settings but the error persists. If TPM or Secure Boot were actually disabled, this step wouldn’t help. But if you’ve already done the BIOS fixes and everything checks out green, this is often the missing piece.
The PC eligibility windows 11 assessment refresh is designed specifically for people in your situation. You’ve done the technical work. You’ve made the hardware changes. You just need Windows to acknowledge it.
After you force the refresh and restart, try Windows Update again. In most cases, does my PC support windows 11 now gets answered with a yes, and the upgrade proceeds normally.
If you still see the windows 11 installation error after clearing the cache and restarting, it means one of the earlier fixes didn’t actually apply correctly. Go back and double check that TPM 2.0 is actually enabled in your BIOS, not just set to enabled but then reverted during a restart. Also verify that Secure Boot is in UEFI mode, not Legacy mode.
But in my experience seeing this problem discussed extensively, most people who reach this step and follow it successfully get their upgrade completed. The eligibility cache was the final blocker they didn’t know existed.
What If My PC Is Genuinely Too Old for Windows 11?
If your PC has a processor older than Intel 8th Gen or AMD Ryzen 2000, you’re facing a real hardware limitation. Windows 11 on older PC hardware that predates these processor generations won’t meet the official requirements no matter what settings you enable. You have three honest options, and I want to walk you through each one so you can decide what makes sense for your situation.
The first thing to understand is that you’re not stuck with only one choice. You have flexibility here, and the right decision depends on your budget, how long you plan to keep using this PC, and whether you’re comfortable taking on some risk.
Option 1: Use the Bypass Methods and Accept the Trade-offs
The first option is to go back to Section 6 of this guide and use one of the bypass methods to install Windows 11 on your unsupported hardware. This is the fastest solution if your PC still runs well otherwise.
The trade off is that Microsoft won’t officially support your system, and future updates might behave unpredictably. You’re making a calculated decision that Windows 11 is worth more to you than having official backing. Many people make this choice, especially when their PC is only a few processor generations behind.
The benefit is that you get the latest security updates right now. Windows 10 end of support already passed on October 14, 2025. After that date, Windows 10 stopped receiving security patches. If you’re currently on Windows 10 on older hardware, staying on an unpatched operating system carries its own serious risks. An outdated system is vulnerable to new security threats that Microsoft will never fix.
In that context, installing Windows 11 on unsupported hardware using a bypass method might actually be the safer choice compared to staying on Windows 10 with no security updates.
Option 2: Upgrade Your Hardware
The second option is to replace the components that are blocking the upgrade. Before you assume you need a whole new PC, understand which parts actually matter.
The compatible processor for windows 11 is the main blocker. If your CPU is too old, that’s the component you’d need to replace. But here’s the thing: if you upgrade just the CPU, you also need to upgrade the motherboard because older motherboards don’t support newer processors.
A CPU and motherboard upgrade together costs somewhere between $300 and $600 depending on how current you want to go. That’s significant, but it’s less than buying a completely new PC.
Before you spend that money, ask yourself: is the rest of my PC hardware still good? If your RAM, storage, and graphics card are fine, then a CPU and motherboard upgrade gets you Windows 11 compatibility without replacing everything.
However, if your PC is 10 or more years old, the motherboard might have other aging components. Power supply, cooling, even the case might start having issues. In that scenario, replacing individual components might be throwing money at a system that’s approaching end of life anyway.
I talked to someone who faced this decision and said, “Do I really have to get a new CPU and GPU? Maybe I’ll just switch to Linux like my other machine.” That comment reflects the real calculation people make: is it worth upgrading this specific hardware, or should I just move to a different approach entirely?
Option 3: Stay on Windows 10 and Plan for the Future
The third option is to keep using Windows 10 for now, but understand that the windows 10 end of support deadline has already passed. Your PC is no longer receiving security patches.
This option only makes sense if you’re planning to replace this PC within the next year or two anyway. If you know you’re upgrading to new hardware soon, staying on Windows 10 in the interim is reasonable.
But if this PC is going to be your main machine for several more years, staying on an unsupported operating system is genuinely risky. Every new security vulnerability discovered in Windows 10 will never be patched. Hackers know this, and they target unsupported systems specifically.
Microsoft set the Windows 10 end of support date years in advance so people would have time to plan. The deadline has passed, which means the urgency to act is real, not theoretical.
If you want to stay on this PC and avoid Windows 11’s hardware requirements, Linux is a legitimate alternative. Linux is free, secure, regularly updated, and runs well on older hardware. Many productivity tasks work fine on Linux. However, some specialized software and games don’t support Linux, so this only works if your actual needs align with what Linux offers.
Making Your Decision
Honest assessment: if your hardware is genuinely too old for Windows 11, you’re choosing between three real trade-offs. Installing on unsupported hardware via bypass accepts the risk of future instability. Upgrading hardware costs money but gives you a supported system. Switching to Linux preserves your hardware but changes your operating system.
There’s no perfect choice here. There’s only the choice that makes the most sense for your PC eligibility windows 11 situation and your budget.
What I can tell you for certain: staying on Windows 10 after end of support without having a specific upgrade plan in place is the riskiest option. Security matters more than hardware compatibility, and an unpatched operating system is a security liability.
The PC eligibility for Windows 11 requirements won’t change. But your options for what to do about it are real, and they’re worth thinking through carefully.
Getting This Error on VMware or Hyper-V? Here’s Why It’s Different
If you’re seeing this pc doesn’t currently meet windows 11 system requirements bypass error while installing Windows 11 inside a virtual machine, the problem isn’t your host PC’s hardware. The problem is that your VM settings don’t have TPM 2.0 or the right boot firmware enabled. Virtual machines have their own separate security settings that are completely independent from your physical computer’s BIOS.
I learned this when I tried installing Windows 11 in a virtual machine and hit the compatibility error. At first, I thought my host computer was the issue. Then I realized the error was coming from settings inside the virtual machine itself, not from my actual PC’s BIOS UEFI firmware.
Here’s the key difference. When you run VMware or Hyper-V, you’re creating a simulated computer inside your actual computer. That simulated computer has its own fake TPM 2.0 chip and its own fake BIOS settings. Windows 11 checks these virtual settings, not your real hardware. You need to enable TPM 2.0 inside the VM settings, separate from anything you do on the host machine.
Enabling TPM 2.0 in VMware Workstation
In VMware Workstation, enabling TPM 2.0 for your virtual machine is straightforward.
Right click on your Windows 11 virtual machine and select Edit Settings. The VM settings window opens.
Look for the Hardware tab. Scroll down through the list of virtual hardware components until you find TPM. If TPM doesn’t appear in the list, it’s not currently enabled.
Click the checkbox next to TPM to enable it. VMware automatically adds a virtual TPM 2.0 chip to your VM.
Make sure the TPM version shows as 2.0, not 1.2. You specifically need version 2.0 for Windows 11.
Click OK to apply the changes. You don’t need to restart the VM immediately, but I recommend powering it off and back on to ensure the TPM change takes effect properly.
After the VM restarts, the Windows 11 compatibility check sees the TPM 2.0 and passes that requirement. You can proceed with the installation.
Enabling TPM and UEFI in Hyper-V
Hyper-V is slightly different because it separates VMs into two generations. Generation 1 VMs use legacy BIOS mode and don’t support TPM 2.0 at all. Generation 2 VMs support UEFI firmware and TPM 2.0, which is what Windows 11 requires.
If you’re trying to install Windows 11 in a Hyper-V VM, your virtual machine must be Generation 2. If you created it as Generation 1, you’ll need to create a new Generation 2 VM and install Windows 11 there.
To check your VM’s generation, right click on the virtual machine in Hyper-V Manager and select Settings. Look for the General information. It tells you whether the VM is Generation 1 or Generation 2.
If you have a Generation 2 VM, TPM 2.0 should already be available. Look in the VM settings for a section called Security. Inside Security settings, you’ll find an option for TPM. Check the box to enable it.
Make sure the VM is set to boot from UEFI firmware, not BIOS mode. Generation 2 VMs use UEFI by default, but verify this in the Firmware settings within the VM properties.
After enabling TPM in a Generation 2 Hyper-V VM, the Windows 11 compatibility check recognizes the virtual TPM 2.0 and allows the installation to proceed.
The Key Difference Between Real Hardware and Virtual Machines
The important thing to understand is that Windows 11 doesn’t know the difference between a real TPM 2.0 chip and a virtual one. If the Windows 11 installer can detect a TPM 2.0 device, whether real or simulated, it passes the compatibility check.
This means you can successfully install and run Windows 11 in a virtual machine even if your host computer doesn’t meet the official requirements. The host PC’s CPU and hardware don’t matter because Windows 11 is checking the VM’s virtual hardware, not your physical machine.
I found this useful for testing Windows 11 on older host computers or for running Windows 11 alongside older versions of Windows on the same physical machine. Virtual machines give you the flexibility to run Windows 11 without replacing your actual hardware.
The limitation is that a virtual machine runs slower than a physical installation because it’s sharing your host computer’s resources. For actual daily use, you’d want Windows 11 on real hardware. But for testing, development, or running Windows 11 alongside other operating systems, enabling TPM 2.0 in your VM settings solves the problem completely.
If you’re troubleshooting your PC and notice display issues alongside the Windows 11 upgrade process, your screen might also be telling you something. A black line appearing on your Dell laptop screen is another hardware-related problem that looks scary but often has a simple fix. I covered exactly how to diagnose it in under 60 seconds in my guide on black line on Dell laptop screen.
Frequently Asked Questions
I enabled TPM and Secure Boot but I’m still getting this error what now?
Windows caches your PC’s compatibility check and doesn’t automatically recheck after BIOS changes. Go to Microsoft’s official Windows 11 eligibility page and clear your compatibility cache, then restart your computer.
Windows will perform a fresh check and recognize your enabled TPM and Secure Boot settings.
Will I lose my files if I install Windows 11 on an unsupported PC?
No data loss with the appraiserres.dll method since it’s an in-place upgrade. The Rufus USB method does a clean install and erases everything. Use the ISO method if you want to keep all your files, programs, and settings.
Will my PC still get Windows Updates after installing on unsupported hardware?
Microsoft officially says updates aren’t guaranteed on unsupported devices. Many users report receiving updates normally, but some experience issues with specific patches. Accept this risk before installing on unsupported hardware.
What is TPM called in my BIOS? I can’t find it
On Intel systems, search for Intel Platform Trust Technology or Intel PTT. On AMD systems, look for AMD CPU fTPM or fTPM Switch. The word TPM itself rarely appears in BIOS menus even though the chip exists
Do I need a USB drive to upgrade to Windows 11 on an unsupported PC?
No, the appraiserres.dll method requires no USB drive. Download the Windows 11 ISO directly to your PC, mount it, modify the file, and run setup from the mounted drive. The Rufus method does require a USB drive and a second computer.


